background image

INSTALLATION


&


USER


MANUAL 

ENERGY EFFICIENT WOODSTOVE 

| ASSOS & ASSOS OVEN 


5 |

 Page


3.


E

NDORSEMENTS 

&


C

ERTIFICATIONS


3.1.


Endorsement 

The ARTE® wood stove you chose has been tested according to 

EN13229

3.2.


Declaration of Performance CE 

The constructor G.  Karnoutsos  &  Co.  declares that ARTE® wood stoves meet  the requirements  of  the standard 

EN 13240

,  also  the  product’s 

performance according to the quality specifications are monitored on a permanent basis. 

3.3.


Features marking plate 

ARTE® wood stove’s feature marking plate is located on the right side of the appliance. 


4.


P

ACKAGING


ARTE®  is  devoted  in  protecting  the  environment,  so  we  use  as  much  recyclable  materials  as  possible  and  the  least  amount  of  packaging 
materials without compromising the secure transfer of our products. 

4.1.


Unpacking the stove 

1. 

The product is delivered on a wooden palette. (

Pic. 4.1.1

2. 

Carefully  remove  the  plastic  membrane  and  the  waterproof  plastic  film  and  also  all  the  styrofoam  on  the  outside  and  inside  of  the 
product. 

3. 

Remove  the  styrofoam  that  is  on  the  upper  part  of  the  baffler  in  ASSOS  and  on  the  back  in  ASSOS  OVEN  and  also  in  the  combustion 
chamber and the ashtray, including any other components. (

Pic. 4.1.2

4. 

Unscrew the 4 screws located on the bottom side of the product, in order to release the stove from the palette. (

Pic. 4.1.3

5. 

Carefully pick up the  product and  place it on  the installation point,  making sure that  the floor can withstand the weight of  the  device. If 
the  existing  construction  cannot  withstand  the  weight  of  the  device,  a  load  distributing  plate  is  necessary.  Also,  make  sure  you  provide 
proper insulation in case the floor is built using flammable materials. 


Pic. 4.1.1 

Pic. 4.1.2 

Pic. 4.1.3 

ΦΕΛΙΖΟΛ 

Summary of Contents for ASSOS

Page 1: ......

Page 2: ...n the woodstove paint dries 8 6 3 2 Incineration preparation 8 6 3 3 Heating during seasonal change or in adverse weather conditions 8 7 Igniting the stove 9 7 1 Traditional method of igniting 9 7 2 I...

Page 3: ...is produced locally which creates local employment and more tax revenues stay in the province 2 2 Buying firewood Where can I get my firewood Regenerated ready to burn firewood can be purchased from...

Page 4: ...tore them to ensure better combustion quality during the winter Useful tips Always choose dry firewood Avoid wood that pops chestnut conifers such as cedar spruce and pine as they may damage your wood...

Page 5: ...tput This depends on the amount of space that is required to be heated and mostly on its insulation In average the required heat output for a properly insulated room and with external temperature of 0...

Page 6: ...transfer of our products 4 1 Unpacking the stove 1 The product is delivered on a wooden palette Pic 4 1 1 2 Carefully remove the plastic membrane and the waterproof plastic film and also all the styro...

Page 7: ...ction Don t use chemicals or liquids as fire starters Do not use ANY fuel other than the recommended 5 3 Flue security instructions Prior to installing the woodstove ARTE the chimney sweep or a qualif...

Page 8: ...EIGHT ABOVE THE RIDGE m H m 15 1 85 m 0 50 m OVER THE RIDGE 1 85 m 1 00 m OVER THE ROOF 30 1 50 m 0 50 m OVER THE RIDGE 1 50 m 1 30 m OVER THE ROOF 45 1 30 m 0 50 m OVER THE RIDGE 1 30 m 2 00 m OVER T...

Page 9: ...ssibility that the first few times the woodstove is lighted the paint emits an odor Let the fire burn with intense convection until all traces of gas disappear and there is no longer a smell The gas i...

Page 10: ...e primary combustion air supply 7 Adjust the regulator of the air curtain air supply to the desired position in order for the optimal combustion to continue Make sure that there is always enough air o...

Page 11: ...he maximum secondary combustion performance The air intake regulating system in cooperation with two vertical ducts having openings Pic 8 1 1 in such a way as to insert the appropriate amount of hot a...

Page 12: ...et Logs are too large or not split Combustion temperatures are too low If there is a need to replace the glass it should be replaced with the high temperature ceramic glass supplied by ARTE For more i...

Page 13: ...ss Clean the chimney using a brush with the same size and shape as the flue Run the brush up and down the flue causing any deposits to fall to the bottom of the woodstove where they can be removed the...

Page 14: ...ant in the combustion chamber such as cat litter helps absorb moisture during the summer Make sure to remove it before the beginning of the operating season 10 TIPS TRICKS FOR RESOLVING ISSUES The woo...

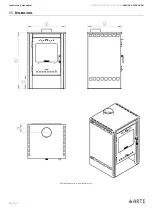
Page 15: ...INSTALLATION USER MANUAL ENERGY EFFICIENT WOODSTOVE ASSOS ASSOS OVEN 14 Page 11 DIMENSIONS All dimensions are in centimeters cm...

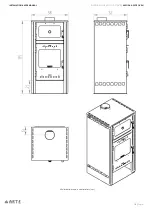
Page 16: ...INSTALLATION USER MANUAL ENERGY EFFICIENT WOODSTOVE ASSOS ASSOS OVEN 15 Page All dimensions are in centimeters cm...

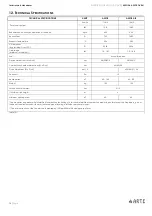
Page 17: ...evice dimensions W x D x H cm 58 53 87 5 58 53 115 Combustion chamber dimensions W x D x H cm 43 43 38 Oven dimensions W x D x H cm lt 40 5 42 21 36 Flue draft Pa 12 Heated area m2 45 140 45 135 Weigh...

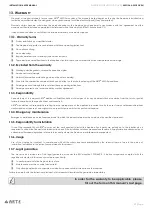
Page 18: ...ive from the total or partial failure to comply with the specifications contained in it ARTE also declines all responsibility resulting from an improper use of the appliance incorrect use by the user...

Page 19: ...INSTALLATION USER MANUAL ENERGY EFFICIENT WOODSTOVE ASSOS ASSOS OVEN 18 Page NOTES S N...

Page 20: ......

Reviews: