background image

Connecting the Telephony Modem

WARNING
Risk of injury or equipment damage

Connecting  the  Telephony  Modem  to  the  home’s  existing  telephone

wiring should only be performed by a professional installer. Physical con-

nections to the previous telephone provider must be removed and the

wiring must be checked; there must not be any voltage. Cancellation of

telephone service is not adequate. Failure to do so may result in loss of

service and/or permanent damage to the Telephony Modem.

1

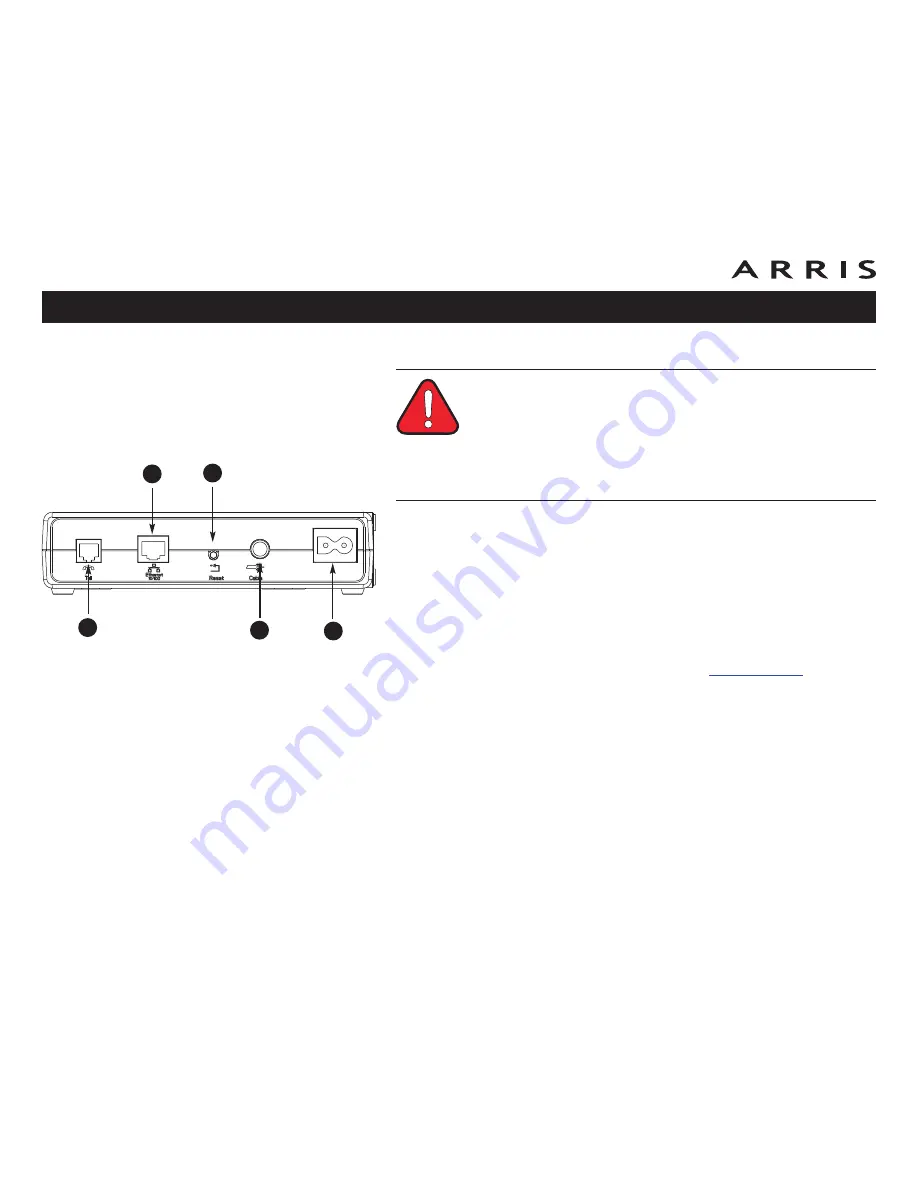
Connect one end of the coax cable to the cable outlet or splitter, and the

other end to the Telephony Modem’s Cable connector (

D

). Tighten the con-

nections by hand, then tighten an additional 1/8 turn with a wrench.

Note

: For best performance, use high-quality RG-6 type coax cable and

minimize or eliminate splitters between the cable jack and the Telephony

Modem.

2

Insert the plug from the power cord into the Power connector on the Tele-

phony Modem (

E

) and insert the power cord into a convenient AC outlet.

The Power light on the front of the Telephony Modem lights up, then flashes

once (refer to the LED table on page 34). See 

Troubleshooting

if the Power

light does not turn on.

3

Connect one end of the Ethernet cable to the yellow port on the back of the

Telephony Modem labeled “Ethernet 10/100,” (

B

) and the other end to the

Ethernet port on a computer, hub, or broadband router.

Note

: If you are connecting to a computer, use the Ethernet cable included

in the Telephony Modem package.

4

Connect one end of the telephone cable to one of the grey telephone ports

on the back of the Telephony Modem (

A

). Connect the other end to the tele-

phone.

Touchstone TM601 Telephony Modem User’s Guide

Safety

Getting

Started

Installation

Ethernet

Configuration

Usage

Troubleshooting

Glossary

17

A

B

C

D

E

Summary of Contents for Touchstone TM601

Page 1: ...one serv ice The Touchstone Telephony Modem provides an Ethernet connection for use with either a single computer or home of ce Local Area Network LAN In addition the Touchstone Telephony Modem can pr...

Page 2: ...rd 1 2 February 2010 Touchstone TM601 Telephony Modem User s Guide 2 Touchstone TM601 Telephony Modem User s Guide Export Regulations Safety Requirements FCC Part 15 European Compliance Getting Starte...

Page 3: ...nt damage to the Telephony Modem The Telephony Modem is designed to be connected directly to a telephone Connecting the Telephony Modem to the home s existing telephone wiring should only be performed...

Page 4: ...equipment is to be installed in an area serviced by an IT power line network as is found in many areas of Norway special attention should be given that the installation is in accordance with IEC 6072...

Page 5: ...ent does cause harmful interference to radio or television reception which can be determined by turning the equipment off and on the user is encouraged to try to correct the interference by one or mor...

Page 6: ...e 2002 96 EC of the European Parliament and of the Council on waste electrical and electronic equipment WEEE WEEE could potentially prove harmful to the environ ment as such upon disposal of the Telep...

Page 7: ...le company What s in the Box Make sure you have the following items before proceeding Call your cable company for assistance if anything is missing Telephony Modem Power Cord Quick Installation Guide...

Page 8: ...ion by splitting a sin gle outlet into two You may need a splitter if you have a TV already con nected to the cable outlet that you want to use You can buy a splitter from any electronics retailer and...

Page 9: ...hony Modem Save this information for future use In addition you should ask your cable com pany the following questions Do you have any special system requirements or les that I need to down load after...

Page 10: ...Windows Vista or Windows 7 MacOS System 7 5 to MacOS 9 2 Open Transport recommended or MacOS X Linux other Unix Hardware drivers TCP IP and DHCP must be enabled in the kernel About this Manual This ma...

Page 11: ...connection to the Internet requires a certain amount of responsibility to other Internet users including the need to maintain a reasonably secure system While no system is 100 secure you can use the f...

Page 12: ...r cable company may suspend your account to protect the rest of the net work If you connect your Telephony Modem to a wireless LAN make sure you enable security and encryption on the wireless hub for...

Page 13: ...w one If you have ordered service your cable company should con gure the Telephony Modem automatically You need only follow the instructions in this section to install and connect the Telephony Modem...

Page 14: ...vailable to the unit Rear Panel The rear of the Telephony Modem has the following connectors and controls A Tel grey connector for the phone line B Ethernet connector yellow for use with a computer or...

Page 15: ...on plywood or studs two 6 x 1 5 38 1 mm self tapping screws not included screwdriver at blade or Phillips depending on what kind of screws you use wall mount template included transparent tape for te...

Page 16: ...all anchors set them into the wall Then drive the screws into the wall leaving a gap of about 1 8 3 mm between the screw head and the wall If not using anchors just drive the screws 4 Orient the Telep...

Page 17: ...ate splitters between the cable jack and the Telephony Modem 2 Insert the plug from the power cord into the Power connector on the Tele phony Modem E and insert the power cord into a convenient AC out...

Page 18: ...ions not using DHCP How to use this chapter The following list shows the procedures for modifying the TCP IP settings on the computer The procedure is slightly different depending on the operating sys...

Page 19: ...tly from those shown in this procedure 1 From the computer select Start Settings Control Panel 2 Double click on the Network icon in the Control Panel 3 Click the Con guration tab in the Network windo...

Page 20: ...click OK 6 Click OK to accept the new settings and OK again to close the Con gura tion window 7 You may have to restart your computer in order for your computer to obtain a new IP address from the ne...

Page 21: ...up Con nections Local Area Connection 2 In the Local Area Connections Properties window highlight TCP IP by click ing on it one time then click on Properties Note If your computer has more than one E...

Page 22: ...cept the new settings and OK again to close the Con gura tion window 5 You may have to restart your computer in order for your computer to obtain a new IP address from the network Touchstone TM601 Tel...

Page 23: ...ly from those shown in this procedure 1 From the computer select Start Settings Control Panel 2 Double click on the Network icon in the Control Panel 3 Click the Con guration tab in the Network window...

Page 24: ...to accept the new settings and OK again to close the Con gura tion window 7 You may have to restart your computer in order for your computer to obtain a new IP address from the network Touchstone TM60...

Page 25: ...those shown in this procedure 1 From the computer select Start Settings Control Panel and double click on the Network Connections icon in the Control Panel 2 Click the Con guration tab in the Network...

Page 26: ...click OK 5 Click OK to accept the new settings and OK again to close the Con gura tion window 6 You may have to restart your computer in order for your computer to obtain a new IP address from the ne...

Page 27: ...the Ethernet interface for use with Touchstone prod ucts 1 Open the Vista Control Panel 2 Double click Network and Sharing Center Touchstone TM601 Telephony Modem User s Guide Safety Getting Started...

Page 28: ...tion 4 Double click the Local Area Connection to open the Status window 5 If Windows requests permission to continue click Continue 6 Click Properties Touchstone TM601 Telephony Modem User s Guide Saf...

Page 29: ...matically and Obtain DNS server address automatically unless instructed otherwise by your cable provider 9 Click OK to close the Properties windows Touchstone TM601 Telephony Modem User s Guide Safety...

Page 30: ...re the Ethernet interface for use with Touchstone prod ucts 1 Open the Windows 7 Control Panel 2 Click Network and Internet Touchstone TM601 Telephony Modem User s Guide Safety Getting Started Install...

Page 31: ...k and Sharing Center 4 Click Local Area Connection to open the Status window Touchstone TM601 Telephony Modem User s Guide Safety Getting Started Installation Ethernet Con guration Usage Troubleshooti...

Page 32: ...matically and Obtain DNS server address automatically unless instructed otherwise by your cable provider 8 Click OK to close the Properties windows and then click Close to back out of the remaining se...

Page 33: ...Touchstone prod ucts 1 Open System Preferences either by choosing System Preferences from the Apple menu or by clicking the System Preferences icon in the dock Touchstone TM601 Telephony Modem User s...

Page 34: ...2 Click the Network icon Touchstone TM601 Telephony Modem User s Guide Safety Getting Started Installation Ethernet Con guration Usage Troubleshooting Glossary 34...

Page 35: ...he TCP IP tab if necessary 5 Choose Using DHCP from the Con gure IPv4 menu 6 If necessary click the Renew DHCP Lease button 7 Close the System Properties application Touchstone TM601 Telephony Modem U...

Page 36: ...Modem Indicator Lights for the TM601A B Models Using the Reset Button Setting up Your Computer to Use the Telephony Modem Follow the instructions in the information packet supplied by your cable compa...

Page 37: ...hts Normal Operation The following table shows light patterns during normal operation Mode Power DS US Online Link Telephone AC Power On On Connected to the Internet Flash Not connected to the Interne...

Page 38: ...Power on Self Test See Cable Modem Start Up Sequence Below On On Flash Retrieving telephone network information On On Off Retrieving telephone line information On On Flash Activating telephone servic...

Page 39: ...roblems connecting to the Internet Using this button will be rare Use a pointed non metallic object to press this button The photo to the left shows the location of the Reset button The Reset button i...

Page 40: ...ged into AC power and connected to the cable system Check the front panel lights The Power and Online lights should be on The Link light should be either on or blinking If the Power light blinks for m...

Page 41: ...nnected to a LAN Local Area Network either directly or through a rewall other communications on the LAN may slow down your connection To test your network speed try an online test such as http reviews...

Page 42: ...rt on the back of the Tele phony Modem labeled Tel If so try a different phone Make sure the new phone is a working phone If a known good phone is used and you still don t have dial tone try a differe...

Page 43: ...e modem together Also some Ethernet hubs may have built in cross over on one or more ports which eliminates the need for a cross over cable DHCP Dynamic Host Con guration Protocol An IP protocol used...

Page 44: ...mmon types of F connector slip on and screw on Use coax with screw on connectors for connecting your Telephony Modem Gateway The device usually a router that connects devices on a given IP subnet to o...

Page 45: ...the Internet The MAC address is printed on a label on the bottom of your Telephony Modem Protocol A set of rules and formats that determines the communication behavior of network entities at a given l...

Page 46: ...r outlet that may be turned on and off using a wall switch Usually intended for lamps Avoid plugging your computer or Telephony Modem into a switched outlet to avoid disruptions TCP IP Transmission Co...

Page 47: ...program components as progress in engineering manufacturing methods or other circumstances may warrant ARRIS Touchstone and the ARRIS logo are trademarks or registered trademarks of ARRIS Group All o...

Reviews: