background image


!

28

!


23.2  Paring the Wheels 

• First power 

Off

 the PLC wheel, by removing the power 

cable

• Press the 

OK

 key

• Press 

Down

 until 

Remote Pairing 

is displayed

• Press the 

OK

 key

• Now the MAXIMA / TRINITY will start a 10 sec. count 

down.

• After 

5 sec.

 the MAXIMA / TRINITY will 

beep

.

Plug 

the power cable into the PLC wheels.

• Now the PLC will be paired

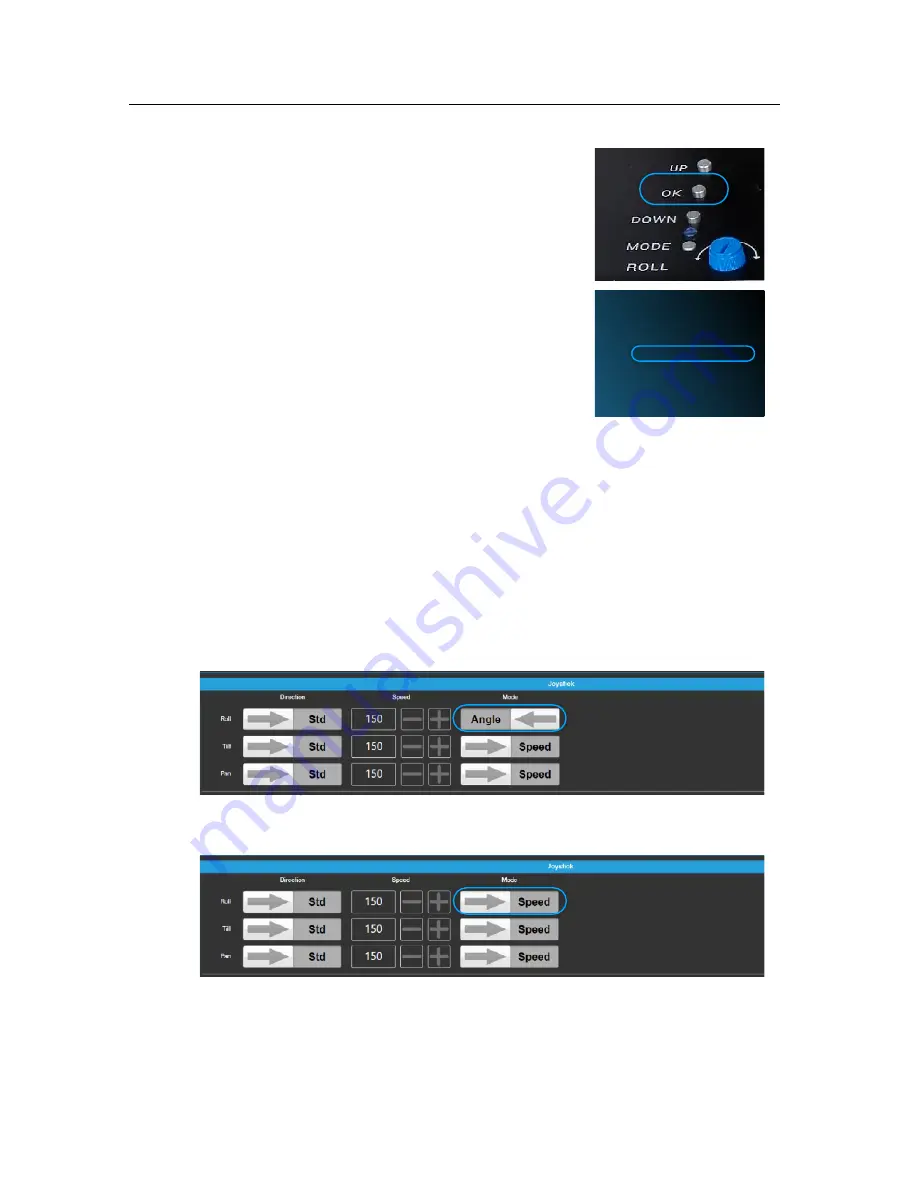
23.3 Using the 3. Wheel for the Roll axis 

If you want to control the Roll axis by a third wheel, you need to go first into  

the 

Advance Mode

(Revere to Changing from Standard to Advanced Mode) 

For the Roll axis you have to change from 

Angle to Speed


1. Joystick

2. Remote

3. Calibration

4. Remote Pairing

5. Restore

6. Info 

7. Exit

PLC Wheels

Summary of Contents for MAXIMA

Page 1: ... 1 GUI Version 3 1 0 2 MAXIMA and TRINITY Date 29 Jan 2018 USER MANUAL ...

Page 2: ...sponsibility for losses incurred due to improper handling or configuration of the TRINITY or other system components ARRI assumes no responsibility for any errors that may appear in this document The information is subject to change without NOTICE For product specification changes after this manual was published refer to the latest published ARRI data sheets or release notes etc for the most up to...

Page 3: ... MAXIMA TRINITY to the PC 9 9 Home Screen 9 10 Motor Power the three payload groups 10 11 Adjusting Motor Power PID 11 12 Uploading adjustments to the MAXIMA and TRINITY 14 13 Cloning Settings 15 14 Vibrations 16 15 Right Motor Power 16 16 Joystick 17 17 Delay Deadband 18 18 Endstops 19 19 Follow Mode Fully Stabilized Mode 22 20 Saving and Loading Profiles 24 21 Troubleshooting 25 22 Pan Lock 26 2...

Page 4: ...ituation which if not avoided will result in death or serious injury WARNING indicates a potentially hazardous situation which if not avoided may result in death or serious injury CAUTION indicates a potentially hazardous situation which if not avoided may result in minor or moderate injury NOTICE NOTE explains practices not related to physical injury No safety alert symbol appears with this signa...

Page 5: ...l Inverted Off by pressing UP or DOWN Press OK to confirm your selection 2 3 Paring the Wireless Remote Control Operated directly on the TRINITY First switch Off the Remote Control Press OK Press Down until you see Remote Pairing Press OK Now the MAXIMA will start a 10 sec count down After 5 sec the MAXIMA will beep Switch ON the wireless Remote Control Now the Remote will be paired 1 Joystick 2 R...

Page 6: ...oad area Profile Motor Power Tilt Pan Feels Good for 1 45 Follow Follow Very direct Handheld Look 2 45 Fully Stabilized Follow Very direct Handheld Look 3 45 Follow Follow Less direct Easy Rig running shots 4 45 Fully Stabilized Follow Less direct Easy Rig running shots 5 45 Fully Stabilized Fully Stabilized Very direct To be used with the wireless control or wheels Profile Motor Power Tilt Pan Fe...

Page 7: ...em to see if you are running 32 or 64 bit system If you are running a 32 bit system install the CP210xVCPInstaller_x86 exe If you are running a 64 bit system install the CP210xVCPInstaller_x64 exe Then install The FoMa Control Setup V exe NOTE While installing the software you can create a desktop shortcut click in the box 5 Starting the GUI software the first time This is the first tab you will s...

Page 8: ...anced mode NOTE For the beginning stay in the Standard mode 7 Connecting the USB Cable To connect the MAXIMA TRINITY to a PC or Tablet computer a USB cable with a MINI USB connector on one end is needed Location of the USB sockets The USB socket on the MAXIMA is located at the right side of the housing The USB socket of the TRINITY is located on the right side of the base plate Standard Advanced M...

Page 9: ...nect Now all profiles of the MAXIMA TRINITY will be uploaded into the GUI software 9 The Home Screen You will see this tab after connecting successfully Connecting Home Screen While connecting the MAXIMA TRINITY to the GUI the motors will be engaged for a short moment Make sure you hold and secure the camera while the display goes off and comes back again CAUTION In the unexpected case that the MA...

Page 10: ... recorders or other accessories Useable area 12 x 7 5 cm 4 72 x 2 95 For all TRINITY systems artemis Cine Broadcast Cine HD Pro EFP HD Maxima Mounting Plate K2 0014909 210 new Additional cheese plate which can be mounted to the right side at the top of the MAXIMA The mounting plate many offers 3 8 threads Length 12 7 cm Width 9 2 cm Length 5 Width 3 62 For MAXIMA only Maxima PAN Lock K2 0014908 24...

Page 11: ... K2 0010425 artemis Post Tool 1 8 1 5 K2 0010461 125 10x60x150 mm 60 gr Special tool to open the Docking Rings and to adjust the friction of the artemis 1 5 and 1 8 gimbals 4mm Hex Key 5 32 K2 0010434 7 10x80x180 mm 10 gr 4mm Hex Key 5 32 Allen Wrench 6 mm Hex Key 1 4 K2 0010435 9 10x100x180 mm 10 gr 6 mm Hex Key 1 4 Allen Wrench 1 5 mm Hex Key K2 0010437 5 10x10x50 mm 10 gr 1 5 mm Hex Key 23 Page...

Page 12: ...otor power changing the values by steps of five up and down will be the best way to find the right motor power adjustment 11 3 Adjusting PID Advanced Mode Proportional Integral Derivative controller PID controller In the Advanced Mode you can adjust the Motor Power more accurate by using the PID adjustments Motor Power PID ...

Page 13: ...oystick to tilt and stop the head and see if the camera stops at the selected point or if it is over driving the point 4 3 or if it is bouncing left and right If the heads over driving or bouncing you need to lower the P and D value of the Tilt axis by steps of five Same process for Pan axis I Time Target Position Actual Position Low value slow High value fast P Position Target Position Actual Pos...

Page 14: ...write the settings to the MAXIMA and TRINITY Click on Write to Device The indicates that there had been changes in the user profile and that these changes have not been uploaded to the MAXIMA TRINITY After the upload the will disappear NOTE As long you see the the changes will not be affective Uploading Adjustments ...

Page 15: ...ofiles You will get a new tab in which you can program the motor power and other adjustments like joystick and follow mode for all 5 user profiles Repeat step 6 0 for changing the motor power and press Write to Device step 7 0 Now you will have the same motor power adjustments in all five user profiles Cloning Settings ...

Page 16: ...t 14 2 Reason 2 If the System still vibrates lift the MAXIMA up from the table case or the stand the TRINITY of the docking stand to see if the vibrations will stops NOTE Gimbals are made for elastic mounts like humans spring arms and so on Stands or tables are too stiff that is why Gimbals start to vibrate 14 3 Reason 3 The motor power is too high 15 The right Motor Power If the system is still v...

Page 17: ...ent will stop NOTE A low value will ensure that the head will stop right away when the joystick movement stops A higher value will add a smooth movement after the joystick movement had stoped Higher values will make operating the MAXIMA TRINITY more and more indirect Deadband Sets the starting point of the Joystick This value controls when the Joystick will react after you touched it The lower the...

Page 18: ... This value controls when the Joystick will react after you touched it Ramp sets how much ramp will be on the joystick movement NOTICE All three parameters are related to each other If the speed is adjusted to a value below 50 keep the ramp value as low as possible If the value is to high there will be more or less NO movement in the end Speed Speed Value Time 255 100 60 50 0 Delay Delay Joystick ...

Page 19: ... only allows certain amount of camera movement NOTE Setting end stops will help to avoid the lens or camera colliding with the frame of the MAXIMA or the base plate of the TRINITY This adjustment will be performed in the Device settings After clicking on Device you will see this tab Endstops ...

Page 20: ...oystick and move the camera setup carefully into the required end position While moving the camera you can see the white arrow moving and indicating the value To transfer the values you can use and to move the red cursor to the tip of the white arrow Or you type in the values which are shown in lower left and right corners Endstops ...

Page 21: ...syrig Remote Controlled MSP 1 mounted with Easyrig Hard Mounted on Crane or Dolly Preset Axes Follow Speed Deadband Ramp Description 1 Tilt On 180 1 0 20 Both axes will follow fast and very directly Pan On 180 2 Tilt Off 180 1 0 20 Only the Pan axis will follow fast and very directly while the Tilt axis is fully stabilized Pan On 180 3 Tilt On 50 6 0 50 Both axes will follow later and more indirec...

Page 22: ...et Axes Follow Speed Deadband Ramp Description 1 Tilt Off 180 5 30 User preset 1 is the so called TRINITY mode a fully stabilized mode 2 Tilt On 180 0 0 5 User presets 2 and 3 is the classic Steadicam mode but with a stabilized roll axis for a steady horizon 3 Tilt On 180 0 0 20 User presets 2 and 3 is the classic Steadicam mode but with a stabilized roll axis for a steady horizon 4 Tilt On 0 1 0 ...

Page 23: ...ent you should set the Deadband to a value higher than 5 Ramp Sets how smooth the camera will be pulled after the camera left the deadband zone A low value will let the camera engage fast and direct A higher value will let the camera engage very smooth and indirectly Applikation Action Mode Speed Deadband Ramp Handheld Direct Lot of body movement Follow 180 1 0 20 Handheld Indirect Lot of body mov...

Page 24: ...e file you need to press first ALL PROFILES and than you need press STORE to save the file 20 2 Load Profiles You can load any stored profile to any of the 5 profiles of the connected MAXIMA TRINITY To load profiles from a drive USB or a cloud drive click on Load from File Click on Load from File and the window below will appear NOTE If you do not own the computer that you are using for these setu...

Page 25: ...Press OK Press DOWN until Restore is displayed Press OK to confirm Press DOWN until Setting is displayed Press OK to confirm 21 4 Remote Access The service team can remotely access the MAXIMA or TRINITY To enable us to access your MAXIMA or TRINITY you need to install the TeamViewer software on your PC first https www teamviewer com Then you need to contact the ARRI service NOTE You will need a st...

Page 26: ...n axis 22 2 Mounting the MAXIMA Pan Lock Open both Clamps and place the bracket onto the rods Move the bracket under the outer ring and tighten the clamp screws Pan Lock Before using the Pan Lock you need to switch OFF the Pan Motors using the GUI Using the Pan Lock with an active motor will cause over heating and possible failure of the Pan motors CAUTION ...

Page 27: ...lues to the settings below Needed values NOTE Before you can start using the wheels you need to read the PLC manual which can be found here http shop plcelectronicsolutions com content Veracity_Operation_Manual 20Wireless pdf Axis Speed Delay Deadband Ramp Tilt 150 1 0 10 0 Pan 150 1 0 PLC Wheels For working with the external PLC wheels the MAXIMA and TRINITY need to be specially adjusted CAUTION ...

Page 28: ...c the MAXIMA TRINITY will beep Plug the power cable into the PLC wheels Now the PLC will be paired 23 3 Using the 3 Wheel for the Roll axis If you want to control the Roll axis by a third wheel you need to go first into the Advance Mode Revere to Changing from Standard to Advanced Mode For the Roll axis you have to change from Angle to Speed 1 Joystick 2 Remote 3 Calibration 4 Remote Pairing 5 Res...

Reviews: