


To reduce the risk of theft of the safe, it can be secured to floor,
wall or in a cupboard. For your convenience, there are holes
(diameter 8mm) on the back and in the bottom; therefore it can
be fixed by the expansion bolts.
CAUTION
: The safe should be placed horizontally when
installing the safe.
En
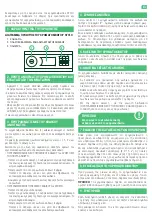
FRONT DIAGRAM OF THE SAFE
1. Key.
2. Plastic cover - Emergency lock.
3. Numeric keypad.
Thank you for purchasing this safe. We advise you to read the
instructions before you install and use the safe to prevent its
improper use from making the guarantee void.
• Remove the small plastic cover on the front panel by pressing
the left side of the cover inward
• Insert the key into the key hole and turn it counter-clockwise
direction. Then, turn the user key clockwise and open the
door.
• In order to function, the safe needs 4 x 1.5 V alkaline
batteries that are placed at the back of the door. Open the
cover of the battery holder and place the batteries taking into
consideration their polarity.
• On completion of this process the electronic system will be
activated.
This safe has 2 opening codes: User code 1 and user code 2.
The initial opening code for the safe is 1 5 9. For your security,
it´s important that you change them and configure the codes
you desire. To change it, proceed in the following manner:
• Programming user code 1.
- Press the reset button (on the left-side of back of door) with
a sharp object.The yellow light will be on.
- Input any 3-8 digits you want, press “#” to confirm. A beep
will indicate the personal code has been accepted and
stored.
• Programming user code 2.
- Press “0” twice. Then press the reset button with a sharp
object. The yellow light will be on.
- Input any 3-8 digits you want, press “#” to confirm. A beep will
indicate the personal code has been accepted and stored.
To open the safe, enter the key and your personal code followed
by the letter “#”. A green light will be on. Turn the key clockwise
to open the door.
If the entered code is incorrect, 5 short deep sounding beeps
will sound. If the incorrect code is used 3 times consecutively,
you must wait for 20 seconds before reattempting. If again
the incorrect combination is selected 3 times, you must wait
approximately 5 minutes before reattempting access.
To close the safe, push the door and turn the key
counterclockwise.
If you forget the code for opening, the safe can be opened using
the emergency key.
• Remove the small plastic cover on the front panel by pressing
the left side of the cover inward.
• Insert the key into the key hole and turn it counter-clockwise
direction
• Insert the user key and turn it to open the safe.
• Once the safe is open, press the reset button on the back of
the door with a sharp object.
• Change the code for opening (see point 3)
Each time that you use the safe, the electronic system verifies
the condition of the batteries.
If the batteries are low, the red light (in the middle of the number
panel) will warn you immediately. The safe needs 4 x 1.5 V
alkaline batteries that are placed at the back of the door. Open
the cover of the battery holder and place the batteries taking
into consideration their polarity. Once you have changed them,
you must reprogram the opening codes, (see point 3).
1. CHARACTERISTICS OF THE PRODUCT
2. FIRST TIME THE SAFE IS OPENED AND
INSTALLATION OF THE BATTERIES
3. PROGRAMMING OPENING CODES
4. NORMAL OPENING
5. CLOSING
6. EMERGENCY OPENING
7. LOW BATTERY INDICATOR
8. INSTALLING THE SAFE
Do not keep the keys in the safe itself.
CAUTION!
1
3
2
Check the condition of the battery compartment on a regular
basis (every 6 months) to identify any possible signs of rust,
sulphation, etc.
Grease/oil any mechanical moving parts, such as locks and
bolts.
9. MAINTENANCE


