background image

4

HOW TO USE

Before First Use:

1. Peel off any adhesive labels.

2. Pour a teaspoon of vegetable oil onto the sandwich maker’s cool, non-stick sandwich

plates. 

3. Spread the oil around the sandwich plates using an absorbent cloth or paper towel.

4. Wipe off excess oil.

Preheating Sandwich Maker

1. Plug into standard wall outlet. The machine will turn on automatically.

2. The red Power light will illuminate indicating that the unit has been turned on.

3. When the sandwich maker reaches the correct temperature, the green Ready indica-

tor light will illuminate.

4. During first use, the unit may give off a smoky haze or slight odor. This is a result of

the manufacturing process and is completely normal.

Making Sandwiches

1. Prepare sandwich as directed in the chosen recipe.

2. Open the lid and place the sandwich onto the bottom sandwich plate.

3. Carefully close the lid.

4. Secure the lid with the safety locking latch during the cooking process.

5. Sandwich will be ready in approximately 3-6 minutes, depending on your preference. 

6. Open the lid and remove the sandwich using a heat resistant spatula.

7. Keep the sandwich maker closed when not it use.

8. When finished, unplug the appliance and leave the lid open. This will help the unit

cool down.

Note: 

- When the sandwich maker is cooking, the Ready indicator light may flicker. This is normal.

- The red and green lights do not indicate when the sandwiches are done. They only

indicate power and when the sandwich maker reaches the appropriate temperature.


Summary of Contents for ASM-905

Page 1: ...Manual de Instrucciones Modelo ASM 905 Sandwichera ...

Page 2: ...Instruction Manual Model ASM 905 Sandwich Maker ...

Page 3: ...delcious meals quickly and easily Please read the following instructions carefully before your first use Published By Aroma Housewares Co 6469 Flanders Drive San Diego CA 92121 U S A 1 800 276 6286 www aromaco com 2004 Aroma Housewares Company All rights reserved ...

Page 4: ...ive San Diego CA 92121 EE UU A www aromaco com 2005 Aroma Housewares Company Felicidades Su sandwichera es una forma increíble de crear comidas deli ciosas con rapidez y facilidad Por Favor Read all instructions carefully before first use ...

Page 5: ...l aparato no funciona bien o cuando se ha dañado en cualquier forma Devuelva el aparato al servicio autorizado más cercano para su revisión reparación o ajuste 8 El uso de accesorios extras no recomendado por el fabricante del aparato puede causar lesiones 9 No se utilice en exteriores 10 No permita que el cable cuelgue sobre la orilla del mostrador o la mesa ni que entre en contacto con superfici...

Page 6: ... 7 Do not operate any appliance with a damaged cord or plug or after the appliance malfunctions or has been damaged in any manner Return appliance to the nearest authorized service facility for examination repair or adjustment 8 The use of accessory attachments not recommended by the appliance manufacturer may cause injuries 9 Do not use outdoors 10 Do not let cord hang over the edge of counter or...

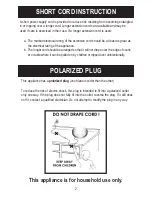
Page 7: ...nger cord should be arranged so that it will not drape over the edge of count er or table where it can be pulled on by children or tripped over unintentionally This appliance has a polarized plug one blade is wider than the other To reduce the risk of electric shock this plug is intended to fit into a polarized outlet only one way If the plug does not fully fit into the outlet reverse the plug If ...

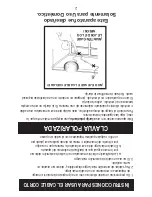
Page 8: ...orde del mostrador o mesa en donde pudiera ser jalado por un niño o alguien pudiera tropezarse con el cable sin querer CLAVIJA POLARIZADA Este aparato cuenta con una clavija polarizada una espiga es más ancha que la otra siga las siguientes instrucciones Para reducir el riesgo de choque eléctrico esta clavija debe ser conectada a una salida o enchufe eléctrico polarizado solamente de una manera Si...

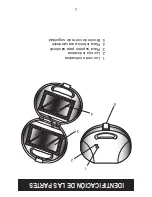
Page 9: ...3 IDENTIFICACIÓN DE LAS PARTES 1 Luz verde indicadora 2 Luz roja indicadora 3 Placa superior para sándwich 4 Placa inferior para sándwich 5 Broche de cierre de seguridad 5 3 4 2 1 ...

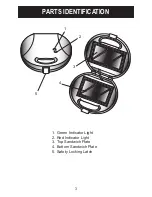
Page 10: ...PARTS IDENTIFICATION 3 5 3 4 2 1 1 Green Indicator Light 2 Red Indicator Light 3 Top Sandwich Plate 4 Bottom Sandwich Plate 5 Safety Locking Latch ...

Page 11: ...the manufacturing process and is completely normal Making Sandwiches 1 Prepare sandwich as directed in the chosen recipe 2 Open the lid and place the sandwich onto the bottom sandwich plate 3 Carefully close the lid 4 Secure the lid with the safety locking latch during the cooking process 5 Sandwich will be ready in approximately 3 6 minutes depending on your preference 6 Open the lid and remove t...

Page 12: ... ligero Esto es el resultado del proceso de manufactura y es completamente normal Cómo hacer sándwiches 1 Prepare el sándwich conforme se indica en la receta elegida 2 Abra la tapa y coloque el sándwich sobre la placa inferior para sándwich 3 Cierre la tapa con cuidado 4 Asegure la tapa con el broche de cierre de seguridad durante el proceso de cocinado 5 El sándwich estará listo en aproximadament...

Page 13: ...n un paño suave húmedo 4 Use un paño húmedo para limpiar la parte exterior de la unidad 5 Seque el cuerpo del aparato con un paño suave No permita que la humedad el aceite o la grasa entren en las ranuras de enfriamiento que se ubican en la parte inferior de la sandwichera No utilice limpiadores abrasivos o fibras que rayen No sumerja la sandwichera o cualquiera de sus partes en agua o cualquier o...

Page 14: ... maker plates with a soft damp cloth 4 Use a damp cloth to clean the outside of the unit 5 Wipe body dry with soft cloth Do not let moisture oil or grease enter the cooling slots located on the bottom of the sandwich maker Do not use abrasive cleaners or scouring pads Do not immerse the sandwich maker or any of its parts in water or any other liquid ...

Page 15: ...kraut 1 2 lb ground lamb cooked crumbled 2 slices of swiss cheese 1 tsp Italian dressing 2 tbsp Thousand Island Dressing 1 tsp Oregano 1 2 tsp garlic powder 1 3 cup cucumber yogurt sauce Salt and pepper to taste Place 2 slices of the buttered bread on the bottom heating plate Add pastra mi sauerkraut dressing and cheese to each half Cover the ingredients with the remaining 2 slices of bread and cl...

Page 16: ... porciones Pita abierta o pan de trigo entero 1 2 libra de carne molida cocida y desmoronada 1 2 libra de cordero molido cocido y desmoronado 1 cucharadita de aderezo italiano 1 cucharadita de orégano 1 3 de taza de salsa de yogurt de pepino 1 3 de taza de salsa de yogurt de pepino Coloque 2 rebanadas de pan con mantequi lla sobre la placa inferior para sándwich Agregue el pastrami la col en salmu...

Page 17: ...oque una mitad sobre cada rebanada de pan Cubra con la otra rebanada de pan y cocine durante 4 a 6 minutos Sándwich club tostado Rinde 2 porciones 4 rebanadas de pan de trigo o blanco con mantequilla 4 rebanadas de pavo cocinado 4 rebanadas de jamón cocinado 4 rebanadas de queso 1 tomate rebanado Queso asado tradicional Rinde 2 porciones 4 rebanadas de pan de trigo o pan blanco con mantequilla 4 r...

Page 18: ...against the bottom heating plate Place ingredients in any order you choose on the bread slices and cover with the other slices of bread Cook for 4 6 minutes Place 2 slices of the buttered bread on the bottom heating plate Place one chocolate bar on each half Slice the banana in half and place one half on each piece of bread Cover with the other slice of bread and cook for 4 6 minutes Place 2 slice...

Page 19: ...Housewares Company Before returning an item please call the toll free number below for return authorization number Allow 2 4 weeks for return shipping This warranty does not cover improper installation misuse abuse or neglect on the part of the owner Warranty is also invalid in any case that the product is taken apart or serviced by an unauthorized service station This warranty gives you specific ...

Page 20: ...nejo Sírvase llamar al número telefónico gratuito que se menciona abajo para obtener un número de autorización de devolu ción Espere entre 2 4 semanas para recibir el aparato nuevamente Esta garantía no cubre la instalación incorrecta uso indebido maltrato o negli gencia por parte del usuario La garantía también es inválida en caso de que el aparato sea desarmado o se le dé mantenimiento por un ce...

Reviews: