Arkbird 433UHF Quick Start Manual Download Page 3

Arkbird 


- 3 - 

3. The R

eceiver’s ID Code matching / Failsafe Protection 


Press the SET button on the receiver for 10 seconds, then the receiver enters the ID code waiting 

status, LED flickers fast (5 times per second). Now reopen the transmitter to match Code. If succeeded, 

the receiver will automatically enter into the FHSS working condition. 

Press the SET button of the receiver for 5 seconds, set the failsafe protection

. (The LED will 

flicker slowly for 3 times after the setting.) 

If the receiver is receiving the signal, the status LED will flicker fast, otherwise flicker slowly (one 

second one time). 

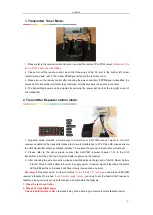
Please place the receiver antenna vertically and away from the interference source such as camera 

& video TX, make grid antenna with 18cm foil paper, increasing the gain for long-distance flight. (Bottom 

of the antenna metal position connected to the grid antenna) 


4. Receiver Single-line PPM & RSSI Output , and SBUS function 


Make a short circuit between the Channel 8

’s

 signal to the 5V 

(in the middle row) using jumper cap. 

Then channel 7 will output composite PPM signal. It can be connected to Arkbird  OSD 

’s AR port, and 

make single-wire transfer of the 10 channels and RSSI value. 

And, the Channel 9, after passing through a SBUS inverter, it can connect with other types of 

SBUS controllers. 


On  the  Arkbird  OSD  1.0,  the  original  1-4  channel  input  ports  which  used  to  connect  common 

receivers, automatically become output ports which will output the controlling value of channel 7-10 of the 

remote control.         

Summary of Contents for 433UHF

Page 1: ...onse of 20ms without delay With Arkbird OSD it has the following functions 7 It can be configured to single wire PPM RSSI output three wire transmission of 10 channel signal and RSSI with very simple wire connecting Arkbird OSD needs to be upgraded to 3 1020 or newer firmware 8 The original channel 1 4 input ports on Arkbird OSD automatically become output ports which will output channel 7 10 of t...

Page 2: ...r placed far to avoid interference to FPV Video RX please ensure the UHF transmitter antenna vertically installed 1 5 m above the ground A tripod is recommended 2 Please refer to the above graph connect the 2 4G 72M receiver channel 1 10 to the UHF transmitter insert the V 5V and G ground wire to power up the receiver 3 After checking the wire connection please insert the balance charge port of th...

Page 3: ...ay from the interference source such as camera video TX make grid antenna with 18cm foil paper increasing the gain for long distance flight Bottom of the antenna metal position connected to the grid antenna 4 Receiver Single line PPM RSSI Output and SBUS function Make a short circuit between the Channel 8 s signal to the 5V in the middle row using jumper cap Then channel 7 will output composite PP...

Page 4: ...mode or 2 4G 72M receiver is working and able to control a servo If you use the Arkbird OSD single wire transmission enter the OSD menu check the first row to see whether it is upgraded to latest firmware above V3 1020 Q Short distance Failsafe less than 5km under maximum power LED brightest A check RSSI intensity through OSD if signal is still not A00 it may be failsafe from repeater receiver Che...

Page 5: ...smission 1 6 channels as follows aileron elevator throttle direction and 2 auxiliary channels If no corresponding please change the servo line sequence or set the radio TX s PPM 1 6 channel as the above order Attentions Be sure to read the Safety precautions of Arkbird equipment carefully 1 The Arkbird equipment can only be used for small aircraft model entertainment Please do not install it in th...

Reviews: