


43
EN
A
BI
SIC
A
SSembly
of
boiler
SupportinG
brAcKet
And
templAte
for
fixinG
frA
-
me
to
roof
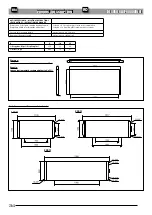
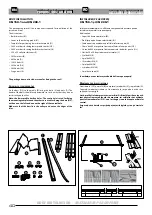
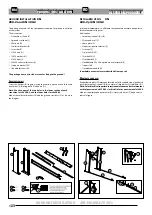
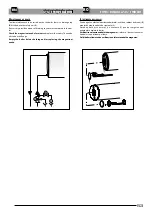
Assemble the three bars (SIL) and the boiler support bracket (BS) and arran-
ge them so that they fit in the tile valley. Position the cage nuts (A) in the slot
and pre-assemble the collector support fasteners (S).
Once the boiler support bracket and lower profile are assembled, install the
template with the two nuts (V6 e D6).
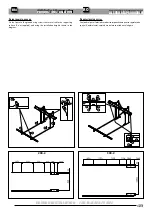
Position the frame on the roof so that all the bars fit exactly in the tile valleys.
Check that the fixings are parallel.
Remove the tiles under the fixing bars (SIC e SIL).
Shape the bars to fit the roof and then fix them onto
the attic using suitable screws (not supplied).
m
ountinG
of
collector
And
boiler
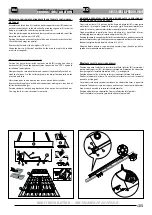
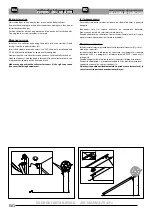
Position the first collector inside the lower profile (BI) resting it on the up-
per bracket (BS). Insert the hydraulic joint connectors (see “200-2 hydraulic
installation”) and tighten.
Now position the second collector and connect it hydraulically to the first.
Hook the fastener S to the collector profile, centring it horizontally on the
frame, and lock.
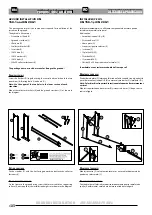
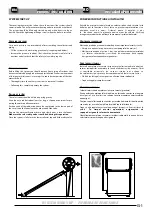
Unscrew and put to one side the four screws on the boiler cylinder.
Remove the three plugs on the boiler connections. making sure they do not
fall inside the exchanger. Position the boiler on the fixing bracket and line
up the slots with the holes. Fix using the four screws previously removed.
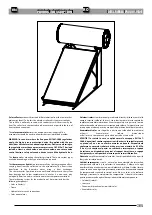
pROduCT INsTallaTION
m
ontAreA Suportului de fixAre A boilerului
ŞI A ŞABLONULUI
DE POZIŢIONARE A CADRULUI PE ACOPERIŞ
Fixaţi cele trei bare
(SIL)
pe suportul de fixare a boilerului
(BS)
şi aranjaţi-le
astfel încât să încapă în şanţurile formate de ţiglă. Poziţionaţi piuliţele cu
cuşcă
(A)
în fantă şi preasamblaţi închizătoarele suportului pentru colector
(S).
După asamblarea suportului de fixare a boilerului şi a profilului inferior,
instalaţi şablonul cu ajutorul celor două piuliţe
(V6
şi
D6).
Po
ziţionaţi cadrul pe acoperiş astfel încât toate barele să se potrivească exact în
şanţurile formate de ţiglă. Verificaţi ca toate elementele de fixare să fie paralele
.
Îndepărtaţi ţiglele de sub barele de fixare
(SIC
şi
SIL).
Adapt
aţi barele pentru a se potrivi acoperişului şi apoi fixaţi-le pe atic cu
şuruburi corespunzătoare (nefurnizate
).
m
ontAreA colectorului
ŞI A BOILERULUI
Pozi
ţ
iona
ţ
i primul colector în interiorul profilului inferior (BI) sprijinindu-l
pe suportul superior (BS). Introduce
ţ
i racordurile hidraulice de conectare
(vezi paragraful « instalare hidraulic
ă
200-2 »)
ş
i strânge
ţ
i-le.
Pozi
ţ
iona
ţ
i apoi cel de-al doilea colector
ş
i conecta
ţ
i-l hidraulic la primul.
Prindeţi elementul de fixare
S
de profilul colectorului, centraţi-l orizontal
pe cadru şi strângeţi-l
.
D
eşurubaţi cele patru şuruburi existente pe cilindrul boilerul şi puneţi-le
deoparte
.
Îndepărtaţi cele trei capace existente pe conexiunile boilerului,
fiind atenţi să nu cadă în interiorul schimbătorului
.
Po
ziţionaţi boilerul pe suportul de fixare şi aliniaţi fantele la orificii.
Fixaţi cu ajutorul celor patru şuruburi desfăcute în prealabil
.
ROOf INsTallaTION -
INsTal
A
RE
A
P
E
A
CO
P
ERI
Ş
D
E
S
CRIERE
A
P
RO
D
USULU
I
D
E
S
CRIERE
A
P
RO
D
USULU
I
R
O
Summary of Contents for CN 150-1
Page 27: ...55 EN FR ...


