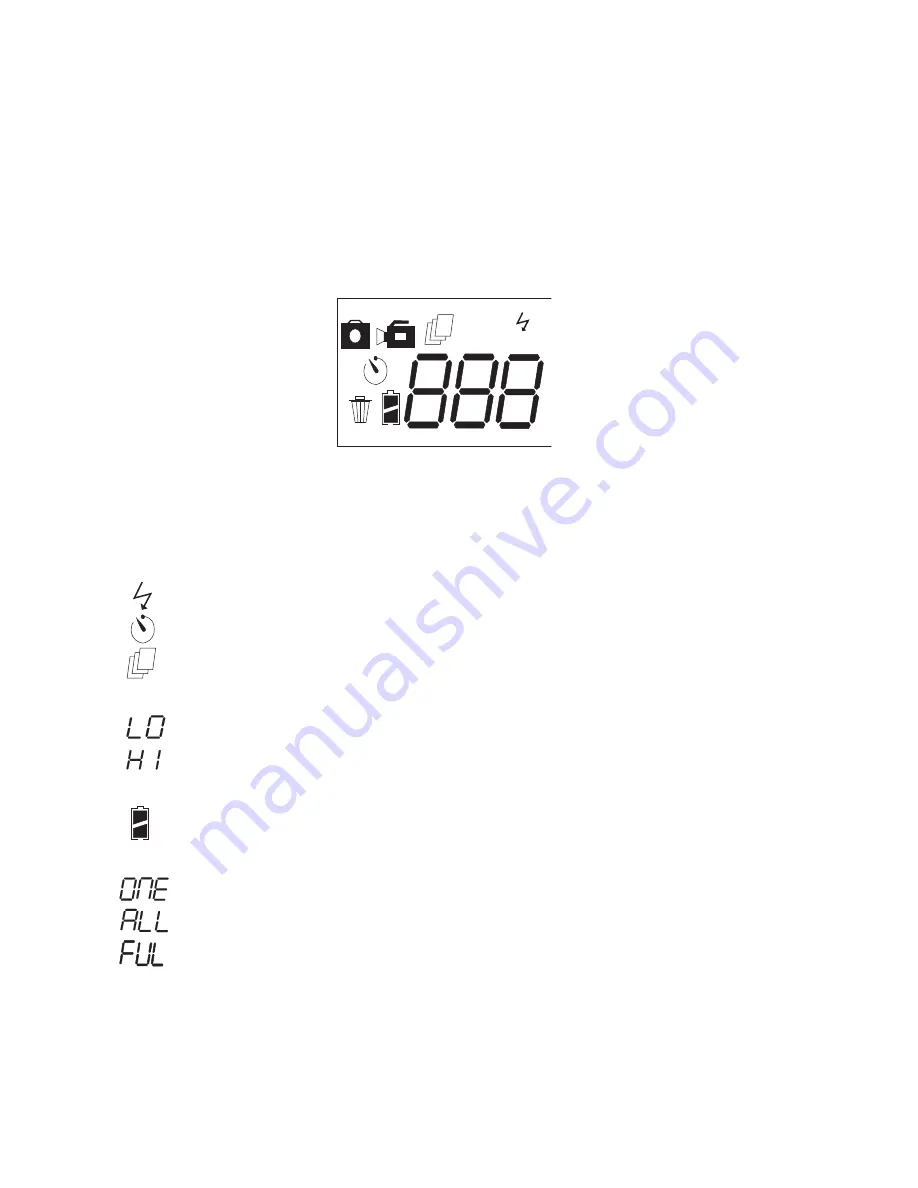
background image

8

LCD Icon Display

LCD Display

          Flash mode

          Self-timer - delayed snap shot

          Burst mode - takes 3 continuous pictures

          Hi/Low quality: 

            *LQ: compression ration is ON

            *HQ: compression is OFF

AVI    Video mode (frame rate is about 8 fps)

          Battery status - displays the battery condition

50/60 Eliminates the flicker effect on the image

          Deletes the last picture taken

          Deletes all the pictures taken

          Memory is full

SXGA

VGA HQ

Summary of Contents for Argus DC-1088

Page 1: ...DC 1088 USER MANUAL Package Contents Argus DC 1088 Digital Camera User Guide USB Cable Wrist Strap Installation CD 3 AAA Batteries Camera Pouch ...

Page 2: ...2 Table of Contents Safety And General Information 3 Getting To Know Your Camera 6 Operating The Camera 8 Installing The Software 16 Downloading Photos 17 Frequently Asked Questions 21 Specification 23 ...

Page 3: ...your camera to your computer with a USB cable the computer will automatically detect a new portable device and now you can download or copy the photos saved to the memory to your computer Caution The software CD ROM packaged with the camera is designed to be used with a personal computer only Do not attempt to play this CD ROM on a stereo or CD player as this may cause damage to both the disc and ...

Page 4: ...s a No Photography restriction in place you cannot record any performance improvisation or exhibit even for personal use Any transfer of pictures or memory cards with data must be conducted under the constraints of copyright law Caution when using the camera This product consists of intricate electrical parts To ensure the camera photographs normally do not drop or hit the camera when taking pictu...

Page 5: ... may expose you to dangerous voltages or other risks Further avoid exposing this camera to direct sunlight as doing so could cause a fire Do not attempt to dry it with an external heat source How to maintain your camera 1 If the lens LCD display or viewfinder is dirty use the accompanying cleaning cloth to wipe the surface clean Avoid touching these areas with your fingers 2 When not in use keep t...

Page 6: ... To Know Your Camera 1 Power on off 8 Operation on light 2 UP 9 Flash 3 DOWN 10 Shutter Button 4 Charge light 11 Strap holder 5 LCD 12 USB port 6 Viewfinder 13 Battery cover 7 Lens 13 12 11 10 9 7 8 2 4 6 5 3 1 ...

Page 7: ...s button for more than 1 second to take pictures Select During mode change press this button to confirm the selected function ON OFF button Press this button to turn the camera on Press again to turn the camera off Note The camera turns off after 60 seconds of inactivity ...

Page 8: ...s pictures Hi Low quality LQ compression ration is ON HQ compression is OFF AVI Video mode frame rate is about 8 fps Battery status displays the battery condition 50 60 Eliminates the flicker effect on the image Deletes the last picture taken Deletes all the pictures taken Memory is full SXGA VGA HQ ...

Page 9: ...ton to change the settings of the camera The mode setting cycles by pressing the Up and Down button SXGA H Q SXGA standby state flash light setting image quality image size capture mode self mode setting frequency setting delete choose Down Up ...

Page 10: ...to confirm AUTO mode the flash fires whenever there is insufficient brightness ON mode the flash fires everytime a picture is taken OFF mode the flash does go off Note When flash is charging will blink on the LCD display If the battery is low and the flash is on AUTO or ON mode the will blink on the LCD display and the camera will not take picture ...

Page 11: ... mode by pressing Up or Down to make the selection and press the shutter button to confirm Image Size or Press the Mode button and select the SXGA VGA Change the mode by pressing the Up or Down to make the selection and press the shutter button to confirm HQ HQ SXGA VGA ...

Page 12: ...ess the shutter button to confirm is the default mode of the camera When the icon is displayed the camera to take 3 continuous pictures When the icon mode is displayed the camera goes into video mode Press and hold the shutter button to start recording release to stop The picture sequence is stored in AVI format ...

Page 13: ...wn to make the selection and press the shutter button to confirm The camera will take the picture after 25 beeps approx 10 sec delay Frequency Control or Press the Mode button until you see 50H 60H Change the mode by pressing Up or Down to make the selection and press the shutter button to confirm ...

Page 14: ...n ALL deletes all the pictures in the camera Additional Information When selecting a mode a corresponding icon will appear on the LCD display panel The camera will return to regular mode after 5 seconds of inactivity When memory is full the camera will beep and will appear on the LCD display panel The battery status indicator The battery is full The battery has half charge The batery is depleted ...

Page 15: ...ions of DSC are disabled The camera will display PC USB connect When the camera is disconnected from the computer it will returns to DSC mode and auto power off USB disconnect To turn off the camera press and hold ON OFF button until the display on the LCD panel disappears Press ON OFF Button SXGA SXGA ...

Page 16: ...16 Installing The Software Insert the CD in you CD ROM drive and the application runs automatically An interface will appear On the right of the interface there are four buttons ...

Page 17: ...17 Downloading Photos Connect the camera to the rear USB port of the computer using the supplied cable Follow the Found New Hardware Wizard installation process ...

Page 18: ...18 Open PhotoImpression 4 and click on Camera Scanner Select your camera under select source and click on ...

Page 19: ...19 An interface will appear click Get Dsc ...

Page 20: ...ad Images Download Images from your camera Save Images Save Images to default folder Erase DSC Images delete the images from camera Preference set preference Transfer ALL Transfer all images to specify folder Transfer Transfer the images to specify folder that you select ...

Page 21: ... hands when taking photos Hold the camera steady with both hands Use the first finger of your right hand to press the shutter Stand on solid ground Do not move or run when pressing the shutter Even tiny movements will result in fuzzy photos The computer does not recognize camera The camera driver has to be installed before picture download Ensure that camera is connected the rear USB port of the c...

Page 22: ...under an electric light source in another country with a different frequency e g European s 50Hz you will get horizontal black stripes in those photos due to incorrect mains frequency There will be no problems when taking photos under sunlight How do I contact technical support Argus Technical Support 888 552 7487 support arguscamera com www arguscamera com ...

Page 23: ...om different ambient light 1 3M 5 normal photos 16 compressed photos 300K 22 normal photos 55 compressed photos Camera Lens 1 2 inch fixed lens Focus 8 34mm Aperture F 3 0 Webcam 10 frame s VGA 20 frame s QVGA Shutter speed 0 2 1 5000 second Depth of Field 1 5m Shutdown 60 seconds White balance and exposure auto Power supply 3 AAA batteries 1 5V USB 5V Interface USB 1 1 ...

Page 24: ...24 PC Compatibility 1 CPU 486 66MHz or above 2 memory 64MB or above 3 monitor 800X600 or above 24bit or above 4 Windows 98SE Me 2000 XP 5 USB port and USB cable CD driver ...

Reviews: