Argosy HD 360C Manual Download Page 10


Note: 

If the hard disk in the external hard disk kit is a whole new hard disk without 

any partition, when the Disk Management is opened, a ‘Stop’ mark indicates 

this drive is an ‘Unknown’ type of disk (refer to the figure shown on right side). 

In this situation, Windows system won’t allow you to create partition with this drive. In the 

meantime, you can: 

♦ 

In Windows 2000: Windows will start up the ‘Write Signature and Upgrade Disk Wizard’ 

immediately. You can use this ‘Wizard’ to initial the hard disk to the ‘Basic Disk’ type and 

can then create partition in the drive. 

♦ 

In Windows XP:  you can right-click on the ‘Stop’ mark, and then click ‘Initialize disk’ to 

initial the hard disk to the ‘Basic Disk’ type and can then create partition in the drive. 

3. 

If the type of the hard disk drive is ‘Dynamic’, you must change it to the ‘Basic’. To do this, 

right-click on the status area (left area) of Disk 1, and then click ‘Revert to Basic Disk’ from the 

options. Wait for few seconds, the type of the hard disk drive will be changed to ‘Basic’ type. 

4. 

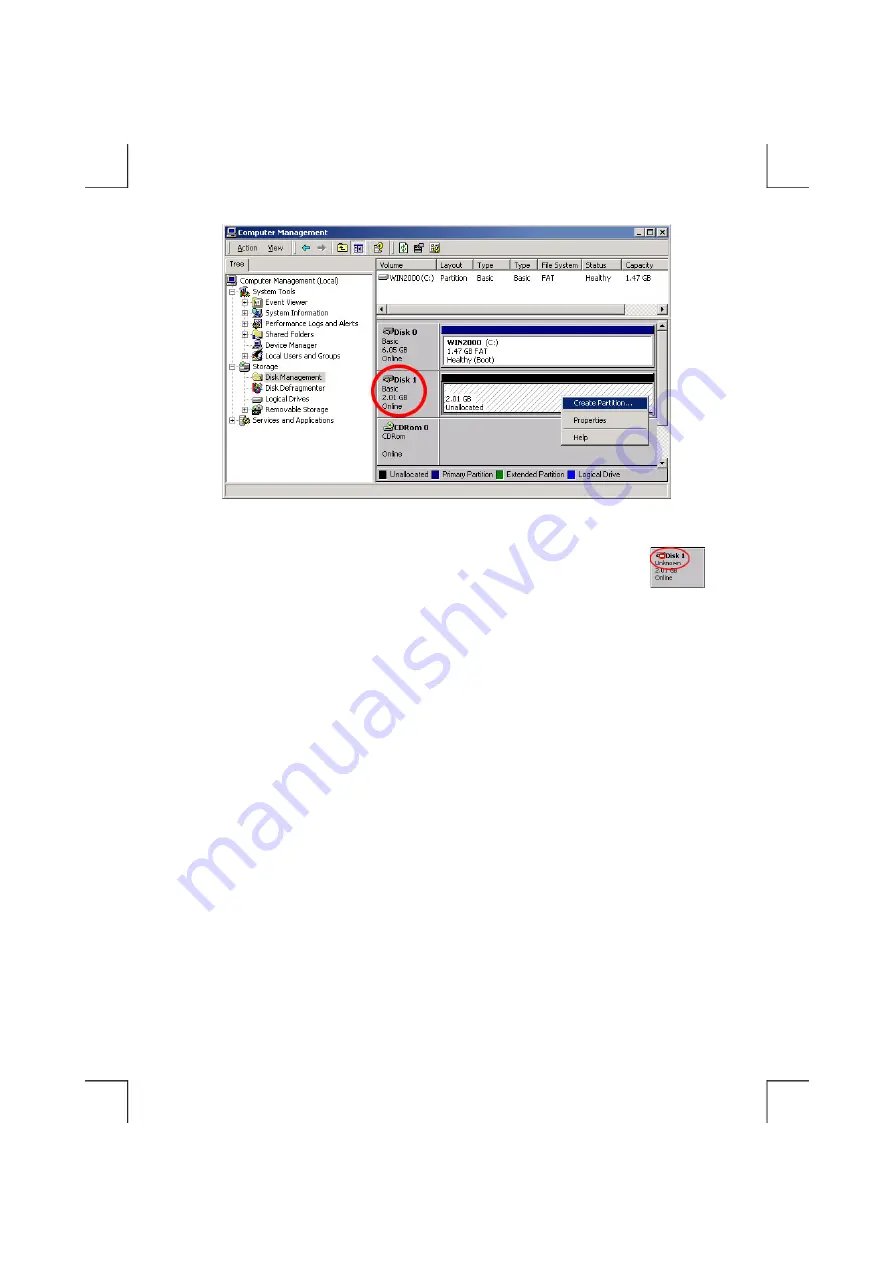
To create a new partition in the external hard disk, right-click on the right area of Disk 1, click on 

‘Create Partition…’, the ‘Create Partition Wizard’ appears, click 

Next

5. 

Select ‘Primary partition’, click 

Next

6. 

Specify the size that you want this partition to be, click 

Next

7. 

Assign a drive letter for this partition, please use the default value, and click 

Next

Summary of Contents for HD 360C

Page 1: ...vailable Mac OS9 x or above NOTE USB2 0 host supports 480Mbps maximum data transfer rate USB1 1 host only supports 12Mbps maximum data transfer rate Check your system to make sure you have the right h...

Page 2: ...ess indicator 2 Power Switch Power on and Power off 3 USB2 0 Interface Connector This connector connects to the USB2 0 interface cable 4 External Power Jack This jack connects to the AC adapter 5 Kens...

Page 3: ...B interface cable into the Interface Connector see the figure 2 Insert the plug of AC adapter into the External Power Jack of drive 3 Attach the AC adapter to the outlet 4 Press Power Switch to ON 5 Y...

Page 4: ...the IDE and Power cables to disk drive and then fix the PCB and drive with screws 1 Loading the drive into case notice at the tray alignment 2 Plug the cable of LED already on the case into the connec...

Page 5: ...screws on stand to separate the stand case and drive 1 Pull out the drive from case about 4cm be careful don t break the LED cable 2 Pull out the cable of LED from the connector on PCB 3 Pull out the...

Page 6: ...Computer double click the CD ROM contains Driver CD and then double click index htm to open the welcome screen 2 On the left part of welcome screen click Install Device Driver On the right part scroll...

Page 7: ...ystem to make this setup effective click OK and then Finish to restart computer 6 After the computer is restart and boot into Windows system insert the USB interface cable into computer the external h...

Page 8: ...tart Programs MS DOS Prompt 3 At the DOS prompt type FDISK and press Enter 4 In the first screen of FDISK answer the question Do you want to enable large disk support Y if you want to create a partiti...

Page 9: ...tition the external hard disk under Windows 2000 or Windows XP please plug the external hard disk and make sure it is recognized then In Windows 2000 click Start Settings Control Panel Administrative...

Page 10: ...click on the Stop mark and then click Initialize disk to initial the hard disk to the Basic Disk type and can then create partition in the drive 3 If the type of the hard disk drive is Dynamic you mus...

Page 11: ...rmat then click Next 9 Click Finish now the formatting is proceed after the process is done the Disk Management window is changed as below Make sure the status of the partition is Healthy 10 Now a par...

Reviews: