Assembly Instructions
12
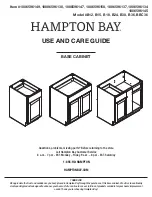
Step
17
Step
18
Fit the 2 plinths
Push the plinths onto
the right side .
Use a screwdriver to
tighten the large locking
nut fitted to each
plinth .
Note:
Turn the large
locking nuts as far as
they will go - more than
1/2 a turn.
10
2
E
10
E
Fit the left side
Push the left side
onto the assembly as
shown.
Slide the 2 small metal
dowels fitted to the
top into the top of
the 2 hollow core locking
nuts fitted to the left
side .
Insert a screwdriver into
the 2 hollow core locking
nuts and turn the nuts
inside as far as they will
go.
Use a screwdriver to
tighten the 2 large
locking nuts fitted to
the shelf and the one
fitted to each plinth .
1
G
3
C
1
C
9
10
E
Support
the plinths
10
10
10
10
2
1
9
3
Summary of Contents for Venice Entertainment Unit
Page 16: ...ALR3129...