background image

Camera Settings

While in camera mode, you will have the following audio & video options:

•  View live video and switch between HD and SD video

•  Turn feeder audio on/off

•  Record audio and video from the feeder

•  Turn on speaking option to speak through the feeder

How to Assemble, Disassemble, & Clean Your Pet Feeder

Always have the pet feeder plugged in. Battery mode should be used as a secondary, backup power 
supply in the event of a power outage.

Adapter/Battery Installation

1.   Open the battery compartment at the bottom of the feeder.

2.  Install three (3) alkaline D batteries. Make sure battery wrappings are not torn and that you match the 
 

positive and negative polarities with the markings in the compartment.

NOTE: Install batteries before connecting the adapter. Batteries should be installed for a backup option in 
case of power outage or if the power adapter becomes disconnected. 

3.  Plug the USB cable into the USB port at the rear of the main body.

4.  Connect the USB power adapter to the USB cable. Then, connect the USB power adapter to a power outlet.

5.  Make sure device is turned on.

NOTE: Users can use the app when the feeder is plugged into a power outlet, but the feeder cannot be 
operated from the app in battery mode. The feeder will follow the schedule that was set before the 
power adapter was disconnected from the feeder.
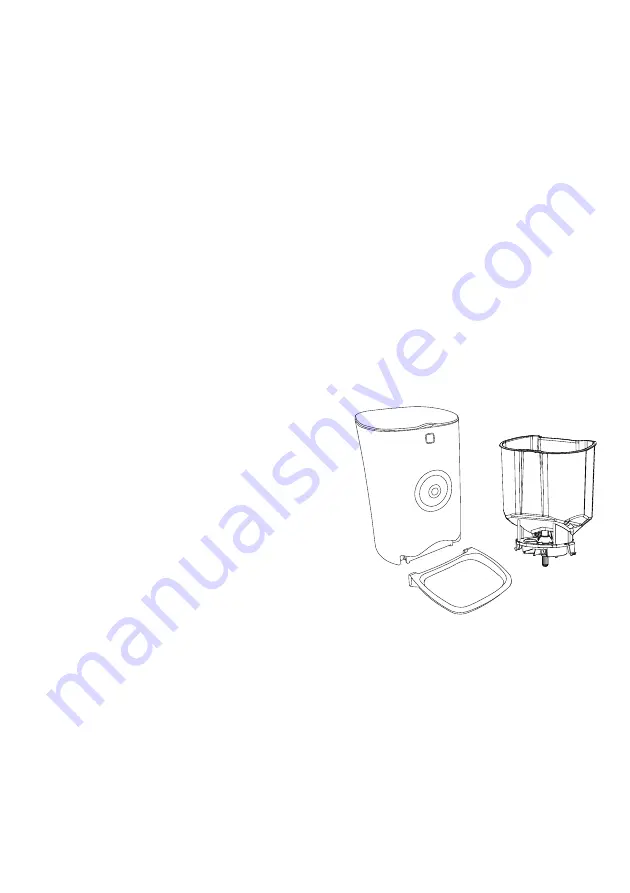
Food Bucket

1.   To assemble, align food bucket with slots in the 
 

main body and press down.

2.  To disassemble, hold both sides of the food 
 

bucket and lift upwards.

Food Bowl

1.   To assemble, press in buckles on either side 
 

of the bowl and push the tray into the main body.

2.  To disassemble, pull the bowl outward.

Cleaning

1.   Turn off and unplug device before cleaning.

2.  Clean the pet feeder with a soft, damp cloth.

3.  The food bucket and food bowl are dishwasher-safe 
 

once removed from the main body.

4.  The main body of the feeder is not dishwasher-safe. Do not immerse the main body in water. This could 
 

damage the internal electronics and cause the batteries to short out, create an electrical shock, or 

 catch 

fire.

5.  Make sure all parts of the feeder are completely clean and dry before filling with food.

6.  If the LOW BATTERY indicator LED starts flashing, replace the batteries in the battery compartment, or 
 

connect the feeder to a power adapter. Three (3) alkaline D batteries should last approximately one (1) 


year, depending on the quantities and frequency of food being dispensed.

Technical Specifications

Dimensions: 

9.84" W x 13.8" D x 15.4" H (25 x 35 x 39 cm)

Weight: 

6.61 lbs. (3 kg)

Capacity:

 29 cups (7 L)

Material: 

ABS plastic

Battery Type:

 Three (3) alkaline D batteries (not included)

5

Summary of Contents for APFWVC

Page 1: ... is safe and does not pose risk to the user Any use that does not conform to the guidelines described in this User Guide may void the limited warranty Please read all directions before using the product and retain this guide for reference This product is intended for household use only It is not intended for commercial use This product is covered by a limited one year warranty Coverage is subject ...

Page 2: ...ling the device 14 Do not submerge the body in water this could damage the internal electronics and cause the batteries to short out create an electrical shock or catch fire 15 Always turn the unit off before cleaning 16 Make sure to check the level of food regularly to ensure the feeder is dispensing food properly 17 Do not use this feeder with a pet that is suffering from any physical disability ...

Page 3: ...cket Food bowl USB cable USB power adapter User guide Portion chart Product Overview 3 MIC Dispensing Port Lid Button Bowl Indicator Camera Power Switch Type D Batteries 3 batteries NOT included SIZE D SIZE D SIZE D USB Port SET Button ...

Page 4: ...z Wi Fi networks 4 The app will show you a Wi Fi network called SL Arfpets xxxx for you to connect to Select Connect to view your available networks 5 Select the SL Arfpets xxxx network then go back to the app to complete connection 6 Allow the device to finish connecting Once connection is confirmed in the app press Done to begin using your feeder Pet Feeder App Homepage Menu Here are the functions...

Page 5: ...the app in battery mode The feeder will follow the schedule that was set before the power adapter was disconnected from the feeder Food Bucket 1 To assemble align food bucket with slots in the main body and press down 2 To disassemble hold both sides of the food bucket and lift upwards Food Bowl 1 To assemble press in buckles on either side of the bowl and push the tray into the main body 2 To dis...

Page 6: ...pany at its sole option and to the extent permitted by law will either 1 repair the Product defect at no charge using new or refurbished replacement parts 2 exchange the Product with a Product that is new or which has been manufactured from new or serviceable used parts and is at least functionally equivalent to the original device or 3 refund the purchase price of the Product A replacement Produc...

Page 7: ...ED ABOVE YOU USE THE PRODUCT AT YOUR OWN DISCRETION AND RISK YOU WILL BE SOLELY RESPONSIBLE FOR AND THE COMPANY DISCLAIMS ANY AND ALL LOSS LIABILITY OR DAMAGES RESULTING FROM YOUR USE OF THE PRODUCT NO ADVICE OR INFORMATION WHETHER ORAL OR WRITTEN OBTAINED BY YOU FROM THE COMPA NY OR THROUGH ITS AUTHORIZED SERVICE PROVIDERS SHALL CREATE ANY WARRANTY IN NO EVENT WILL THE COMPANY S TOTAL CUMULATIVE ...

Reviews: