www.areca.com.tw
Quick Installation Guide
2700-1M1203-0022
Product Features
Form Factor
I/O Processor
Driver Connector
On-Board Cache
Drive Support
Enclosure Ready
ARC-1203-2i
ARC-1203-4i
ARC-1203-8i
64.4(H) x 134(L) mm
BBM Support
ARM_based 1066MHz storage I/O processor
512MB on-board DDR3-1066 SDRAM
256MB on-board DDR3-1066 SDRAM
Up to 2 / 4 / 8 x 6Gb/s SATA HDDs/SSD
2 Discrete SATA latch connector
1xSFF-8087
In-Band: PCIe /
Out-of-Band: Push Button and LCD
ARC-6120BA-T121-12G
In-Band: PCIe /
Out-of-Band: LCD, and LAN Port
TEL:886-2-87974060 FAX: 886-2-87975970
Technical Support: [email protected]
Sales Information: [email protected]
Serial
Attached
SCSI
12
2xSFF-8087
64.4(H) x 168(L) mm
•
•
If you need more detail information, please download ARC-1203 user manual from the website below:
•
https://www.areca.com.tw/products/sataadapters_1203.html
•
https://www.areca.com.tw/support/downloads.html
※
Method 3: MRAID Storage Manager From ArcHTTP
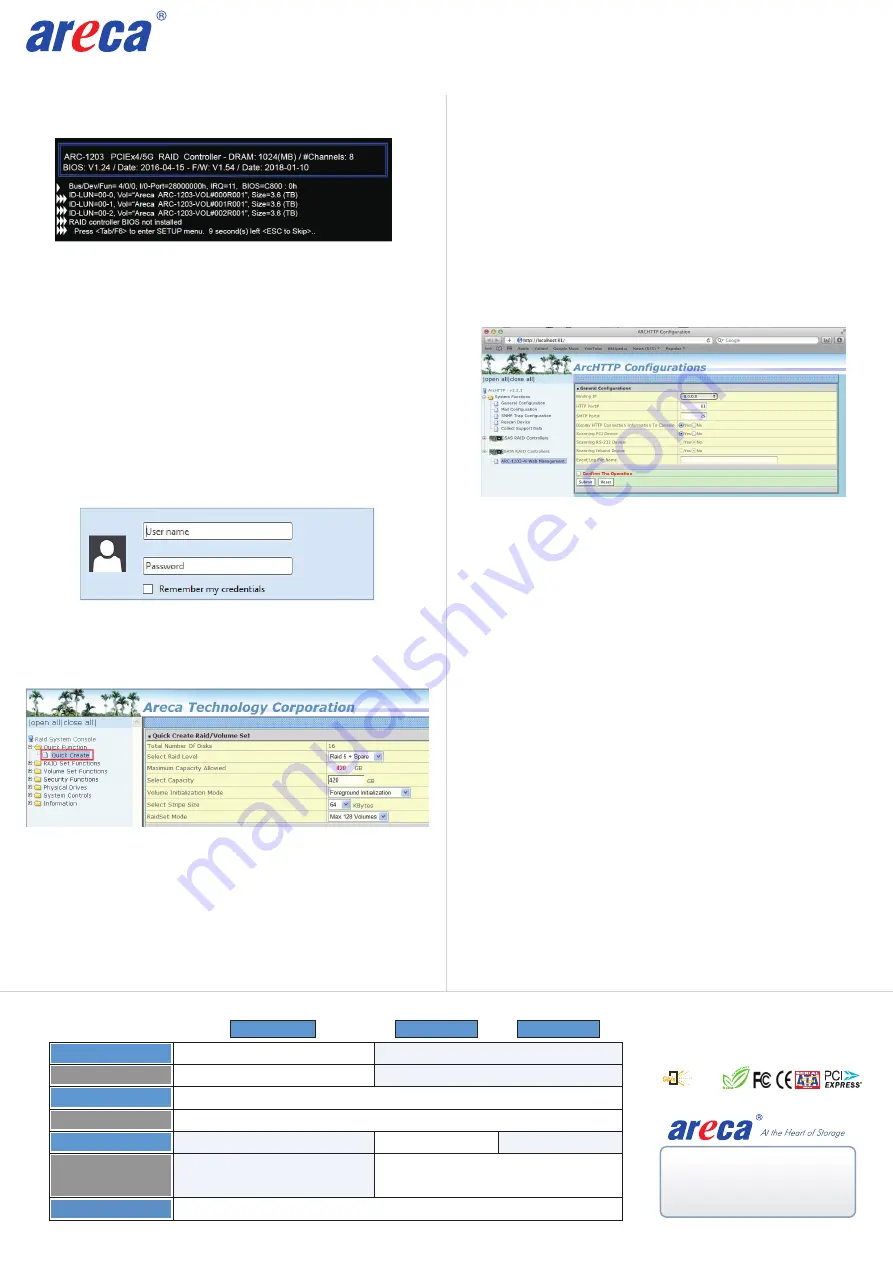
1. Start ArcHTTP– Browser Edition:
(1) In Windows, right-click on “Start” menu and choose
“Programs”. Clicking “MRAID” program icon starts the
ArcHTTP utility (From the Start menu, choose Programs >
MRAID > ArcHTTP).
(2) On a Mac, there is one MARID icon showing on your desktop.
This icon is for you to start up the ArcHTTP utility.
2. When you double-click on the “ArcHTTP64”, it shows all RAID
adapters available on the system and create an individual RAID
adapter icon located on left column of the “ArcHTTP Configura-
tions” screen.
3. Locate “ARC-1203 Web Management” and launch the selected
MRAID storage manager.
4.
Type the User Name and Password
when the login page prompt
.
The RAID adapter default User Name is “admin” and Password
is “0000”.
After logging in, the MRAID storage manager process
starts.
5. Click on the “Quick Create” in the main menu, your volume is
automatically configured based on the number of disks in your
system. You can create a RAID set associated with exactly one
volume set.
The user can change the Raid Level, Capacity, Initialization Mode,
and Stripe Size. A hot spare option is also created, depending on
the exist configuration. Tick on the “Confirm The Operation”
check box and click on the “Submit” button, the RAID set and
volume set will start to initialize. If you prefer to customize your
volume set, please use the “Raid Set Functions” and “Volume Set
Functions”. See chapter 6 of ARC-1203 user manual for information
on customizing your RAID volumes using MRAID storage manager.
※
Method 2: MRAID Manager From LAN Port
User can remote manage the ARC-1203-4i/8i without adding
any user specific software (platform independent) via standard
web browsers directly connected to the Gigabit Ethernet RJ45
LAN port. You can find controller Ethernet port default IP address
in McBIOS RAID manager “System Information” option. Launch
the Web Browser-based MRAID storage manager by entering
http://[IP Address] in the web browser.
Type the User Name and Password.
The RAID controller default
User Name is “admin” and the Password is “0000”.
After entering
the user name and password, click the button to access the
MRAID storage manager.
Click on the “Quick Create” in the main menu, your volume is
automatically configured based on the number of disks in your
system. You can create a RAID set associated with exactly one
volume set.
See the chapter 6 of Web Browser-based Configuration on the
user manual detailing the MRAID storage manager to customize
your RAID configuration.
1. Power on your computer. When prompted, press Tab or F6 to
enter the McBIOS RAID manager message.
2. If you have more than one controller in your system, the
McBIOS RAID manager window appears showing a selection
dialog box listing the SATA RAID controllers, select your
controller, then press Enter.
3. Follow the McBIOS RAID manager to complete the configuration.
※
Method 4: Front LCD Panel with Keypad (Optional)
You can use LCD front panel and keypad function to simply create
the RAID volume. The LCD status panel also informs you of the
disk array’s current operating status at a glance. For additional
information on using the LCD to configure the RAID controller see
the LCD manual on the website. The LCD provides a system
of screens with areas for information, status indication, or menus.
The LCD screen displays up to two lines at a time of menu items
or other information.


