Ardo TL107SA Instruction Book Download Page 21

21

SM3086

CLEANING THE  FILTER

EN

MAINTENANCE

22

21

24

25

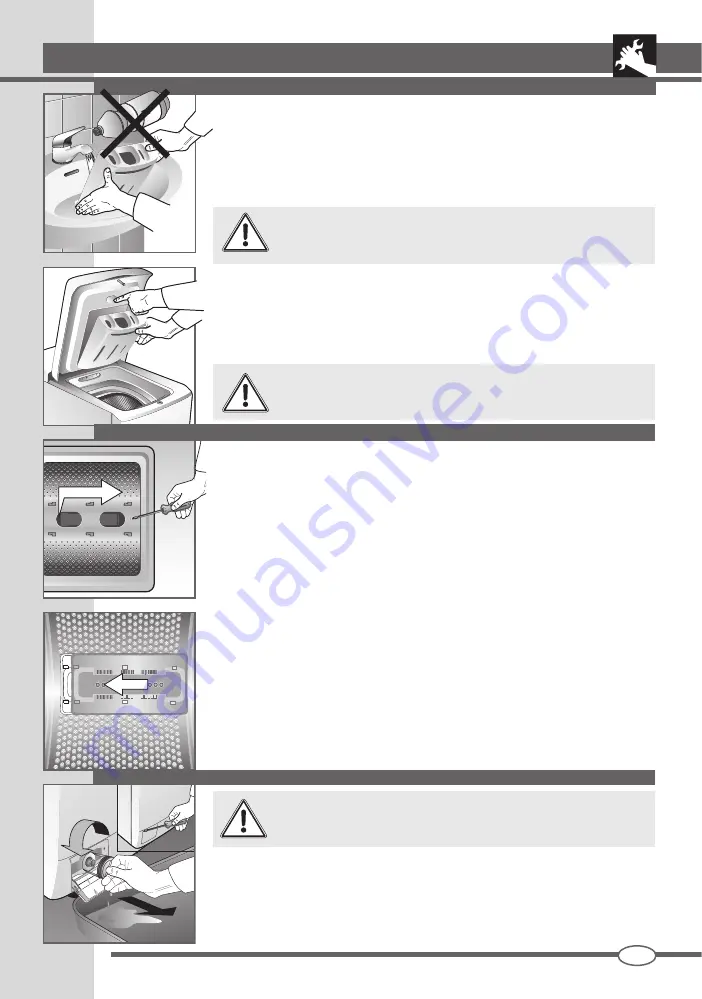
Make sure the washing machine is empty before starting the 

operations described below. Do not remove the filter while the 

machine is running or when it is full of water.

Place a recipient underneath the filter to gather water remaining inside. Open the 

filter door. Unscrew it anti-clockwise and remove it.  

A tool might be needed to open the door. (fig. 25). 
Rinse the filter under running water and remove any residue. 
Put the filter back inversely repeating all the operations.

If an object falls by accident in between the drum and the basin, it can be recovered 

by means of an extractable plug on the drum:

1.   Disconnect the appliance from the electrical mains.
2.   Take the laundry out of the drum.
3.   Close the drum doors and rotate it on half turn.
4.   Using a tool, press the metal edge or, if present, unscrew the screw by sliding 

the blade from left to right.

5.   The plastic plug will fall into the drum.
6.   Open the drum: recover the objects through the holes.
7.   Place the blade from inside the drum; place making sure that the metal tab 

or the fixing hole are on the right side, slide the blade from right to left until it 
engages.


In the presence of the screw, to match the mounting holes and proceed to the 

tightening of the screw itself (fig. 24).

8.  Close the drum doors, rotate it a half turn and check the positioning of the plug 

at all its fixing points.

RECOVERING FALLEN ITEMS BETWEEN DRUM AND BASIN

23

CLEANING THE WASHING  MACHINE

The washing machine has been designed to reduce maintenance to a minimum. It 

is however important to remember to clean it regularly.

Before cleaning, make sure the appliance is disconnected from the electrical mains 

and the water supply is closed.

The outer structure and the plastic parts must be cleaned only with a moist cloth.

Never use chemical agents, abrasive products, alcohol, soap, 

petrol or other solvents to clean the machine since they could 

damage it. 

After a wash, leave the top open for awhile in order to dry the rubber parts. Wash 

the detergent chambers periodically. To do this, take out the detergent compartment 
and rinse it under running water (fig. 21). Then put it back in.

  To take the detergent compartment out, press “PUSH” with your right hand and 

with the other hand pull the drawer out pulling it towards you (fig. 22).

The detergent compartment must always be inserted in its hous-

ing for proper machine operation.

Summary of Contents for TL107SA

Page 1: ...IT LIBRETTO ISTRUZIONI EN INTRUCTION BOOK...

Page 2: ...ITALIANO 3 12 ENGLISH 13 22 EN IT...

Page 3: ...llo e la vasca 11 Pulizia del filtro 11 Soluzione dei problemi 12 MODELLO DATA D ACQUISTO NUMERO DI FABBRICAZIONE IT Consigliamo di avere sempre a portata di mano i seguenti dati Il simbolo del cestin...

Page 4: ...one Durante il funzionamento dell apparecchio evitare il contatto con l acqua che fuoriesce dal tubo di scarico in quanto potrebbe avere una temperatura elevata Lavare esclusivamente tessuti destinati...

Page 5: ...di corrente elettrica provvista di messa a terra e conforme alle norme di sicurezza E vietato collegare la lavatrice alla presa elet trica utilizzando prolun ghe o spine multiple Terminato il lavaggi...

Page 6: ...trovano nella parte posteriore della lavatrice non devono essere in nessun modo schiacciati La lavatrice deve essere sistemata su una superficie piana e solida Si sconsiglia di installare la macchina...

Page 7: ...nnipolare La presa di corrente alla quale viene allacciata la macchina deve essere munita di messa a terra In caso contrario il produttore declina qualsiasi responsabilit per eventuali incidenti fig 1...

Page 8: ...rlo ad una conduttura di scarico o a uno scarico a muro posto tra 60 e 90 cm da terra fig 14 Se previsto lo scarico dell acqua direttamente nella conduttura di scarico l estremit libera del tubo della...

Page 9: ...ncheria si consiglia di eseguire un breve ciclo di lavaggio senza panni e senza detersivo per pulire il cestello Attenzione importante che l operazione d apertura chiusura del ce stello sia effettuata...

Page 10: ...un cubetto di ghiaccio sul tessuto sfregare il pi possibile e poi passare con un panno di cotone imbevuto di acetone Vernice non lasciare asciugare la vernice Passare sulla zona sporca il solvente in...

Page 11: ...no Aprire lo sportellino del filtro svitare e togliere quest ultimo girando in senso antiorario Per aprire lo sportellino pu essere necessario l uso di un utensile fig 25 Sciacquare il filtro sotto l...

Page 12: ...one di esclu sione della centrifuga 5 Non sia stata selezionata la funzione di stop con acqua La lavatrice vibra e fa rumore assicurarsi che 1 Tutte le protezioni per il trasporto siano state tolte 2...

Page 13: ...symbols for clothing treatment MAINTENANCE 21 22 Cleaning the washing machine 21 Recovering fallen items between drum and basin 21 Cleaning the filter 21 Problem solving 22 MODEL DATE OF PURCHASE SER...

Page 14: ...ct with the water coming out of the drain hose and this may be hot Only wash clothes that are machine washable In case of doubt check the manufacturer s instructions found on the label attached to the...

Page 15: ...with the safety requirements Extension leads or mul tiple adapters must not be used to connect the washing ma chine to the mains supply After the end of each washing cycle it is ad visable to unplug t...

Page 16: ...machine must not be crushed The washing machine must be placed on a flat and solid surface Do not install the machine in a room where the temperature could go below 3 C Place the machine in the chosen...

Page 17: ...e mains supply to which the appliance is connected must be fitted with an earthing system If this is not the case the manufacturer will not be held liable for any incidents that may occur fig 11 If th...

Page 18: ...cm from the ground without squeezing it fig 14 If the water drains directly into the drain piping the free end of the machine hose must be inserted in the piping with an inside diameter no smaller tha...

Page 19: ...ashing laundry for the first time it is advised to run a brief wash cycle without laundry or detergent in order to clean the drum Attention it is important to open and close the drum carefully to avoi...

Page 20: ...itten on the packet Chewing gum rub ice over the fabric scrape away as much chewing gum as possible and then rub with a piece of cotton soaked in acetone INTERNATIONAL CLOTHING CARE SYMBOLS Before pla...

Page 21: ...are on the right side slide the blade from right to left until it engages In the presence of the screw to match the mounting holes and proceed to the tightening of the screw itself fig 24 8 Close the...

Page 22: ...ower supply The washing machine continuously fills and drains the water check that 1 The drain hose has been installed at the proper height 60 90 cm 2 The end of the drain hose is not under water The...

Page 23: ......

Page 24: ...J P Industries S p A Via Dante 284 60044 Fabriano AN Tel 39 0732 6161 Fax 39 0732 616900 www ardo it 461308612 CA SM3086 01 18 04 2017 IT EN...

Page 25: ...IT GUIDA PROGRAMMI LAVAGGIO EN WASHING GUIDE...

Page 26: ...ITALIANO 3 6 ENGLISH 7 10 IT EN...

Page 27: ...all apposito simbolo 5 Selezionare il programma di lavaggio adatto alla tipologia di tessuti tramite la manopola A seguendo le indicazioni riportate nella tabella programmi Uno dei LED della barra fun...

Page 28: ...posita vaschetta 1 La lavabiancheria effettua un prelavaggio a 40 C max Il prelavaggio indicato nel caso di indumenti sporchi di polvere terra sabbia o in presenza di macchie partico larmente resisten...

Page 29: ...AVVIO PAUSA Per confermare le scelte ed avviare il ciclo di lavaggio toccare il simbolo AVVIO PAUSA il relativo led dopo alcuni secondi si accender di colore verde confer mando l avvio del ciclo A pro...

Page 30: ...gio e la velocit di centrifuga vengono regolate elettronicamente per diminuire la formazione di pieghe e facilitare la stiratura di bluse e camicie Il programma sport pensato per gli indumenti sportiv...

Page 31: ...ogram most suitable to the type of fabrics by using knob A following the instructions in the programs table One of the LEDs on the function bar will light up to indicate which wash phase the program w...

Page 32: ...TEMPERATURE symbol until all LEDs are off The machine will automatically prevent from setting a temperature higher than the temperature expected for each program PROGRAM PHASE INDICATOR LEDs The progr...

Page 33: ...00 7 0 TL148SW A B X TL128SW A B X 40 0 90 0 60 0 1000 8 0 TL108SW A B X TL107SW A B X 40 0 90 0 60 0 1200 7 0 TL127SW A B X START PAUSE To confirm your selection and start the wash cycle press the ST...

Page 34: ...y of washing and spin speed are adjusted electronically to prevent creases and making ironing of blouses and shirts easier The sportswear program is designed for sports and casual wear The 40 C wash c...

Page 35: ......

Page 36: ...J P Industries S p A Via Dante 284 60044 Fabriano AN Tel 39 0732 6161 Fax 39 0732 616900 www ardo it 461000012 SM3187 19 02 2018 IT EN...

Reviews: