ArcTiv Technologies ATSGWM6606PS Owner'S Manual Download Page 6

OWNER’S MANUAL:  EDGE

-SERIES 

 SWING GATE WALL MOUNT CABINETS 

© 2018 ArcTiv Technologies, LLC 


ATSGWM-MANUAL-01 


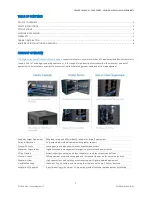
CABINET INSTALLATION 

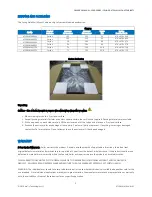
Edge-Series Swing Gate Wall Mount Cabinets are welded and ship fully assembed.  The figure below depicts the standard 

configuration with specialized accessories installed (Revi-

Ring™ Vertical D

-Ring Managers, Vertical Lacing Brackets, Fan Kits). 
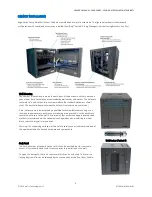
 

Wall Mounting 


Wall Anchor (Pack of 4) 

The number of keyhole cutouts on the back door of the enclosure will vary based on 
your model.  Each keyhole can accommodate a wall anchor and washer. The holes are 

centered 16”

 apart horizontally to accommodate the standard placement of wall 

studs. The vertical distance between the holes will vary based on your model. 

 
Note: Enclosure must be installed by a qualified technician. Before mounting, use a 
level and tape measure to position your mounting area precisely. Use the anchors to 
secure the enclosure to the wall. A minimum of four anchors and appropriately-sized 
washers is recommended. Use suitable mounting means when installing to cinder 
block, concrete, drywall or wood studs.  

 
Warning: The supporting surface must be able to safely support the combined load of 
the equipment and all attached hardware and components.  
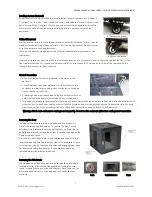
Back Panel 


The back panel has a standard cut-out, which can be punched-out for rear cable 
access.  Use standard hand tools to remove prior to installation on the wall. 
 
To open the back gate, there is a rear-lever which can be unlocked.  This lever is a 
locking device which can be released by the common key as the front door handle.   
 

Summary of Contents for ATSGWM6606PS

Page 1: ...OWNER S MANUAL EDGE SERIES SWING GATE WALL MOUNT CABINETS 1 2018 ArcTiv Technologies LLC ATSGWM MANUAL 01 OWNER S MANUAL Swing Gate Wall Mount Cabinet EDGE SERIES CABINETS ...

Page 2: ...ment Supports Larger Equipment 90kg load rating and 650mm depth suitable for large IT equipment Reliable Operation Fully assembled welded frame provides greater support Greater Security Locking doors and side panels prevent unauthorized access Maximum Organization High density cable management for organizing network and power cables Office Friendly Attractive design and low noise fans suitable for...

Page 3: ...e enclosure and any other enclosures and or equipment that will be installed nearby Use caution when cutting packing materials The enclosure could be scratched causing damage not covered by the warranty Save all packing materials for later use Repacking and shipping the enclosure without the original packing materials may cause product damage that will void the warranty Do not reship the enclosure...

Page 4: ...dle Glass w Swing Handle Side Panels S Solid V Vented S Solid V Vented S Solid V Vented Color Black Black Black Certifications CE RoHS CE RoHS CE RoHS Compliance IP 20 PCI Compliant IP 20 PCI Compliant IP 20 PCI Compliant Approvals EIA ECA 310 E EIA ECA 310 E EIA ECA 310 E Accessories Part No Description Packaging Compatibility Cable Management ATREVRING6 Revi Ring Vertical D Ring Cable Manager 6U...

Page 5: ...n and place on a firm level surface 4 Examine the enclosure for any damage or loose parts Confirm all parts are present If anything is missing or damaged contact ArcTiv for assistance Do not attempt to use the enclosure if it has been damaged WARRANTY 1 Year Limited Warranty Seller warrants this product if used in accordance with all applicable instructions to be free from original defects in mate...

Page 6: ...etween the holes will vary based on your model Note Enclosure must be installed by a qualified technician Before mounting use a level and tape measure to position your mounting area precisely Use the anchors to secure the enclosure to the wall A minimum of four anchors and appropriately sized washers is recommended Use suitable mounting means when installing to cinder block concrete drywall or woo...

Page 7: ...tion including front or back door reversals Grounding holes are also provided on top and bottom corners of both front and back doors to accommodate any configuration To ground the enclosure simply connect the two quick disconnect grounding wires one to the hole provided on the inside of either the front or back door and the other to the stud provided in any corner of the enclosure Connect your fac...

Page 8: ...ting any equipment inside Revi Ring Vertical D Ring Manager Installation ArcTiv s patented Revi Ring Vertical D Ring Managers allow for high density organization of network and power cables in the cabinet They attach directly to the mounting rails via 2 screws and can be reversed to allow the greatest mounting rail depth To use the full benefit of the reversed Revi Ring s move the front and or rea...

Page 9: ...n Fan Kit Installation Each cabinet includes mounting provisions for low noise or standard fan kits on both the top and bottom panels Each fan installs with 4 mounting screws and is powered with local plug options The power cables can be routed via the Vertical Lacing Brackets and Revi Ring Vertical D Ring Managers EIA Equipment Installation EIA equipment and accessories can be installed on both t...

Page 10: ...SGWM MANUAL 01 If you have questions about this product or need technical support please contact us or visit our website ArcTiv Technologies LLC 30 N Gould St Ste R Sheridan WY 82801 sales arctiv tech com www arctiv tech com Copyright c 2018 All Rights Reserved Latest Revision November 30 2018 ...

Reviews: