


6
2.2.2 Security software installation under Windows Me/2000/XP
1) Turn on the write-protection switch of the ARCFlash before use. The figure “Key” indicates writable and the “Lock” indicates write-protected.
2) There is no driver necessary in Windows ME/2000/XP. The system should automatically detect the new hardware and install the driver when
the ARCFlash is plugged into the computer.
3) Run “security/setup.exe” from the driver CD. Follow the system messages to complete the security software installation. A green arrow icon
should appear at the taskbar and the
U
tility
F
ast
D
isk will appear in the programs after the security software is installed.
2.3 How to use the security function
After installing the security software, the new program should appear and a new icon will show in the taskbar. Right on this icon and then follow
the options (as shown below)
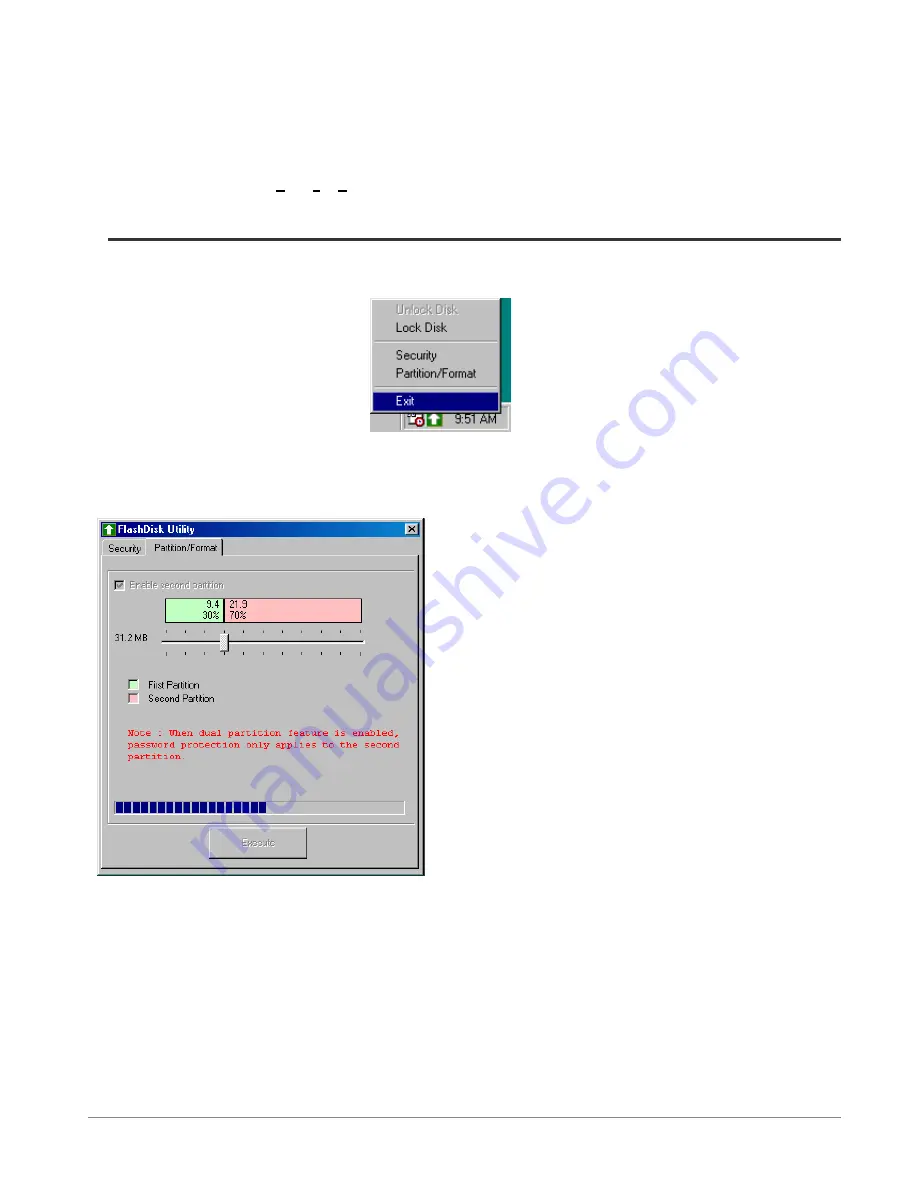
(Fig 2.9)
The explanation for the options:
1) Partition/Format
Click the “Partition/Format” option. The Flash Disk Utility window should appear.
(Fig 2.10)
The user will have the option of dividing the ARCFlash into two
disks or not.
Divide into two disks:
Click the “Enable second partition”option
and drag the resizing indicator to resize the secure area and public
area. Click the “Execute” button to start this operation.
Combine to one disk:
If the ARCFlash has been divide into two
disks and the user wants to combine them back into one, do not tick
the “Enable second partition”option. You can also drag the resizing
indicator to make the public area 100%. Click the “Execute” button
to start this operation.
WARNING:
1. All data in the ARCFlash will be erased after a resizing operation.
2. If the ARCFlash is used as the bootable disk, the public area must have more than 2MB of space available.
After resizing, two disk symbols will appear in “My computer”. Under normal conditions, the first removable disk will be
assigned as the “public area” and the second one will be assign as the “secure area”.
2
)
))
)
Security
Click the “security”option. The Flash Disk Utility window will appear.


