


4
5
POSITIONING THE UNIT
Always place the CD player on a level, firm surface. Placing your
player on a set of dedicated isolation feet will isolate the unit from
its surroundings as well as absorbing the vibrations created within the
player itself. You will generally hear some sonic improvements, which
makes this an extremely cost-effective upgrade.
CONNECTING TO OTHER EQUIPMENT
INTERCONNECT CABLES
Interconnecting cables are not supplied with this CD player. We
recommend high quality cables as inferior quality cables will degrade
the sound quality of your system. Please contact your Arcam dealer for
details of suitable cables.
AUDIO OUTPUTS
Connect these to your amplifier’s CD or any other line-level input
using suitable high quality interconnect cables. Ensure that the left and
right audio outputs from the CD player are connected to the same left
and right inputs on your amplifier.
The second set of sockets can be used to connect to a second
amplifier set up for multi-room use.
COAXIAL DIGITAL OUTPUT
Use this socket if you are using a separate digital to analogue converter
(DAC) or digital recorder. Connect to the DAC or recorder’s digital
input using a suitable 75
Ω
screened cable.
CAUTION
: Never connect the digital output socket to a
conventional audio input.
OPTICAL DIGITAL OUTPUT
Use this socket if you are using a separate DAC or digital recorder
with an optical connection. Connect using a suitable optical cable.
REMOTE INPUT CONNECTION
It is not necessary to make any connection to this socket in normal
use. This connection is for ease of installation to multi-room remote
control systems and is suitable for modulated IR commands. Contact
your multi-room installer for more information.
CONNECTING TO A POWER SUPPLY
WRONG PLUG?
Check that the plug supplied with the unit fits your supply and that
your mains supply voltage agrees with the voltage setting (120V or
230V) indicated on the rear panel of the unit.
If your mains supply voltage or mains plug is different, consult your
Arcam dealer or Arcam Customer Support on +44 (0)1223 203203.
MAINS LEAD
The appliance is normally supplied with a moulded mains plug already
fitted to the lead. If for any reason the plug needs to be removed, it
must be disposed of immediately and securely, as it is a potential shock
hazard when inserted into the mains socket. Should you require a new
mains lead, contact your Arcam dealer.
PLUGGING IN
Push the plug (IEC line socket) of the power cable supplied with the
unit into the socket (
POWER INLET
) in the back of the unit. Make sure
it is pushed in firmly.
Put the plug on the other end of the cable into your power supply
socket and switch the socket on.
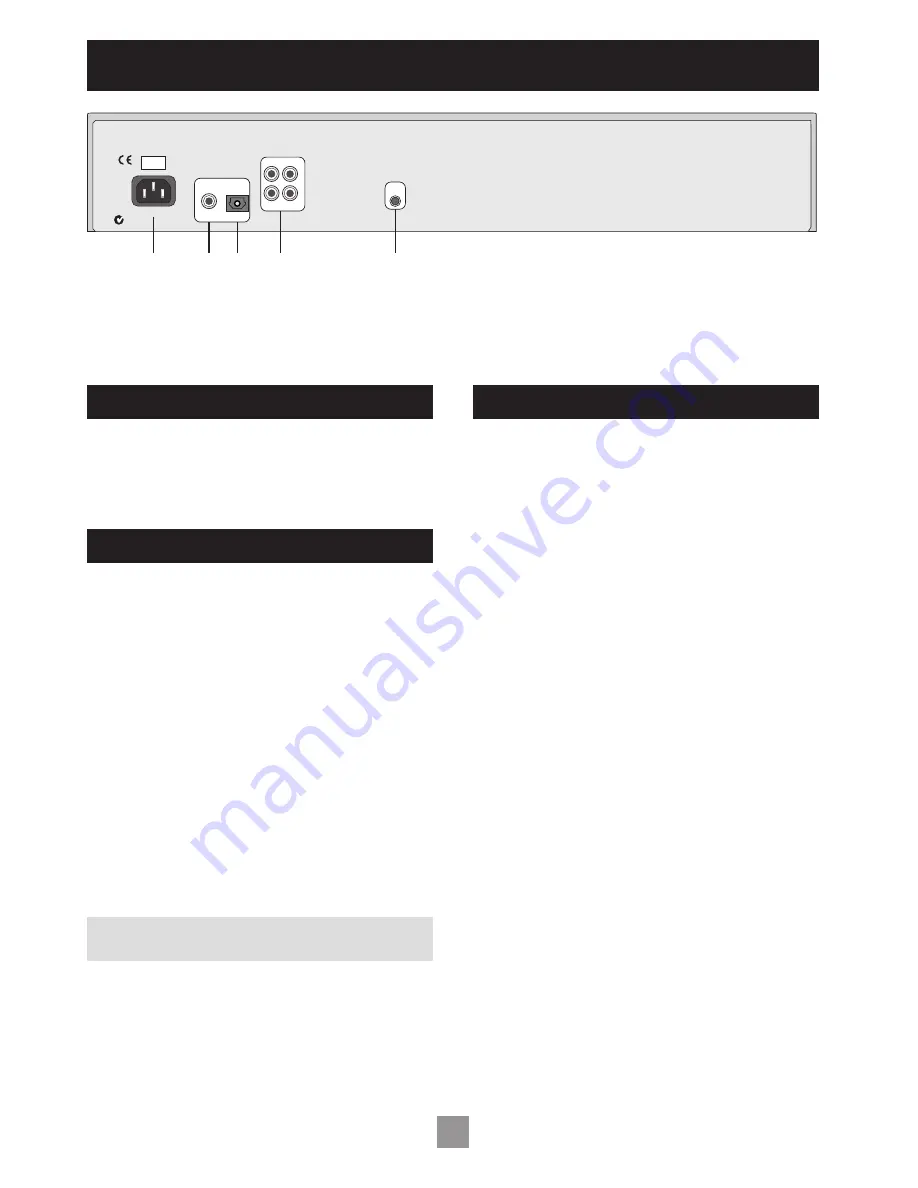
POWER INLET
230V
2
1
3
REMOTE
IN
CO-AXIAL
OPTICAL
DIGITAL OUTPUTS
5
4
AUDIO OUTPUTS
1
2
L
R
Installation
1
Power inlet, with voltage indicator
2
Coaxial digital output
3
Optical digital output
4
Twin audio outputs
5
Remote input
Summary of Contents for CD33
Page 1: ...Compact disc player CD33...


