


AVR350
E-19
E
n
g
li
s
h
Remote control
SELECT DEVICE
SET
LAST
SLEEP
A–B
EXIT
GUIDE
CH
VOL
MUTE
0
FM
8
AV
9
MCH
7
TUN
5
AUX
6
TAPE
4
CD
2
SAT
3
VCR
1
DVD
THX
FX
SUB
P.MODE
SUBT
TITLE
MENU
ZOOM
AUDIO
MEM
RETURN
ANGLE
SETUP
STATUS
SEARCH
DIS
TRM
1
2
TST
SYN
DYN
SLP
P –
P +
TM
FAV
MODE
OPEN
MENU
INFO
CR80
DVD
CBL
VCR
TV
SAT
CD
AMP
AUX
OK
AM
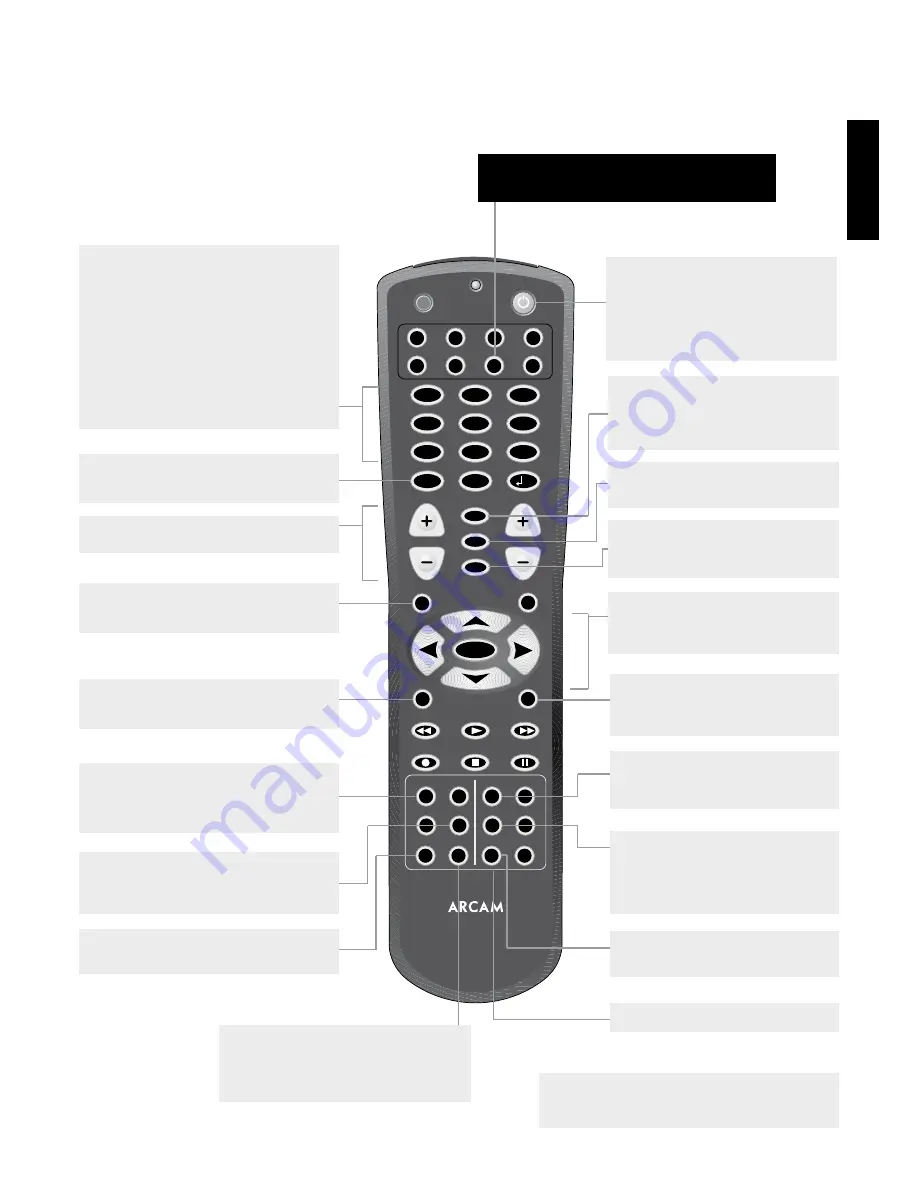
NOTE
Remember to install the two AA batteries supplied before
trying to use your remote control.
The CR80 remote control is a multi-function unit that controls the
AVR350 and up to seven other devices. The instructions on this page
only refer to the control of the Arcam AVR350.
For information on using the remote control for other devices, and
a full list of features, see the instruction booklet supplied with the
CR80.
SYN (Lip sync)
Press once to adjust the Lip sync audio delay. Use
the
D
and
E
navigation buttons.
Press again to exit the Lip sync function.
TRM (Speaker trim)
Press to display the OSD Speaker trim level
menu.
TRM
allows temporary adjustment of
speaker levels, using the navigation buttons.
Press again to exit the ‘Speaker Trim’ function.
Source selection
DVD
– DVD input
SAT
– Satellite input
VCR
– toggle between the VCR and PVR inputs
CD
– CD player input
TAPE
– Tape (monitor) input
AV
– AV input
MCH
– DVD-A (multi-channel) input
FM
– FM tuner input
AM
– AM tuner input
Press the relevant button once to select input;
press and hold to select the analogue input if a
digital input is present.
Device selection
IMPORTANT: Press the ‘AMP’ button first to operate
the AVR350.
On/Stand-by
This allows the AVR350 to be put into and
taken out of stand-by remotely.
If you do not wish to put Zone 2 into stand-
by at the same time as the main zone, press
and hold the stand-by button on the remote
control for about 3 seconds.
Navigation buttons
Arrow buttons allow navigation around the
menus on the AVR350.
Confirm selection by pressing
OK
.
SUB (Subwoofer trim)
Allows a temporary trim of the subwoofer
level. Press
SUB
, then adjust using the
D
and
E
buttons.
Fx (DSP effects mode)
Use this button to cycle through effects
modes for two-channel sources.
MUTE
Press once to mute the main system. Press again
(or use
VOL +/–
) to un-mute.
/–
Adjusts the volume.
MODE
Use this button to cycle through available
surround modes.
INFO
Press to change the RDS display mode for the
tuner.
DIS (Display)
Press to cycle through Off/Dim/Bright illumination
of the front panel display
The other buttons in this area are used for
DVD control and do not effect the AVR350.
MENU
Press to select the OSD Main menu.
Press and hold for more than two seconds to
select the ‘Set-up Menu Index’.
THx
In Zone 2, use this button to enable ‘Follow
Zone 1’ mode.
Note that the AVR350 does not support THX
processing.
P- / P+ (Tune/Preset Down/Up)
If the tuner is in
PRESET
mode, then these
buttons decrease/increase the preset selection.
If the tuner is in
TUNE
mode, then these buttons
decrease/increase the selected frequency.
DYN/MEM
Used to store a radio station in a preset.
Press once to enter store mode; use the
P+
/
P-
buttons to select the preset to use,
then press this button again to confirm the
selection.
1/STATUS
Press this button to toggle between FM
‘stereo mute’ and ‘mono’ on the tuner.
TM
Tuning mode: press this button to toggle
between ‘preset’ and ‘tuning’ modes on the
tuner.


