- 52 -
Installation & Maintenance
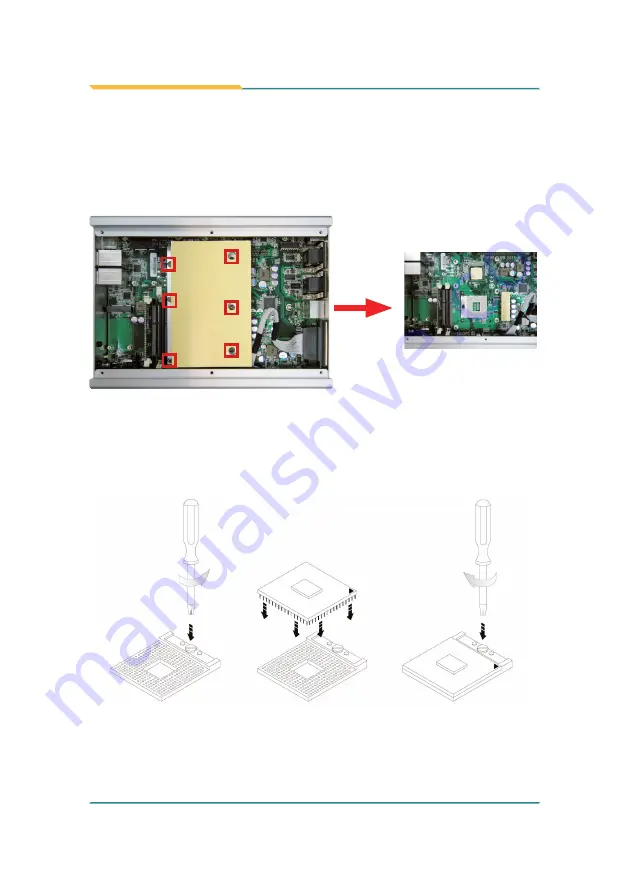
4.1.3. Install CPU
1.
Locate the six screws which secure the Thermal Lump.
2.
Use a screwdriver to remove the six screws and keep them safely
for later use.
3.
The processor socket comes with a screw to secure the CPU. As
shown in the picture below, loose the screw first before inserting
the CPU.
4. Place the CPU into the socket by making sure the notch on the corner of
the CPU corresponding with the notch on the inside of the socket. Once
the CPU is slid into the socket, lock the screw.
Summary of Contents for FPC-7600 Series
Page 2: ...2 This page is intentionally left blank...
Page 6: ...iv This page is intentionally left blank...
Page 12: ...x This page is intentionally left blank...
Page 13: ...1 1 Chapter 1 Introduction Chapter 1 Introduction...
Page 19: ...7 2 Chapter 2 System Overview Chapter 2 System Overview...
Page 21: ...9 System Overview 2 1 2 FPC 7601 7602 7603 Unit mm...
Page 22: ...10 System Overview 2 1 3 FPC 7604 Unit mm...
Page 30: ...18 This page is intentionally left blank...
Page 31: ...19 3 Chapter 3 System Configuration Chapter 3 System Configuration...
Page 50: ...38 This page is intentionally left blank...
Page 51: ...39 4 Chapter 4 Installation and Maintenance Chapter 4 Installation and Maintenance...
Page 69: ...57 4 Use the screwdriver to loose the screw securing the lower expansion slot bracket...
Page 74: ...62 This page is intentionally left blank...
Page 75: ...63 5 Chapter 5 BIOS Chapter 5 BIOS...
Page 102: ...90 This page is intentionally left blank...


