background image

The touch screen lets you select items or perform function. Learn basic 

actions to use touch screen. 


Tap : Touch once with your finger to select or launch the menu option, or 
application 

Drag : Tap and drag your finger up, down, left, or right to move to items on lists. 

Tap and hold : Tap an item and hold it for more than 2 seconds to open pop-up 
option list 

Double-tap : Tap twice quickly with your finger to zoom in or out while viewing 
photos. 

Use the touch screen 

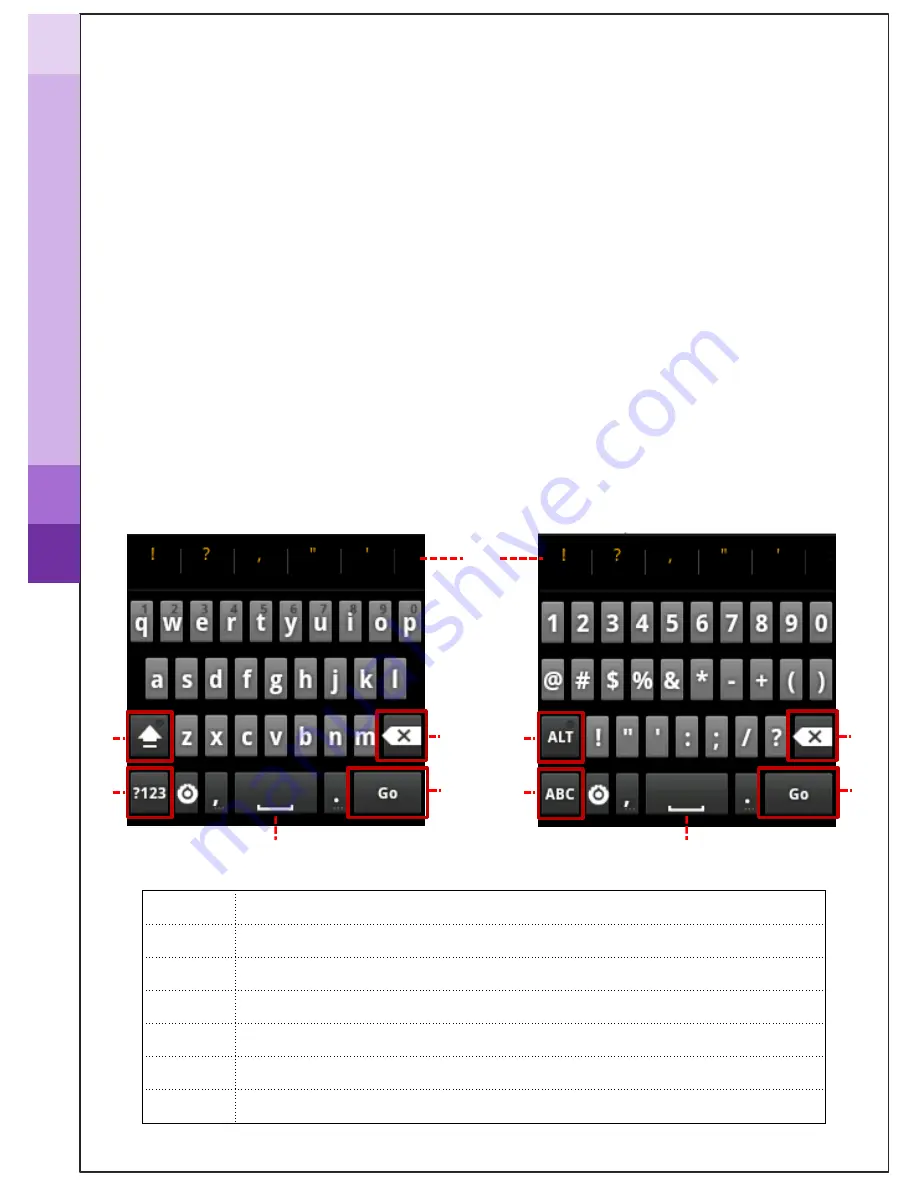
Enter text 

Enter text by selecting characters on the virtual keypads 

① 

③ 


No. 

Function 

① 

 Shortcuts for frequent use 

② 

 Capitals lock key   

③ 

 Switch between ABC and Number(symbol) mode 

④ 

 Space 

⑤ 

 Delete 

⑥ 

 Start new line 

④ 


④ 

③ 


H

ow 
to 

us

Summary of Contents for Aramo Smart NavigatorII-100

Page 1: ...ASNII 100 User s Manual Aramo Smart Navigator SKIN DIAGNOSIS SYSEM A ramo S mart N avigator II 100 ...

Page 2: ...on against harmful interference in a residential installation This equipment generates uses and can radiate radio frequency energy and if not installed and used in accordance with the instructions may cause harmful interference to radio communications However there is no guarantee that interference will not occur in a particular installation If this equipment does cause harmful interference to rad...

Page 3: ...to operate System setting Wireless network setting 3 How to diagnosis Full mode View mode 4 How to set 5 Additional information Standard Features Troubleshooting Guide FAQ CAUTION UPON INSTALL USE A ramo S mart N avigator II 100 ...

Page 4: ...and strip Number Function Number Function Moisture Elasticity sensor SD memory card slot LED light Lens On Off Touch screen No function Go to Setup Volume on MP3 Capture button Volume on MP3 Go to Back Capture button External Adaptor connection Battery cover Cradle Leather case How to use Touch pen ...

Page 5: ...charger By Cradle Charge the unit after connecting the cable Plug the charger into the cradle and connect the device to the cradle Available to check the charging status on system main page Note Available to re charge the spare bat tery on back side of cradle Battery front side How to use ...

Page 6: ...ight to move to items on lists Tap and hold Tap an item and hold it for more than 2 seconds to open pop up option list Double tap Tap twice quickly with your finger to zoom in or out while viewing photos Use the touch screen Enter text Enter text by selecting characters on the virtual keypads No Function Shortcuts for frequent use Capitals lock key Switch between ABC and Number symbol mode Space D...

Page 7: ...pturing page OK Go back to previous page Use the image taken for diagnosis Analyze the image 3D Image Go back to previous page on skin image Change the lighting mode OK Cancel Analysis 3D USE Mode Touch the or fling the screen to go to next page Tap the screen to focus Note How to use ...

Page 8: ...album Add alarm MP3 Internet System setting Turn on off System main page How to operate_ Turn on off Go back to system main page Go to setup page On Off button Press and hold for 3 seconds Sleep mode on off Press the button Tap in red box Turning on Turning off ...

Page 9: ... to set the system Adjust the Brightness to display the application more effectively How to operate_ System setting Tap in red box Check the mark The setting have to be a ctivated to download ap plication Application setting ...

Page 10: ...Deactivate Changed the keyboard language Select the language you want to use Language setting Keyboard language How to operate_ System setting Tap in red box How to set the system ...

Page 11: ... How to set the system Language setting How to change the System language Select the language you want to use How to change the keyboard language Drag left or right to choose the language Press and hold the space bar to show the language selection ...

Page 12: ... Time setting How to set date Enter the current date How to set time zone time Select user s time zone or city name Enter the current time How to operate_ System setting Tap in red box How to set the system ...

Page 13: ...Tap setup On System main page Find and connect the available Wi Fi Check the Wi Fi mark Wi Fi connection How to operate_ System setting Tap in red box How to set the system ...

Page 14: ...the name of host device Select the host device Activate the Bluetooth function on host device for the diagnosis system to search and pair with host device Example image Scan for host device Accept the paring request sent from diagnosis system Password 0 number On host device Check the pairing status Check the Bluetooth mark How to operate_ System setting Tap in red box How to set the system ...

Page 15: ... Bluetooth Pairing Enter the device name what you want How to change the name of diagnosis system How to operate_ System setting Tap in red box How to set the system ...

Page 16: ...easurement page before starting diagnosis Green activate status Gray deactivate status Measurement Select what you want to diagnose Show the diagnosed result by number on the capture page Green activate Analyze Gray deactivate Do not analyze How to operate_ setting Tap in red box Drag ...

Page 17: ...easurement page before starting diagnosis Green activate status Gray deactivate status Measurement Select what you want to diagnose Show the diagnosed result by number on the capture page Green activate Analyze Gray deactivate Do not analyze How to operate_ setting Tap in red box Drag ...

Page 18: ...ion of application Set Wireless connection Wi Fi or Bluetooth Register the sender s email account Selected status Unselected status Email Enter the ID ex abcd1234 Enter the Domain ex gmail com Enter the Password ex aaaa1234 Tap in red box How to operate_ setting ...

Page 19: ... Full mode Note Gray deactivate status Black activate status Enter age group and gender of customer Start diagnosis Hydration Elasticity Note Do NOT move during the measurement Please rescan To measure again by taping How to diagnose_ Full mode Tap in red box ...

Page 20: ...e below sebum tape pink area onto the U or T zone of your face for 3 seconds T ZONE Sebum T U zone Tap in red box How to diagnose_ Full mode How to hold the sebum paper How to put the sebum paper on T zone How to put the sebum paper on U zone ...

Page 21: ...zone Tap Tap to go back to Sebum U T page Analysis Tap each image to magnify Touch the or fling the screen to go to next page Tap the screen to focus Take the image without any white blank Note Tap in red box How to diagnose_ Full mode X O ...

Page 22: ...Diagnosis Process Full mode Tap Analysis Pore Tap 3D image 3D Touch the or fling the screen to go to next page Tap the screen to focus Note Tap in red box Drag How to diagnose_ Full mode ...

Page 23: ...e Tap Analysis Melanin Tap Touch the or fling the screen to go to next page Tap the screen to focus Note Sensitivity Analysis Wrinkle Tap Analysis Choose the area by moving the white box Tap in red box How to diagnose_ Full mode ...

Page 24: ...Diagnosis Process Full mode Tap 3D Wrinkle Tap Touch the or fling the screen to go to next page Tap the screen to focus Note Acne Analysis Tap in red box 3D image How to diagnose_ Full mode ...

Page 25: ...Diagnosis Process Full mode Analysis result Note Product recommendation to be updated Tap in red box How to diagnose_ Full mode ...

Page 26: ...Diagnosis Process Full mode Enter the customer s email address Send Bluetooth to be updated Note Turn to USB storage Recognized as a Removabl e disk on PC Tap in red box How to diagnose_ Full mode ...

Page 27: ...age Tap to change the lighting mode PL mode for Melanin Tap to change the lighting mode Mode Mode Tap in red box Choose the area by moving the white box 3D image Touch the or fling the screen to go to next page Tap the screen to focus Note How to diagnose_ View mode ...

Page 28: ...nosis Process View mode UV mode for Acne UV UV UV Touch the or fling the screen to go to next page Tap the screen to focus Note Tap in red box Tap to change the lighting mode Mode How to diagnose_ View mode ...

Page 29: ...How to update the application Check the Wi Fi connection before updating Note Drag down How to set the ASNII 100 Tap in red box ...

Page 30: ...How to remove the application On System main page Find Smartnavi application How to set the ASNII 100 Tap in red box ...

Page 31: ...o re install the application after removing On System main page Enter the address below and download the application www aramhuvis com data asn2 smartnavi apk Drag down How to set the ASNII 100 Tap in red box ...

Page 32: ... Wi Fi Wireless 802 11b g n Wi Fi Direct Avail Bluetooth BT ver3 0 HS Audio AC97 Codec WM1800 SPEAKER Max 1 0 W Internal Speaker USB USB 2 0 HOST DEVICE Battery Li ion 1150mAh Adaptor AC Adaptor DC 5V 2000mA Key Pad Power 4 direction navi Key Left Right Microphone Internal MIC Storage Micro SD ver2 0 2GB Weight 127g with battery Dimension mm 57 W x 116 H x 18 D SW Bootloader u boot 1 3 2 OS Androi...

Page 33: ...he manual The battery using time will be shorten if you put the charged battery in a low or high t emperature The battery using time vary in service type using environment using period of the batt ery The battery is consumed without using the device and the battery using time will be s horten if you use additional functions of the device The device turns on but the diagnosis doesn t work Check the...

Page 34: ... device The password of pairing is 0 number The touchscreen doesn t react to my finger commands Before using for the first time remove the protective plastic film Use the stylus pen provided from supplier The screen was turned off The device has a power save function that turns the screen OFF after 1 minute Press the on off button to turn on the screen I can see the black screen only during measur...

Page 35: ...roduct defect If service is requested due to the reasons except for defect service fee may be charged Defect resulting from the mistreatment by the user Defect resulting from the lack of caution leakage or shock or unauthorized repair or remodeling Defect due to natural disasters such as fire earthquake or flood Model Serial No Date of Purchase Customer Name Place of Purchase Contact Information C...

Page 36: ...tion Do not drop the product or give it a strong shock or vibration 7 If the product does not work properly If a problem occurs while using the product unidentified noise smell or smoke stop using it and turn the power off and contact the seller 8 Dirt on Lens Make sure that keep camera lenses clean and away from pollution If it polluted by finger print or external dirt cleanse it with cotton stic...

Page 37: ...yucksan Technopia 434 6 Sangdaewon dong Jungwon gu Seongnam city Gyeonggi do KOREA 462 716 TEL 82 31 732 6320 FAX 82 31 732 6330 E MAILinfo aramhuvis com WEBSITEwww aramhuvis com A ramo S mart N avigator II 100 ...

Reviews: