background image

DEFRA Stove Installation and User Guide

2

Installation

2.1

Hearths and Recesses

The stove should be installed on a surface with adequate load bearing

capacity. If the existing construction does not meet this prerequisite,

suitable measures (e.g. load distributing plate) should be taken to achieve

it. Please pay particular attention when examining existing building work

for suitability to meet the following requirements.

When installing an inset stove, hearths should have a sufficiently flat

surface to allow a good seal to the stove body to be created during its

installation. Stonework, uneven bricks etc., may need further work to

ensure that this can be achieved. Any voids behind an inset stove should

be filled with vermiculite or similar.

The stove should be installed on a non-combustible surface not less

then 125mm thick (conforming to Building Regulations unless otherwise

specified) of suitable load bearing capacity and heat resistance. Allowances

should be made for the expansion and contraction of any materials which

are fitted up to and near the appliance.

Dimensions of the constructional hearth for all stoves should project at

least 500mm forward of the front of the appliance and 150mm at the sides.

The surface of the hearth should be free of combustible materials. The

superimposed hearth for all installations should project at least 225mm

forward from the front of the appliance and 150mm either side of the

edge of the appliance.

In most buildings with solid concrete or stone floors, the requirement will

be met by the floor itself, but mark the hearth to ensure floor coverings

are kept well away or use different levels to mark the hearth perimeter.

Please be aware that hot air can cause staining above the fire in a similar

fashion to walls above radiators. To help prevent this and cracking we

recommend that any plaster above the fire should be fitted with reinforcing

expanding mesh for at least 220mm above, and the full width of the fire.

You should also use a suitably heat resistant plaster which should be

BK575 Rev02

2

Summary of Contents for DEFRA

Page 1: ...DEFRA Stove Installation and User Guide DEFRA Stove Installation and User Guide March 2015 BS EN 13240 2001 A2 2004 CE BK575 Rev02 ...

Page 2: ...it should provide a lifetime of heating satisfaction Should you have any questions about your stove which are not covered by this manual please contact the Arada retailer in your area call our technical support department on 44 0 1297 35998 or visit our website www aradastoves com which offers a wealth of information on how to care for and get the best from your stove Please ensure that you read t...

Page 3: ... Commissioning the stove 10 5 Before using your stove 11 5 1 Warning Fume Smoke emissions 13 5 1 1 Refuelling on to a low fire bed 13 6 Advice on fuel types 14 6 1 Wood 14 6 2 Clean burning of wood 14 7 Air controls 15 8 Lighting your stove 17 8 1 Ignition Sequence Lighting from cold 17 8 2 Re fuelling Normal use after the ignition sequence 17 9 Further information for all stove owners 18 9 1 Door...

Page 4: ...2 Convected heat 21 11 Ongoing care for your Arada stove 21 11 1 Adjusting the door hinges 22 11 2 Liners firebricks 22 11 3 Throat plate 23 11 4 Fire door seal 23 11 5 Cracked glass 23 12 Further resources reading 23 13 Guarantee 25 13 1 Guarantee 25 13 2 Terms and Conditions 25 13 3 General 27 BK575 Rev02 ...

Page 5: ... to a government approved competent persons scheme such as operated by HETAS If in doubt contact HETAS Limited telephone 01684 278170 or visit www hetas co uk A fireguard conforming to BS 8423 2002 should be used in the presence of children or elderly people Do not use aerosol sprays or any other flammable materials near the appliance when in use Arada Ltd will not be responsible for any consequen...

Page 6: ...and heat resistance Allowances should be made for the expansion and contraction of any materials which are fitted up to and near the appliance Dimensions of the constructional hearth for all stoves should project at least 500mm forward of the front of the appliance and 150mm at the sides The surface of the hearth should be free of combustible materials The superimposed hearth for all installations...

Page 7: ...flues 2 3 Air for Combustion All stoves require ventilation to burn safely and correctly There are a number of requirements that need to be met when installing a stove for example allowing for the permeability of the house air permeability is the general seepage of air into the house via air vents doors and windows etc There must always be a permanent means of providing air for combustion into the...

Page 8: ...ace recess The fitting of an extractor fan in the same room as the stove or an adjacent room is not permitted A spillage test will be required to determine how any extractor fans may affect the required size of ventilation requirements For more detailed guidelines on required ventilation sizes please refer to the HETAS Guide which can be found on the HETAS website If you plan to use an external ai...

Page 9: ...ssembly is secured in place with four M5 bolts supplied Tighten bolts diagonally and evenly to ensure full compression of the gasket but do not over tighten Place appliance on the hearth and make sure that it is level and does not rock Connect the chimney ensuring all joints are sealed with fire cement Note The flue pipe must be fitted inside the outlet spigot Failure to do so could result in the ...

Page 10: ...ate must be installed before the liners can be fitted and the liners removed before the throat plate can be removed To remove fitting the liners Open the fire door Remove the wood burning tray Remove the lower side liners carefully allowing the upper side liners to slide down to the landing plate 2 6 Fitting the throat plate This must be carried out with the wood burning tray and side liners remov...

Page 11: ...l hold the bottom edge into the correct position Figure 4 Throat plate support and secondary air pipe 2 7 Assembling the grate bars In a multi fuel stove the grate comprises of a series of cast iron grate bars seated on a pair of combs All bars in the grate are identical In stoves with a riddling grate system the bars should be seated with every other bar rotated 180 degrees so the ends marked H a...

Page 12: ...ve must be connected to a suitable and efficient flue so that products of combustion fumes from the stove are expelled to the outside air Please remember that chimney draught is dependent on four main factors Flue gas temperature Flue height Flue size Flue terminal To ensure a good up draught it is important that the flue gases are kept warm and that the flue size suits the stove The termination o...

Page 13: ...ons Suitable types of chimney include the following Masonry Chimney Built with clay or concrete liners or a chimney block system meeting Building Regulations These types of chimneys should be installed in accordance with the Building Regulations and BS EN 15287 1 2007 Factory Made Insulated Chimney Complying with BS 4543 Part 2 often called Class 1 prefabricated metal chimney These types of chimne...

Page 14: ...be as straight as possible Horizontal runs should be avoided except where the rear outlet of the appliance is used in which case the horizontal section should not exceed 150mm in length If necessary a combination of 45 and 90 bends can be used as long as the sum of their angles is not greater then 180 in total i e four 45 bends or two 45 and a 90 bend If the stove appears to be working hard but pr...

Page 15: ... must be between 1m to 3m from the appliance and approximately 150mm below the ceiling level A fireguard conforming to BS 8423 2002 should be used in the presence of children or infirm people A notice plate should be provided containing information on the performance characteristics of the hearth fireplace flue or chimney Explain the following to the customer How to operate the riddling mechanism ...

Page 16: ...y and efficiently A Carbon Monoxide detector is correctly installed in the same room as the appliance Ensure that you have read and understood these instructions before lighting the fire Our YouTube channel www youtube com user aradastoves features a collection of videos designed to help you get the best from your Arada stove Always wear suitable protective fire gloves when refuelling your stove s...

Page 17: ...p using the appliance if you smell fumes or see smoke escaping If fume emission does persist the following immediate actions should be taken Open doors and windows to ventilate room Let the fire die or extinguish and safely dispose of fuel from the appliance Check for flue or chimney blockage and clean if required Seek expert advice from your HETAS registered installer Do not attempt to re light t...

Page 18: ...re than 100mm 4 inches diameter If when burning wood you see signs of sticky tar inside the appliance or chimney your wood is green or too wet and requires further seasoning An electronic moisture meter can be obtained in order to determine the moisture content of your wood fuel Paper will burn successfully Burn dry paper only or chimney damage will occur Wet wood must not be used as this will gre...

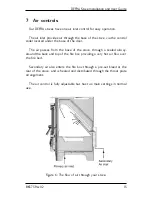
Page 19: ...air passes from the base of the stove through a sealed airway around the back and top of the fire box providing a very hot air flow over the fire bed Secondary air also enters the fire box through a pre set bleed at the rear of the stove and is heated and distributed through the throat plate arrangement The air control is fully adjustable but has two main settings in normal use Figure 6 The flow o...

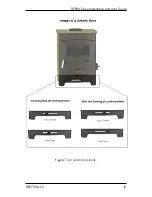
Page 20: ...DEFRA Stove Installation and User Guide Figure 7 Air control positions BK575 Rev02 16 ...

Page 21: ...rs the Ignition Sequence is complete and re fuelling for normal use can commence The purpose of these ignition instructions lighting from cold is to ensure that both the stove and chimney are heated to full running temperature as quickly as possible so avoid smoke emissions during subsequent re fuelling 8 2 Re fuelling Normal use after the ignition sequence When the stove requires re fuelling i e ...

Page 22: ...appliance It will give off fumes which are non toxic but certain persons may find they have an unpleasant or irritant effect Ensure that the surrounding area is well ventilated during this time 9 Further information for all stove owners 9 1 Door glass The door glass should remain clear during normal burning However under certain conditions such as burning at a low rate using damp wood or overnight...

Page 23: ...ed with a water repelling corrosion inhibitor for the summer months during periods of prolonged non use If possible store the throat plate outside of the stove Check all moveable components at regular intervals to ensure they are moving freely Allow air movement through the stove by opening the airwash and primary air inlet control s to about half way open or leave the door ajar This will allow a ...

Page 24: ...ed to build up to touch the underside of the grate bars as this will greatly reduce the life span of the grate To remove ash use the supplied operating tool Open the door of the stove pausing briefly when ajar so as to allow the fire to adjust to the increased air supply Put the fork end of the operating tool into the slots of the ash pan and remove from the ash pit chamber Empty the ash into a su...

Page 25: ...earth etc which heat the surrounding air 10 2 Convected heat Air immediately adjacent to the stove is heated as a result of contact with its hot surfaces This air then rises being replaced by cooler air which is then heated and rises again This creates a circuit or flow of air referred to as a convection current which helps to distribute heat around the room in which the stove has been installed 1...

Page 26: ... for the misalignment and then re fit the door and check to ensure it now sits square to the body if not repeat the above steps If the fire door needs to be raised please follow the instructions below When the appliance is cold open the fire door so that it is at right angles to the front of the stove and lift the fire door up off the hinges Drop one washer on the top and bottom hinge pins Fit the...

Page 27: ... glass It is not recommended to operate the stove with cracked glass this can lead to over firing due to air leaking into the firebox and it may fail completely leading to personal injury or a fire You should discontinue use of your stove until it has been repaired You can source replacement glass kits from your stove dealer or online at www aradastoves com 12 Further resources reading Once again ...

Page 28: ...w hetas co uk Solid Fuel Association www solidfuel co uk Document J Building Regulations Combustion Appliances www planningportal gov uk The National Association of Chimney Sweeps NACS www nacs org uk Arada Technical Support 01297 35998 technical aradastoves com Arada Stoves Support Site www aradastoves com support BK575 Rev02 24 ...

Page 29: ...er casing and items fixed immovably to the casing The following guarantee periods shall apply in respect of the following Arada stoves Non boiler Aarrow and Villager stoves come with a lifetime guarantee Non boiler Hamlet stoves come with a ten year guarantee Stratford and Villager boiler stoves come with a five year guarantee Hamlet boiler stoves have a three year guarantee Arada s range of AX st...

Page 30: ...ons Stoves not installed by a suitably qualified person or not installed in accordance with the manufacturer s installation instructions will not be covered by this guarantee 6 Any claims under this guarantee shall not be valid where the installation of the stove does not conform to all required building regulations and other legislation in force at the time of purchase and where flue draw reading...

Page 31: ... be sourced through an approved dealer or directly from Arada online at www aradastovesandspares com 12 The guarantee is not valid where any repairs or modifications have been made to the stove which have been carried out by anyone other than Arada or its authorised representatives or approved dealers 13 All guarantee periods commence on the date of purchase and are non transferable and solely for...

Page 32: ...RA Stove Installation and User Guide Manual last updated March 2015 Arada Ltd 2015 T 44 0 1297 35700 info aradastoves com Arada Ltd Weycroft Avenue Axminster Devon EX13 5HU www aradastoves com BK575 Rev02 ...

Reviews: