6
www.
AQUASURE
USA
.com
818 N Mountain Ave #203c, Upland, CA 91786 | 800.661.0680 | [email protected]
IV. Quick Connect / Compression Fitting Installation Instruction
Note:
This systems is equipped with quick connect fittings. These user-friendly fittings provide
superior performance and leak-free seal if installed correctly.
2.
Quick Connect Tubing Removal
•
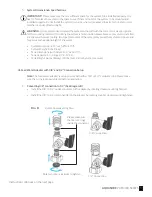
Release the Tubing (See Diagram B-4)
- Relieve pressure from the tubing and
fitting. Push the collet flange against the
fitting body while pulling the tubing away
from the fitting to release it.
IMPORTANT!
Should a leak occur at a fitting, the cause is generally defectively cut tubing. To fix a leak,
relieve pressure, release tubing, cut o at least 1/4” from the end (square cut), reattach the tubing and
confirm the connection is leak free. Each time a new connection is made, it is advisable to cut off 1/4”
from the end of the tubing using these fittings.
1.
Quick Connect Tubing Installation
•
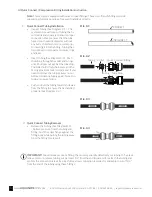
Inspect Tubing (See Diagram C-1) - The
system comes with pre-cut tubing that is
cut cleanly and squarely to ensure proper
connection. Please ensure that the tube
has a smooth outside diameter without
any burrs, chamfers or score marks prior
to inserting it into the fitting. Tubing that
has not been cut properly can cause drips
and leaks
•
Insert Tubing (See Diagram C-2) - Push
the tubing through the collet and o-rings
until it bottoms out against the tube stop.
The collet holds the tube in place and the
O-ring provides a leak resistant seal. If you
need to remove the tubing always re-cut
before connecting tubing again. Scores on
tubing can cause failure.
•
Push and pull the tubing toward and away
from the fitting to ensure that is installed
properly. (See Diagram C-3)
CORRECT
INCORRECT
Tubing
Quick Connect Fitting
O-Ring
Collet
Tube Stop
Dia. C-1
Dia. C-2
Dia. C-3
Dia. C-4


