14
www.
AQUASURE
USA
.com
818 N Mountain Ave #203c, Upland, CA 91786 | 800.661.0680 | [email protected]
STEP 5.
Mounting or Placement of the System
WARNING!
If mounting the system is not an option, please make sure system is installed in a space
with secure footing. Improper placement of the system may cause the system to tip over and break due
to the added weight of the water.
1.
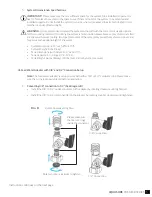
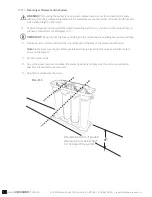
Position the system on the wall at the desired mounting location 3 - 4 inches from the cabinet floor to
the base of the system. (See Diagram H-1)
IMPORTANT!
Be careful not to kink any of tubing on the system as kinked tubing can rupture and leak.
2.
Using a pencil or marker and mark the mounting hole on the back of the bracket onto the wall.
Note:
Please make sure the bracket mount is leveled using a level tool to ensure evenly distributed
stress on the bracket.
3.
Set the system aside.
4.
Screw the two screws into the wall at the marked position and make sure there is some protrusion
space for the bracket to seat securely.
5.
Mount the system onto the screw.
We recommend 4” of ground
clearance from cabinet floor
to the base of the system
4”
Dia. H-1
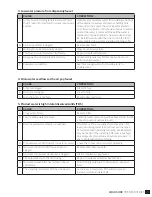
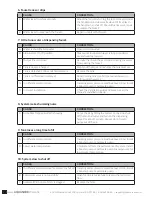
Summary of Contents for AS-PR100E
Page 1: ...PREMIER SERIES DRINKING WATER SYSTEM OWNER S MANUAL FOR MODEL NO AS PR50S AS PR75A AS PR100P ...
Page 2: ......
Page 11: ...9 AQUASURE PREMIER SERIES ...
Page 23: ...21 AQUASURE PREMIER SERIES ...
Page 30: ......
Page 31: ......


