4
☎
US (866) 877-6637 |
☎
CAN (866) 766-3426 | aquascapeinc.com
Installation
SETUP
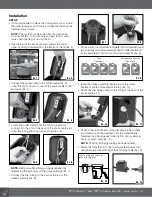
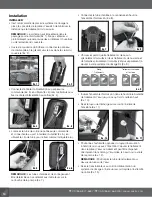
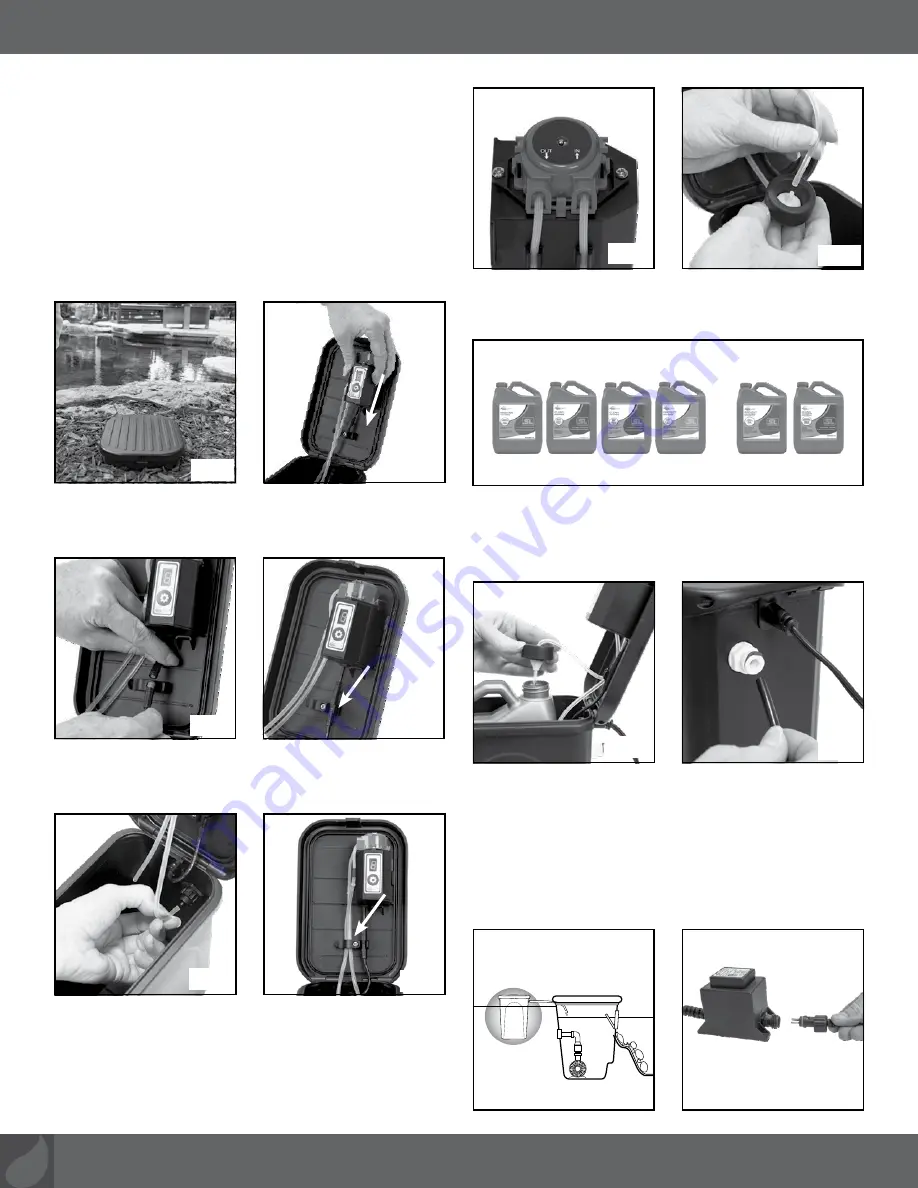
• It is recommended to place the dosing system as close to
the water feature as possible to minimize the distance the
treatment must travel.
NOTE:
The system can be buried into the landscape
to conceal it (Ex. 1). Do not bury so deep that it causes
issues with opening or closing the lid.
• Open the lid of the enclosure and connect the control
panel by sliding downward into the tracks on the lid (Ex. 2).
• Connect the power cable to the control panel (Ex. 3),
using the clip as shown to secure the power cable to the
enclosure (Ex. 4).
• Locate the outlet tubing from the control panel and
connect it to the port at the back of the enclosure (Ex. 5),
using the tubing clip to secure as shown (Ex. 6).
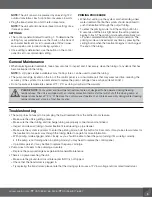
NOTE:
Inlet and outlet tubing can be determined by
referencing the indicators on the pump cartridge (Ex. 7).
• Connect the inlet tubing to the barb at the top of the
intake assembly (Ex. 8).
• Choose from four specially formulated pond treatment and
two specially formulated waterfall and fountain treatments
(sold separately) to add to your Dosing System SL (Ex. 9).
• Insert the intake assembly into the top of the water
treatment bottle until sealed at the top (Ex. 10).
• Attach the discharge tubing to the fitting at the back of the
enclosure (Ex. 11).
• Position the opposite end of the discharge tubing where
you intend to add the treatment into the water feature.
Treatment can be dispensed directly into pond, skimmer,
basin, or pump vault (Ex. 12).
NOTE:
Position discharge tubing above water level.
• Attach the transformer to the dosing system power cord
using the quick-connect fitting at the end of the cable (Ex. 13).
Ex. 2
Ex. 1
Ex. 4
Ex. 3
Ex. 7
Ex. 8
Ex. 10
Ex. 11
Ex. 13
Ex. 12
Directly into pond, skimmer,
basin or pump vault
Pond
Treatments
Waterfall and Fountain
Treatments
Ex. 9
Ex. 6
Ex. 5


