Cleaning and Changing the Filter Bags
Your Cleaner is equipped with a highly efficient Filter Bag (8100, 8101, 8200 or 8201) the Dual-Body Cleaner has two Bags. The
Fine Filter (small pore Bag - 8100 or 8101) collects fine particles of dirt and debris including algae and bacteria. Much of this de-
bris cannot be seen and may give the appearance that the Filter Bags are clean when in reality, they are not.
IMPORTANT NOTE: Most problems of poor performance are a result of dirty Filter Bags. If the Filter Bags become
clogged, the operation of the Cleaner will become sluggish and its vacuuming ability will be reduced. Although the Fine
Filter Bags may not appear dirty, they are capable of filtering out particulates 20 times smaller than what is visible to the
naked eye (i.e algae, bacteria etc.)
We recommend cleaning the Filter Bags whenever the Cleaner is removed from the water. Dirty bags left out of the pool
will dry out and become more difficult to clean. Should you use your Cleaner primarily to vacuum large debris like
leaves, we suggest using our Mesh Filter Bag (8200 or 8201).
MAINTENANCE AND ADJUSTMENT
Your Cleaner is virtually maintenance free. Since it is an robotic pool cleaner, it has very few moving parts to wear out. Here are
a few suggestions which will allow your Cleaner to perform at its optimum.
WARNING! Before any maintenance or adjustment to the unit is performed, the pool cleaner must be disconnected from the Power
Supply and the Power Supply must be unplugged from the electrical outlet to prevent damage to the Cleaner and possible personal injury!
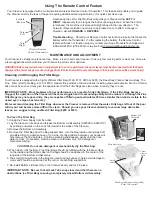
Your Cleaner is equipped with a multi-directional wireless Remote Control Transmitter. This feature will enable you to guide
the Cleaner directly to areas of the pool requiring additional cleaning attention or for quick spot clean ups.
Depressing the Left or Right buttons will guide your Cleaner either
LEFT
or
RIGHT
respectively for as long as the button is being pressed. When the button
is released, the machine will proceed straight ahead in the new direction. The
Forward / Reverse Button need only to be pressed once to effect a change in
direction, either
FORWARD
or
REVERSE
.
Troubleshooting
- Should your Remote Control not function properly, first check the
battery within the Transmitter. If, after replacing the battery, the Remote Control
feature still does not function properly, contact your Aqua Products Tech Support at:
888-AQUATECH (278-2832) or via e-mail at [email protected]
Using The Remote Control Feature
Forward
/Reverse
Turn
Left
Turn
Right
Wireless Remote
Control Transmitter
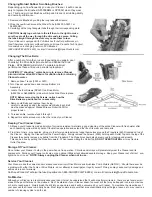
To Clean The Filter Bag:
1. Unplug the Power Supply from the outlet.
2. Lay the Cleaner on its back and release the Bottom Lid Assembly (A9200X or A9201XC)
by pushIng outwards on the Lock Tab (towards the sides of the Cleaner).
3. Remove the Bottom Lid Assembly.
4. Remove the Filter Bag from the Bag support bars, turn the Bag inside out and wash off
all visible dirt with a garden hose or in a sink. Gentle agitation between your hands will
help remove the fine particles. Continue cleaning and squeeze gently until the rinse
water is clear. If necessary, machine wash in cold water only. No detergent or
mechanical drying.
CAUTION: Do not use detergent or mechanically dry the filter bag.
5. When clean, refit the Bag. Fine Filter Bags should be refitted with the felt-like surface
on the inside and the Small Label on the bag should be positioned in the center of the
long side of the Bottom Lid Assembly.
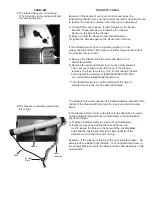
6. The small grommet holes in the Bag are used to allow bypass to help avoid damage to
motor and should be positioned at the corner of each Bag support bar.
7. Re-install Bottom Lid Assembly in the Cleaner’s body and lock in place.
IMPORTANT NOTE: Be sure that all Lock Tabs snap closed and that there are no
obstructions (i.e Filter Bag) ensuring a completely closed Bottom Lid Assembly.
Fig.2
Lock Tabs
Filter Bag Open
Filter Bag and Bottom Lid Assembly
Ready To Re-install
Bottom Lid
Assembly
Small
Label
Corner
Gromet
Hole


