


Cousteau/ SEA First Stage Service & Repair Manual
9
© 2000 Aqua Lung America, Inc.
tighten the spring retainer to a torque measurement of 20 (
±
2)
foot-lbs.
10. Check to ensure that the spring pad is positioned over the
center of the diaphragm, and place the main spring(29) over
the spring pad inside the spring retainer. Then lay the
washer(30) on top of the spring.
11. Mate the adjustment screw(31) over the spring and washer,
and turn it clockwise to engage the threads of the spring
retainer. Apply a 8mm hex key to turn the adjustment screw
to its appropriate preliminary setting, depending on whether it
will assembled in the standard configuration, or with the “D”
environmental protection kit.
a.
Standard Spring Retainer – Turn the adjustment screw clock-
wise until it is exactly flush with the top of the spring retainer
(see Fig. 5a).
b.
“D” Environmental Spring Retainer – Turn the adjustment
screw clockwise until it is exactly flush with the internal
shoulder, above the female threads (see Fig. 5b).
When the adjustment screw has been set at its preliminary
adjustment, loosen the vise to remove the first stage.
NOTE: Do not proceed further with the assembly of the “D”
environmental protection kit at this time. Instructions for final
assembly follow the section titled, Final Adjustment & Testing
Procedures.
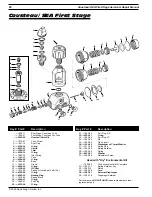
12. While holding the high pressure seat(13) by its stem, insert
the pin(24) into the center opening. Hold the first stage above
the pin with the high pressure side facing down, and carefully
align the end of the pin with the opening of the crown inside
(see Fig. 6a). Gently guide the pin and seat into the first stage
body so that the pin passes through the crown and into the
bottom of the pin support, which can be sighted through one
of the low pressure ports (see Fig. 6b). When the pin is
securely seated between the pin support and high pressure
seat, turn the fist stage over and stand it on a padded surface
with the high pressure side facing up.
CAUTION: Be careful to avoid damaging the polished
sealing surface of the crown when installing the pin and high
pressure seat. Excessive force or carelessness may other-
wise scratch or nick the crown, and require it to be replaced.
13. Insert the backup ring(16) into the high pressure spring
block(17), and gently tamp it into place with a non-metallic
probe so that it is seated evenly and flat inside. Then, gener-
ously lubricate and install the O-ring(15) into the spring
block, directly over the backup ring.
Fig. 6b
Fig. 5b
Fig. 5a
Fig. 6a


