background image

DeFLAtioN methoDS

Throughout the course of a dive, it may be necessary to release air from the Atlantis using one of the two 

methods described in the following instructions. Each method uses a valve that is in a different location. 

The method you choose at any time may depend on whether you are making your initial descent feet-first, 

head-first or maintaining neutral buoyancy underwater.  Always remember to utilize the valve that is at the 

highest point on the bladder (closest to the surface), depending on your position in the water.

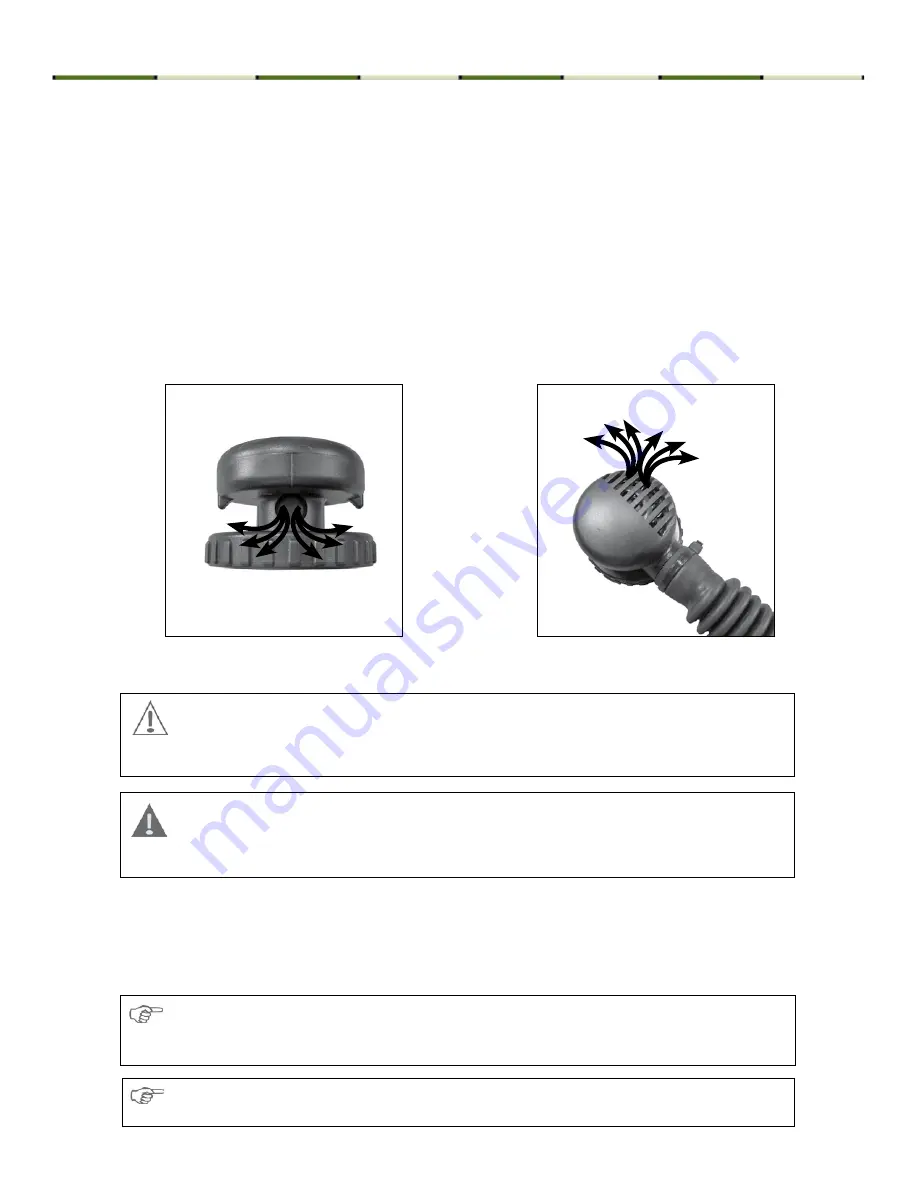
Deflation via Rapid Exhaust Valve (REV) (Primary Method)

Inside the inflator’s spiral hose is a steel cable that attaches the inflator to the dual valve at the top of the airway 

assembly. You can vent air from the Atlantis by firmly pulling straight down on the inflator. Once resistance is 

felt, a pull of only .25 in (7mm) is required. The Rapid Exhaust Valve (REV) provides an effective and convenient 

way to vent air from the BC while in either an upright or face down swimming position 

(Fig. 11)

. It also functions 

as an Over Pressure Relief Valve (OPRV) that will open automatically to relieve excessive air pressure. This 

feature is very critical for preventing stress or damage to the BC bladder 

(Fig. 12)

.

Fig. 12

Fig. 11

Deflation via Oral Inflator (Secondary Method)

To deflate the Atlantis using the oral inflator, lift the inflator body to its highest possible position (above the 

head). Press the oral inflator button 

(Figs. 9 & 10 Step. B, previous page) 

to start venting air. This method 

is most effective on the surface when starting the initial descent. 

CAUTION:  The  proper  function  of  the  Over  Pressure  Relief  Valve  (OPRV)  is  vital  to 

prevent damage to the BC bladder.  Unauthorized service or tampering may render this 

valve inoperable and could cause the bladder to leak or burst. This type of damage is 

not repairable and is not covered under warranty.

WArNiNg:


Most training agencies recommend that you descend in an upright, feet-first 

position, in order to maintain a slower and more controlled descent. this is especially 

true if you experience difficulty equalizing your ears or if you are descending in low 

visibility conditions.

NOTE: Depressing the oral inflator while the jacket is empty may cause water to enter the 

air bladder.

NOTE: To deflate the Atlantis using the oral inflator (secondary deflation method), the oral 

inflator must be untied from the oral inflator cord (military oral inflator only). The oral inflator 

cannot be raised above the head while tied to the oral inflator cord.

14   

Atlantis Technical Manual

Summary of Contents for 762989

Page 1: ...ATLANTIS Military Buoyancy Compensator TECHNICAL MANUAL ...

Page 2: ...NDER P N 762950 ATLANTIS BC W O CYLINDER P N 762960 You can contact a Technical Advisor via e mail at rbedard aqualung com Trademark Notice Aqua Lung is a registered trademark of Aqua Lung America Inc Warnings Cautions and Notes Pay special attention to information provided in warnings cautions and notes that is accompanied by these symbols A WARNING indicates a procedure or situation that if not ...

Page 3: ...flator 13 Inflation via the Powerline Inflator 13 Inflation via the Auxiliary Air Cylinders 13 DEFLATION METHODS 14 Deflation via Rapid Exhaust Valve REV Primary Method 14 Deflation via Oral Inflator Secondary Method 14 DONNING ADJUSTMENT PROCEDURES 15 Donning 15 Adjusting strap length 15 PRE DIVE INSPECTION CHECKLIST 16 POST DIVE INSPECTION CHECKLIST 17 CYLINDER VALVE CONNECTOR MAINTENANCE PROCED...

Page 4: ...NS 27 TABLE 3 RECOMMENDED CLEANERS AND LUBRICANTS 27 PROCEDURE A CLEANING AND LUBRICATING 28 EXPLODED PARTS DIAGRAMS 29 ATLANTIS COMPONENTS 32 OVERHAUL PARTS KITS 33 TECHNICAL DATA 34 ATLANTIS RECOMMENDED SPARE PARTS LIST 35 ATLANTIS ACCESSORIES 35 ANNUAL SERVICE AND INSPECTION RECORD 37 MAINTENANCE NOTES 38 WARRANTY INFORMATION 39 4 Atlantis Technical Manual ...

Page 5: ...ica 004 13 20 Feb 13 Updated Cylinder Valve Maintenance Procedures Aqua Lung America 005 13 20 Feb 13 Added Final Assembly Testing Aqua Lung America 006 13 20 Feb 13 Added Expiration date note to Weld On 4784 Aqua Lung America 007 13 20 Feb 13 Updated Powerline Exploded Parts Diagram Aqua Lung America 008 13 20 Feb 13 Updated Atlantis Components Aqua Lung America 009 13 20 Feb 13 Added Overhaul Pa...

Page 6: ...e manual open beside you for reference while performing each procedure Do not rely on memory 2 All service and repair should be carried out in a work area specifically set up and equipped for the task Adequate lighting cleanliness and easy access to all required tools are essential for an efficient repair facility 3 As the valve inflator is disassembled reusable components should be segregated and...

Page 7: ...hroughout the manual MP is Medium Pressure HP is High Pressure LP is Low Pressure 5 Numbers in parentheses reference the key numbers on the exploded parts schematics For example in the statement remove the o ring 16 from the valve body the number 16 is the key number to the o ring NOTE Before performing any disassembly refer to the exploded parts drawing which references all mandatory replacement ...

Page 8: ... ascent rate if neutral buoyancy cannot be reestablished WARNING Your jacket is not a lift bag DO NOT rely on it to bring heavy objects to the surface Doing so may permanently damage the jacket and could result in serious injury or death If you have any questions regarding your Buoyancy Compensator or these instructions contact Aqua Lung at 760 597 5000 WARNING Although this manual provides some b...

Page 9: ...t with compressed breathing air The air cylinders come equipped with a standard connection for use on the jacket The distribution of the buoyancy chambers provides excellent safety performance either during buoyant ascent vertical stability or at the surface natural support position with head and shoulders out of the water The bladder is constructed of heavy duty urethane coated 1000 denier black ...

Page 10: ...dded to the Atlantis by opening the cylinder valves Fig 3 Required for closed circuit and semi closed circuit diving To fill the cylinder you will need an optional fill adapter Aqua Lung part number 101215 Fig 4 Filling the Auxiliary Air Cylinders P N 101314Z P N 101271Z Fig 3 Fig 4 10 Atlantis Technical Manual ...

Page 11: ... valve are completely dry especially in the area surrounding the valve outlet Examine the cylinder markings to verify that it is rated for a fill pressure of 3000 psi 206 BAR 2 Using a calibrated pressure gauge check the supply cylinder is filled to 3000 psi 206 BAR It is very important to ensure that the auxiliary air cylinder is filled to its total capacity but not overfilled WARNING DO NOT atte...

Page 12: ...the threaded valve outlet with the cylinder valve connector Turn the connector nut counter clockwise and thread the cylinder valve connector onto the valve outlet until finger tight Fig 8 8 Close the valve of the supply cylinder and then the valve of the auxiliary air cylinder Slowly loosen the bleed valve by turning it counter clockwise to relieve the high pressure air trapped in the adapter 9 Lo...

Page 13: ...connected To connect the LP inflator hose grip the grooved sleeve C with your thumb and forefinger and slide the sleeve back Place the hose fitting over the quick disconnect QD fitting D and push inward while releasing the sleeve Check to ensure the hose is securely attached To inflate your BC with medium pressure air MP depress the power inflate button E Do not hold the inflator button depressed ...

Page 14: ...ical for preventing stress or damage to the BC bladder Fig 12 Fig 12 Fig 11 Deflation via Oral Inflator Secondary Method To deflate the Atlantis using the oral inflator lift the inflator body to its highest possible position above the head Press the oral inflator button Figs 9 10 Step B previous page to start venting air This method is most effective on the surface when starting the initial descen...

Page 15: ...male buckle on the opposite side lobe Fig 14 Adjusting strap length 1 The length of the straps may be adjusted by holding the strap and moving the 3 bar slide C After adjusting the position of the 3 bar slide readjust the strap through the quick release buckle Ensure any excess webbing is secured back thorough the 3 bar slide 2 Once the straps are readjusted don the Atlantis to make sure the adjus...

Page 16: ...essive force will damage the airway ______ 4 Install 2 fully charged 3000 PSI 206 BAR air cylinders to the Atlantis ______ 5 Orally inflate the Atlantis until the bladder is completely full Slightly open the valve on the air cylinder to over pressurize the Atlantis until the OPRV opens to relieve excess pressure Close the cylinder valve Verify the OPRV reseats and keeps the bladder fully inflated ...

Page 17: ... Number_________ Initials ______ 1 Remove the oral inflator assembly from the Atlantis by unscrewing the collar at the base of the dual valve Thoroughly rinse the inflator assembly inside and out with fresh water Hang oral inflator assembly dual valve end down utilizing the oral inflator cord to allow complete drainage and drying ______ 2 Direct fresh water into the REV opening to rinse the interi...

Page 18: ...10 1 Open cylinder valve counter clockwise and ensure cylinder 17 is fully depressurized Place cylinder in cylinder vise jaws pn 100398 secure in cylinder vise and remove the cylinder valve from the cylinder by turning valve body 12 counter clockwise with a 1 1 16 inch 27mm crowfoot pn FC38A and flex wrench pn 9 44363 When done remove cylinder from cylinder vise 2 Remove the o ring 16 from the val...

Page 19: ...n 944333 Discard safety plug Remove the safety disc red 13b and gasket 13c from the port in the valve body Discard safety disk and gasket This Concludes Disassembly of the Cylinder Valve Before starting assembly perform parts cleaning and lubrication in accordance with Procedure A Cleaning and Lubricating in the back of the manual 6 Holding the valve body assembly in a vise use a 22mm socket pn 76...

Page 20: ...ean and free of any dust corrosion or blemishes Before dressing each o ring with Christo Lube check to ensure it is clean supple and free of any blemish WARNING Use only genuine Aqua Lung parts sub assemblies and components whenever assembling any Aqua Lung product DO NOT attempt to substitute an Aqua Lung part with another manufacturer s regardless of any similarity in shape size or appearance Do...

Page 21: ...driver until it stops CAUTION Avoid cross threading the handwheel nut If resistance is felt while screwing the handwheel nut on to the spindle stop and start over 8 Lubricate the o ring 14 and install on the valve seat adapter 15 Apply one drop of Loctite 242 to the small threads of the valve seat adapter Secure the valve body assembly in a vise using a 5mm hex key adapter pn 8367A23 and inch poun...

Page 22: ...d the spiral hose remains seated flush against the base of the inflator housing 4 Manually inflate the BC until it is taut and fully inflated Press the deflation button and then pull down on the oral inflator to ensure a rapid and unobstructed exhaust using both methods of deflation Fully inflate the BC once again and listen closely for any signs of leakage Push to Deflate NOTE If leakage is not i...

Page 23: ...ion Carefully read all cautions on the label of the adhesive and avoid inhaling vapors CAUTION It is important to prevent any adhesion between the internal surfaces of the bladder caused by the entrance of adhesive through the hole or tear Position the bladder as needed to maintain a separation of the bladder at the point of the hole or tear 5 After twenty minutes have elapsed apply a third coat o...

Page 24: ...until no leakage is present or have the jacket repaired by a trained technician prior to use 3 Annually or as required Replace the external o ring on the cylinder valve connectors a Carefully remove the o ring on the cylinder valve connectors b Replace the o ring with a new lubricated o ring 4 Annually Pre mission Pre use Inspect the strap assembly a Inspect all straps for damage or chafing b Insp...

Page 25: ...ubrication of O rings 944333 1 2 socket Removal Installation of Burst Plug Assembly 13 8367A23 5mm Hex Key Adapter Removal Installation of Valve Seat Adapter 15 9 44363 Flex Wrench Removal of Parts 100398 Vise Insert Adapter For Existing Shop Vise Removal Installation of Cylinder Valve FC38A 1 1 16 inch Crowfoot Removal Installation of valve body 12 N A Screw Driver Large Blade Removal Installatio...

Page 26: ...RIPTION APPLICATION 769354 22 mm or 7 8 Socket Removal Installation of Valve Plug 4 N A 3 8 Drive Torque Wrench 0 125 in lb Range Tightening of Parts N A 3 8 Drive Torque Wrench 0 80 ft lb Range Tightening of Parts 26 Atlantis Technical Manual ...

Page 27: ...nc 50 Valley Road Berkeley Heights NJ 07922 White distilled vinegar Acid bath for reusable stainless steel and brass parts Household grade Non ionic Liquid dishwashing detergent diluted with warm water Degreaser for brass and stainless steel parts general cleaning solution for plastic and rubber Household grade CAUTION Do not use muriatic acid for the cleaning of any parts Even if strongly diluted...

Page 28: ...nly a soft nylon toothbrush to scrub away any deposits Rinse in fresh water and thoroughly blow dry using low pressure filtered air Cleaning Hoses 1 Hose fittings Ultrasonically clean with soapy water vinegar is OK on tough corrosion hose ends only 2 Run soapy water through hose if needed 3 Thoroughly rinse with fresh water hang with hose ends down 4 Blow out hose before installing Lubrication and...

Page 29: ...ed 3000 psi 206 bar 1 13c Gasket Zytel 101 206 x 032 1 14 820013P O ring 10 pk 1 15 101306Z Adapter Valve Seat Mag 1 16 820316P O ring 10 pk 1 17 079105 Cylinder 1 5 cf 3000 psi Black 1 Key P N Description Qty 18 820310P O ring 10 pk 1 19 101314Z Connector Cyl Valve Fixed Mag 1 Part numbers in BOLD ITALICS are standard overhaul replacement parts VALVE EXPLODED PARTS DIAGRAM Part numbers in BOLD IT...

Page 30: ...ve Assembly 1 22 15719 Clamp Black Plastic Tie 3 23 15149 Hose Spiral 11 5 in D V 1 24 104913 Clamp Strap Black 1 25 762979 Whistle Ball Type 1 26 15610 Pin Retaining S S 1 27 15635 Inflator Assembly Lower Oral 1 101270 Airway Complete Military Oral Inflator 22 23 24 25 26 27 22 22 20 21 30 Atlantis Technical Manual ...

Page 31: ...2 Clip Chevron Hose 1 26 15610 Pin Retaining S S 1 30 15029 Cover QD Powerline 1 31 15280 Lower Inflator Assy Powerline Char 1 769347 Airway Complete Powerline 20 21 22 22 28 29 32 33 30 31 34 35 POWERLINE INFLATOR EXPLODED PARTS DIAGRAM 26 32 820011P O ring 25 pk 1 33 44827 Low Pressure Hose 27 1 34 820043P O ring 1 35 778564 Valve Schrader 1 44827 MP Hose 27 31 ...

Page 32: ...er Mag 2 39 12238 D Ring 1 5 Bent Dull Tumbled S S 2 19 101314Z Connector Cyl Valve Fixed Mag 2 40 762953 Kit Strap Complete 1 5 Atlantis 1 40a 762956 Removable Chest Strap 1 0 Atlantis 1 40b 762957 Kit Waist Strap 1 5 Atlantis 1 40c 762958 Kit Back Strap 1 5 Atlantis 1 40d 762952 Crotch Strap Kit 1 5 Atlantis 1 41 15665 Cap Universal Connector 2 N A 8762900 Kit Upgrade Atlantis Vest to 1 5 Straps...

Page 33: ... Key PN Description Qty 5 820088 O ring 1 46 828009 Ring Backup 1 47 820010 O ring 1 49 101167 Washer 1 51 101165Z Seat Valve Non 02 Mag 1 53 487590 Burst Plug Assembly Non Mag 1 54 820013 O ring 1 56 820316 O ring 1 394099 Kit Maintenance Cylinder Valve Key PN Description Qty N A 42611 Bladder Repair Kit 1 33 ...

Page 34: ...specific locations Annual Maintenance The Atlantis is subject to annual maintenance All parts listed in the overhaul parts kits must be replaced annually even if they appear to be in good condition Features LIFT CAPACITY Fresh Water 33 lbs 14L CYLINDER CAPACITY 2 X 1 5 cu ft 43L CYLINDER WORKING PRESSURE 3000 PSI 206 BAR DUAL VALVE OPENING PRESSURE 2 5 3 5 PSI 17 24 BAR OVER PRESSURE RELIEF VALVE ...

Page 35: ...e 10 23 15149 Hose Spiral 11 5 D V 5 19 101314Z Connector Cyl Valve Fixed Mag 2 40 762953 Kit Strap Complete 1 5 Atlantis 1 21 42743 Dual Valve Assembly 2 27 15635 Inflator Assembly Lower Oral 2 37 101270 Airway Complete Military Oral Inflator 1 41 15665 Cap Universal Connector 2 ATLANTIS RECOMMENDED SPARE PARTS LIST ATLANTIS ACCESSORIES Key PN Description Qty 38 101271Z Valve Assy w 1 5 cu ft 43L...

Page 36: ... Latex 1 4 in Black 66 in 1 N A 104913 Clamp Strap Black 1 N A 18099 Lit Instruction Sheet Collar Atlantis 1 Key PN Description Qty 41 15665 Cap Universal Connector 2 N A 44825 Hose Low Pressure 25 in 1 N A 394038 Buckle Assembly Double Male 1 5 in 1 N A 394039 Buckle Assembly Double Male 25 mm 1 N A 42746 Airway Complete Powerline 1 N A 18343 Lit Instruction Sheet Atlantis OC 1 36 Atlantis Techni...

Page 37: ...ANNUAL SERVICE INSPECTION RECORD Serial Number _________________________ Purchase Date _________________________ Date Service Technician Name Number Technician Signature Stamp 37 ...

Page 38: ...Maintenance Notes 38 Atlantis Technical Manual ...

Page 39: ...LUSIONS OF LIABILITY SO THIS MAY NOT APPLY TO YOU Restrictions The following restrictions apply to this warranty This warranty extends to inflator parts and to the seams of the BC bladder Factory prescribed annual service by a trained technician is required This warranty does not extend to abrasion punctures or tears of the bladder or seam separation caused by chemical attack including prolonged e...

Page 40: ...ature P N 762989 REV 03 13 2013 Aqua Lung International 2340 Cousteau Court Vista CA 92081 Phone 760 597 5000 Fax 760 597 4900 www aqualung com militaryandprofessional ATLANTIS Military Buoyancy Compensator ...

Reviews: