background image


More


Security,


More


Convenience


www.apexis.com.cn


/


www.apexis.cc


Figure 10.2 


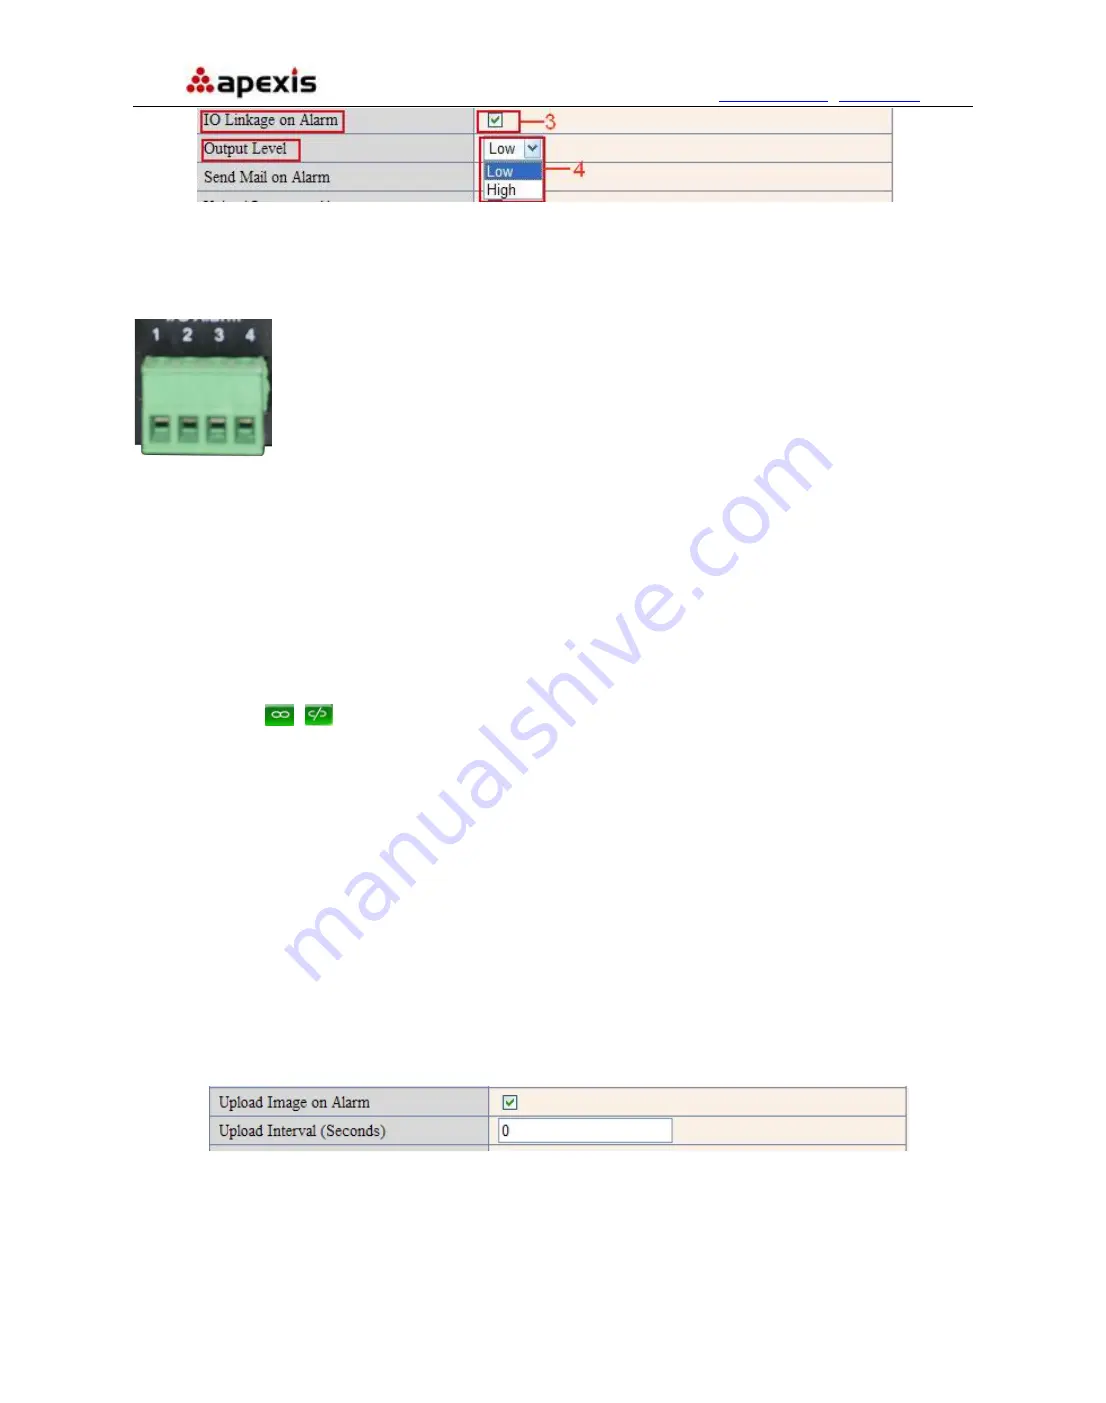
3.18.4 IO Pins for IO Alarm Linkage 


Figure 10.3


I/O PINS:  1  Output  2  Output  3  Alarm input  4  Input (GND) 


Input pins:

 The input pins can be used for 1-way external sensor input. For example, you may connect a 

Person Infrared Sensor (PIP) to it for motion detection. When external sensor triggered, IP CAMERA can be 
programmed to send an email with picture or control the internal relay output. 
If you link an external alarm device with Pin3 and Pin4, when select 

Alarm Input Armed 

(Figure 10.0), 

external alarm is enabled. 

Output pins

: The output pins can be enable IO linkage on alarm. 

You can also use

&

  to control IO output Switch ON/OFF (See Figure 4.4). 

NOTE

: All the pins work as switch only. 


3.19 Send Mail on Alarm 

Choose it, it will sent picture and mail inform to customer’s e-mail once alarmed. (Firstly you should finish the 
Mail Service Settings. Figure 9.1) 

NOTE

: It usually will send 6 snapshots by one email to your mailbox for each alarm triggered. Each alarm will 

last for 60 seconds. 
 

Upload Image on Alarm


Enable 

Upload Image on Alarm

 to set upload images to FTP once alarmed. 

Upload Interval

: Set the upload interval (Seconds). 

NOTE

: The total alarm time is 60 seconds. 


Figure 10.4 


Scheduler 
 

Here you can set the camera alarm during the time you set. Choose Scheduler and set the date & time range. 
(Figure 10.5) From Monday to Sunday, and every day divide into 24 hours, each hour divide into 4 quarters. 

 
Shenzhen Apexis Electronic Co., Ltd


                 Tel: +86-755-26509025              Fax: +86-755-26509229 

48

Summary of Contents for APM-J803-WS

Page 1: ...IP Wireless Wired Camera REMOTE PAN TILT ROTATE User Manual Black White...

Page 2: ...29 3 3 BASIC NETWORK SETTINGS 29 3 4 WIRELESS LAN SETTINGS 31 3 5 ADSL SETTINGS 33 3 6 UPNP SETTINGS 33 3 7 DDNS SERVICE SETTINGS 33 3 8 SYSTEM SETTINGS 37 3 9 ALIAS SETTINGS 38 3 10 DATE TIME SETTIN...

Page 3: ...by clicking the website through the network 1 1 Features Powerful high speed video protocol processor High sensitivity 1 4 CMOS sensor Picture total 300k pixels Support PT control Pan 320 Tilt 120 Op...

Page 4: ...sensor with fixed focus lens Default is 3 6mm 6mm optional 4 Network Indicator LED If there is network activity the LED will blink 5 Microphone Build in microphone 6 Speaker Build in speaker 7 Wirele...

Page 5: ...1 3 3 Bottom View Figure 1 3 Original Apexis IPCAM have some stickers at the bottom such as MAC address sticker QC sticker etc If your camera does not have these stickers it may be a clone one clone...

Page 6: ...the front of the camera will flash The indicator LED can be controlled by software Figure1 4 1 6 Software Installation Attention In order to make the installation correctly we suggest that turn off yo...

Page 7: ...ence www apexis com cn www apexis cc Figure1 6 Figure1 7 Figure1 8 After this done the icon IP Camera Tool will be displayed on desktop automatically Shenzhen Apexis Electronic Co Ltd Tel 86 755 26509...

Page 8: ...e installed in an indoor environment where the rain or snow could not pour it Do not touch the lens of the IP Camera at will The optimum focus range has been set before it is delivered out of the fact...

Page 9: ...wn in Figure 1 9 3 The IP Cameras installed within LAN do not share the same subnet with the monitoring PC A prompt as shown in result field prompt Subnet doesn t match double click to change Click th...

Page 10: ...times if there is no IP address showed on the IP Camera tool maybe it s blocked by firewall then add the MAC ID to the router and give it a fixed IP or add the MAC ID as a trusted site There are two M...

Page 11: ...IP of your router DNS Server IP address of IPS network provider You can also set it s the same as the Gateway NOTE You can find the Subnet Mask Gateway DNS Server from your router or check the local c...

Page 12: ...Refresh Camera List Refresh camera list manually 2 1 1 5 Flush Arp Buffer When cable network and wireless network of the device are fixed IP address There is a problem you may encounter is can search...

Page 13: ...assword the Sign In interface will pop up There are three models to login figure 2 7 Figure 2 7 1 Active Mode For IE Browser available in IE6 0 or above explorer 2 Server Push Mode available in Firefo...

Page 14: ...sign in Figure 2 8 The first time login the camera maybe get ActiveX prompt as the picture above please click the prompt and choose Run Add on refresh and login the camera again then will see live vi...

Page 15: ...e Especially Enable Download unsigned ActiveX controls Enable Initialize and script ActiveX controls not marked as safe Enable Run ActiveX controls and plu ins Figure 3 1 In addition you can also clic...

Page 16: ...oogle Browser and sign in uch as Play Stop Record tware does see live video please close your firewall or anti virus software and try again 2 4 For Safari Firefox Google Browser C Server Push Mode doe...

Page 17: ...t can work with our IP Camera Figure 3 4 2 6 ActiveX Mode For IE Browser Login the camera in ActiveX mode the main User Interface as below NOTE There are 3 levels of users Visitor Operator Administrat...

Page 18: ...want to view 4 9 channels you should set the Multi Device firstly See 3 1 Multi Device Settings Status of Channels There are 9 icons at the bottom of the UI which show the status of each channel of t...

Page 19: ...he OSD Color Can set the OSD text color as black yellow red white blue etc Add time stamp on record Click this there will be time OSD on record video files Figure 3 7 Rate and Resolution Rate Set vide...

Page 20: ...be saved to the folder you set Figure 10 8 Figure11 0 Click it to collect the sound around the camera if you plug a earphone or a speaker in the computer which you are using you will hear the sound a...

Page 21: ...udio Video Settings Figure 4 2 Audio buffer Click this icon it will show five numbers which means 1 2 3 4 5 seconds buffer of audio Reversal Click this icon to see the reversal image Click again will...

Page 22: ...re 4 4 Click this icon the camera will pan tilt and then stop at the center Normally it will rotate 1 circle Click this icon camera will move up you can click one by one or hold it to control the move...

Page 23: ...ing only Call Preset Position It supports 15 preset positions If operator wants to monitor an important area quickly and precisely just click Call Preset Position button it will pop up a dialog frame...

Page 24: ...ax 9 channels device at the same time 3 1 1 Set Multi Device in LAN In the Multi Device Settings page you can see all devices searched in LAN The 1st device is the default one You can add more cameras...

Page 25: ...enience www apexis com cn www apexis cc Figure 4 7 Click Live Video and then select to see four channels or click to see nine channels Figure 4 8 Shenzhen Apexis Electronic Co Ltd Tel 86 755 26509025...

Page 26: ...View 3 7 DDNS Service Settings And also these cameras work well with DDNS Login the first camera by DDNS domain name and port this camera will be as the host camera Figure 5 0 Click Multi Device sele...

Page 27: ...DDNS domain name and without http it s not the Lan IP address If you have several cameras you can use the same DDNS domain name just set different port number for each different camera Figure 5 1 Not...

Page 28: ...Firmware If you want to upgrade the camera please upgrade Device Firmware first then upgrade Web UI Click Browse and choose correct bin file then click Submit to do upgrading NOTE Before doing upgrad...

Page 29: ...5 5 3 1 5 Reboot Device Click Reboot the device will pop up a prompt select OK then the device will reboot Figure 5 6 3 2 Network Settings Click Network will pop up the prompt as below 3 3 Basic Netwo...

Page 30: ...5 7 If you don t know Subnet Mask Gateway DNS Server Please check the Local Area Connection Status of your computer it contains all these information steps as below 1 Control Panel Network Connection...

Page 31: ...1 Make sure the router is wireless router 2 Make sure the Wi Fi antenna installed 3 Make sure whether there is encryption of the WLAN of router if there is encryption keep the key 4 Login the camera c...

Page 32: ...More Security More Convenience www apexis com cn www apexis cc Figure 6 3 Figure 6 4 Figure 6 5 Shenzhen Apexis Electronic Co Ltd Tel 86 755 26509025 Fax 86 755 26509229 32...

Page 33: ...warding automatically It s helpful for using DDNS if your router support UPnP then you no need do port forwarding in router Figure 6 9 NOTE Here UPnP only for port forwarding now It has much relation...

Page 34: ...f you use third party DDNS please choose the server you use such as 3322 org or dyndns org as below Figure 7 2 Figure 7 3 You have to register an account firstly keep the user password host then input...

Page 35: ...to the IP of your camera correctly then the DDNS will work Because there are so many kinds of routers from all over the world so it s difficult to show a fix steps but there are some samples of diffe...

Page 36: ...uter 2 Choose Advanced select Virtual Servers 3 Input the port IP address Protocol then click save NOTE The public port private port should be the same as camera s port choose the protocol to be both...

Page 37: ...ure 7 9 3 8 System Settings Figure 8 0 3 8 1 Device Info You can find the information about Device ID Firmware Version Embedded Web UI Version Alias Alarm Status DDNS Status UPnP Status and MSN status...

Page 38: ...any new name for your camera here then click Submit Figure 8 2 3 10 Date Time Settings Set the date and time for your camera Choose the Clock Time zone of your country You can choose Sync with NTP Ser...

Page 39: ...Administrator Operator or Visitor the permission for them as below z Visitor In this mode you can only view Details 2 7 z Operator You can control the direction of IP Camera and set some parameter Det...

Page 40: ...eed of cruising rightward NOTE Value 0 means the fastest value 10 means the slowest In order to protect the camera s motor we recommend that setting the speed to value 5 3 13 Indicator Settings Figure...

Page 41: ...ch has a backup click Browse to load the bin file then Submit it Log Figure 8 9 Record User information including weekday date time user name visitor IP address etc MSN Settings NOTE Set the port forw...

Page 42: ...rd url after a few seconds you will get a reply for the remote access ip address for this ip camera 3 15 Other Settings Figure 9 0 Here you can configure some additional functions such as Motion Detec...

Page 43: ...ation SMTP User Input correct SMTP User here Some SMTP User is the sender s full email address such as test qq com some are without suffix only the username such as test SMTP Password Input correct SM...

Page 44: ...For example IPCAM s URL is http 121 213 109 69 1008 3 17 FTP Service Settings Set the FTP Service you can upload images to your FTP server when motion detection triggered Figure 9 3 Figure 9 4 FTP Ser...

Page 45: ...access the folder Please be sure the folder exists and your account is authorized 6 Error in PASV mode Please be sure the server support PASV mode 7 Error in PORT mode PASV mode should be selected if...

Page 46: ...tection triggered Figure 9 7 After enable motion detect armed if there is motion triggered the Alarm Status will turn to Motion Detect Alarm Figure 9 8 Figure 9 8 3 18 2 Motion Detect Sensibility You...

Page 47: ...to enable it Figure 10 0 There are two options for Trigger Level Figure 10 1 High When the external alarm device is close then the alarm triggered Low When the external alarm device is switching off t...

Page 48: ...ontrol IO output Switch ON OFF See Figure 4 4 NOTE All the pins work as switch only 3 19 Send Mail on Alarm Choose it it will sent picture and mail inform to customer s e mail once alarmed Firstly you...

Page 49: ...inking Figure 10 7 2 If you set Sound on Alarm plug an earphone or a speaker to the computer you use you can hear the beep sound when alarmed Figure10 6 3 If you set Record on Alarm the camera will re...

Page 50: ...it will start alarm record automatically the record file will be saved to the specified path here set Figure 11 0 NOTE If you couldn t set the path here in Windows 7 or Vista please do it as below Wi...

Page 51: ...s below Figure 11 2 NOTE Server Push Mode does not support ActiveX Play Stop Record Audio Talk Multi device settings Path settings functions are controlled by ActiveX so if you use Safari Firefox Goog...

Page 52: ...the camera you will see the main user interface as below Figure 11 3 NOTE Mobile phone Mode doesn t support ActiveX In mobile phone mode it only supports some easy functions such as Resolution Mode B...

Page 53: ...hem in the same subnet of your computer Figure 2 3 4 1 3 IP Address configuration Check whether IP address of the IP camera server shares the same subnet as your work station Click My Computer Control...

Page 54: ...ss of the camera manually 4 1 9 I can t find multi device settings and record icon Record and multi device function are controlled by activeX controller So if you use Safari Firefox Google chrome it i...

Page 55: ...se a switch for multiple IP Camera Servers rather than a HUB 4 1 15 How to register an account from DDNS web You can enter http www dyndns com and register an account more details please check the Qui...

Page 56: ...Base TX Ethernet Port Supported Protocol TCP IP DHCP SMTP HTTP DDNS UPNP PPPoE FTP DNS UDP GPRS Wireless LAN Support wireless network Wi Fi 802 11 b g WEP Encryption Disable 64 bit 128 bit WPA WPA2 En...

Page 57: ...irstly if they could not resolve your issue please contact our company This user manual is based on the latest version of our camera System Firmware 17 22 2 30 Web UI 20 8 1 88 If your cameras do not...

Reviews: