background image

In  the  

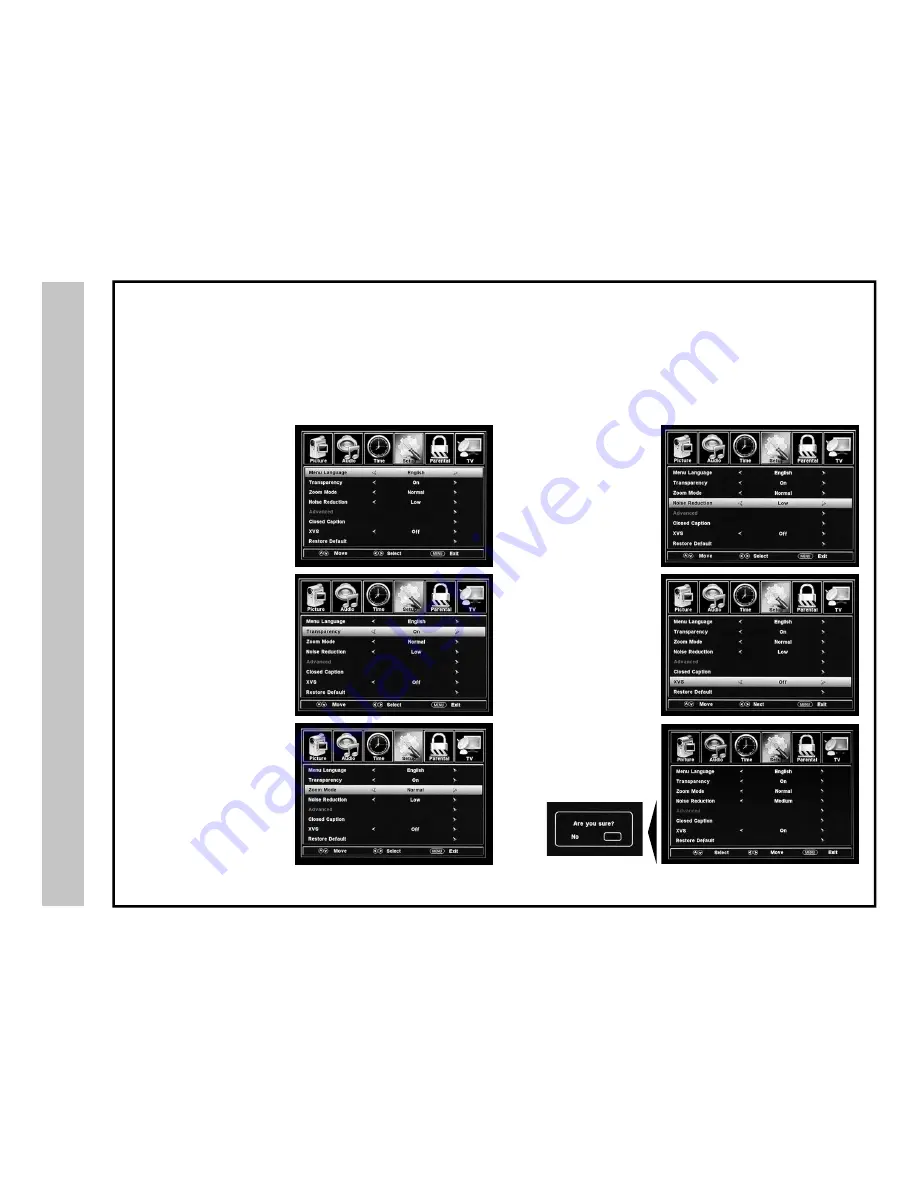
SETUP

  menu  you  may  change  the  initial  set  up  of  preferences  that  include  settings  for  language,  menu  display,  computer  monitoring,  

closed  captions,  enhancement  of  black  detail  in  the  picture  and  resetting  your  TV  back  to  its  factory  default  status.

How to Navigate: 

Press  the  

MENU

  button  on  the  remote  control.  Navigate  using  arrow  

W


X

  buttons  to  select  

SETUP

.  Gain  access  to  display  options  by  press-­

ing  the  down  

T

  arrow  button  to  highlight  

Menu  Language

  or  other  options,  then  press  


X

  arrow  button  on  your  remote  to  select.

‡+LJKOLJKW

Zoom  Mode

.  

Navigate  using  the  

W


X


arrow  buttons  to  select  the  
viewing  mode  displayed:  
Normal  >  Wide  >  Zoom  >  
Cinema.

(This  feature  is  also  available  on  the  

remote  control.  See  page  27)  

‡+LJKOLJKW

Restore  Default

.  

Press  the


X

  arrow  button  to  

automatically  set  all  adjust-­
ments  back  to  their  original  
settings.  

‡+LJKOLJKW

Transparency

.  

Navigate  using  the  

W


X

  ar-­

row  buttons  to  turn  Off


>


  On  

the  translucent  effect  of  the  
User  menu.  

‡2WKHUODQJXDJHVLQFOXGH

Spanish  and  French.  

‡+LJKOLJKW

XVS

.  

Navigate  using  the  

W


X

  ar-­

row  buttons  to  select:  
Off  >  On.  XVS  provides  
noticeable  black  detail  
enhancement  that  may  be  
preferred.

‡+LJKOLJKW

Noise  Reduction

.  

Navigate  using  the  

W


X

  ar-­

row  buttons  to  reduce  video  
noise:  Off  >  Low  >  Medium  >  
High  (Default  setting:  Low)

:KHQSURPSWHG6HOHFW³<HV´WRFRQ¿UP

NOTE:  Closed  Caption  and  Advanced  are  features  described  on  the  following  pages.  

Menu Adjustments

Setup  Settings

21

Summary of Contents for LD3288T

Page 1: ...012411 LD3288T USER S MANUAL 32 LCD TELEVISION ...

Page 2: ...ital device pursuant to Part 15 of the FCC Rules These limits are designed to provide reasonable protection against harmful interference in a residential installation This television generates uses and can radiate radio frequency energy and if not installed and used in accordance with the instructions may cause harmful interference to radio communications However there is no guarantee that interfe...

Page 3: ...Safety Instructions 2 ...

Page 4: ...Safety Instructions 3 ...

Page 5: ... TV Setup Initial Setup Wizard TV Channel Setup Channel Auto Scan Picture Settings Contrast Brightness Color Tint Sharpness Color Temperature Power Saving Mode 6SHFL FDWLRQV Troubleshooting Index Warranty Audio Settings Bass Treble Balance Surround Audio Language Date Time Settings Setup Settings Menu Language Transparency Zoom Mode Noise Reduction XVS Restore Default Closed Caption Settings Advan...

Page 6: ...s included to connect through your KRPH DPSOL HU UHFHLYHU WR SURYLGH D VSHFWDFXODU KRPH WKHDWHU VRXQG H SHULHQFH RXU QHZ WHOHYLVLRQ LV DQ 1 5 67 5 FHUWL HG GHYLFH ZKLFK PHHWV HQHUJ saving standards to reduce power consumption and the associated cost of use From the factory the default picture setting is currently set in the Power Saving mode We recommend that you read the user manual thoroughly be...

Page 7: ...o not plan to use the remote control handset for an extended period of time Do not mix bat teries of different age and or type Always discard used batteries safely Do not expose remote control to liquids direct sunlight or sources of excessive heat The IR receiver will not work properly if TV is in direct sunlight the remote control is pointed off axis or an object is in the IR path 3ODFH WZR EDWW...

Page 8: ...R PDNH VHOHFWLRQV 3UHVV 17 5 WR FRQ UP 15 Exit Press to exit a menu that is displayed 16 Return Press to return to the previous menu displayed 17 Sleep Press to activate the Sleep function to turn off the TV automatically 5 Min 10 Min 15 Min 30 Min 45 Min 60 Min 90 Min 120 Min 180 Min 240 Min OFF 18 Menu Press to display the Main menu 19 Zoom Select viewable display options Normal Wide Zoom Cinema...

Page 9: ...e VOL VOL buttons to adjust volume up or down 5 Power Press the POWER button to turn the LCD display ON OFF standby When the power is on a blue LED illuminates on the front panel The screen image will appear within a few seconds NOTE To turn OFF power completely switch the Master Power button located on the rear of the television When the Master Power switch is off neither the remote control or te...

Page 10: ...tion Make sure it is switched ON for regular TV viewing on a daily basis 2 AC Power Plug Insert power cord during initial setup 3 USB Port For service technician use only 4 HDMI Inputs 3 Connects to digital AV devices that feature 0 FRQQHFWLYLW 0 VXSSRUWV HQKDQFHG KLJK GH QLWLRQ YLGHR and two channel digital audio all from one cable Recommended for best performance 5 PC IN VGA Audio Input 3 5mm Co...

Page 11: ...eo or an HDMI installation shown Refer to your set top box user manual See pages 16 17 for TV setup and Channel Auto Scan Installation TV REAR PANEL F Connector F Connector Optional HDMI cable TV REAR PANEL It is strongly recommended that the installation of a high quality roof top antenna digital cable or satellite set top box be used LQ FRQMXQFWLRQ ZLWK RXU WHOHYLVLRQ IRU EHVW EURDGFDVW UHFHSWLR...

Page 12: ...W 0 From your external device connect an HDMI cable from the HDMI OUT PUT to the HDMI INPUT on the TV s rear panel RZ 7R 8VH Press the HDMI button on the remote control repeatedly if necessary or Press the INPUT button on the remote control Use TS arrow buttons to highlight the input to view HDMI 1 2 3 then press ENTER Connecting to an HD Set Top Box Game Console or Blu ray Player Using HDMI Digit...

Page 13: ...Compo nent 1 or Component 2 INPUT s on the TV s rear panel Connect white red audio cables for sound from the audio L R OUT PUT jacks on your external device to the Component 1 or Component 2 INPUT s on the TV s rear panel RZ WR 8VH Press the COMP button on the remote control repeatedly if necessary or Press the INPUT button on the TV remote control Use TS arrow but tons to highlight the input to v...

Page 14: ...Connect an optional S Video cable from the S Video OUTPUT jack on your external A V equipment to the S Video INPUT on the TV s rear panel Connect the white red audio cables for sound from the audio L R OUTPUT jacks on your external device to the AV1 L R INPUT on the TV s rear panel RZ WR 8VH 9 RU 6 9LGHR Press the AV button on the remote control repeatedly if necessary or Press the INPUT button on...

Page 15: ...dio output jack to the audio input on the TV s rear panel RZ WR 8VH Press the INPUT button on the remote control Use TS arrow but tons to highlight the input to view VGA then press ENTER NOTE If your PC uses a standard signal mode the screen will adjust automatically TV REAR PANEL Connecting a Personal Computer with VGA to your television Connection to a Personal Computer 14 Optional cables I NPUT...

Page 16: ... HU RU ROE 3UR Logic sound system when connected to your AV equipment Example Diagram illustrates the connection of audio cables from your external equipment to a stereo receiver instead of the audio L R jacks on the TV s rear panel NOTE When audio cables are connected to a stereo receiver DPSOL HU IRU D SDUWLFXODU LQSXW QR DXGLR VRXQG FDQ EH KHDUG IURP WKH TV s built in speakers RZ WR 8VH 9LGHR P...

Page 17: ...CABLE or AIR based on your an tenna connection Press the T arrow button to select Auto Scan and press ENTER when Cable is selected AUTO is recommended Otherwise press the X arrow button to select STD IRC HRC Auto Highlight Start to Scan and press ENTER Channel Auto Scan may take several minutes to complete Initial Setup Wizard After connecting your TV antenna or cable wire turn the television ON T...

Page 18: ...uto Scan may take several minutes to complete Select CABLE if you subscribe to a pay television service without the use of a set top box Connect cable wire to the televi sion see page 10 Press the W X arrow button to highlight CABLE 3UHVV WKH T arrow button to select AUTO SCAN Press ENTER and the cursor will move up and CABLE SYSTEM will be displayed next 3UHVV WKH X arrow button to select STD IRC...

Page 19: ...18 Note When adjustments are complete you may select another menu by pressing the Menu button The POWER SAVING mode adjusts the brightness of the TV in order to save energy and reduce power consumption 3UHVV GRZQ T arrow button to highlight Contrast Navigate using the W X arrow buttons to increase or decrease contrast intensity 3UHVV GRZQ T arrow button to highlight Brightness Navigate using the W...

Page 20: ...uency intensity 3UHVV GRZQ T arrow button to highlight Balance Navigate using the W X arrow buttons to adjust sound towards the left or right speaker 3UHVV GRZQ T arrow button to highlight Surround Navigate us ing the W X arrow buttons to turn surround sound effect from built in speakers ON or OFF 3UHVV GRZQ T arrow button to highlight SPDIF type Navigate using the W X arrow buttons to select betw...

Page 21: ...hlight Sleep Timer then press the X arrow button to select time to view before timer turns television off 5 Min 10 Min 15 Min 30 Min 45 Min 60 Min 90 Min 120 Min 180 Min 240 Min OFF 3UHVV GRZQ T arrow button to highlight Time Zone then press the X arrow button to select between EASTERN CENTRAL MOUN 7 1 3 6 3UHVV GRZQ T arrow button to highlight Daylight Savings Time Navigate using the W X arrow bu...

Page 22: ...wing mode displayed Normal Wide Zoom Cinema This feature is also available on the remote control See page 27 LJKOLJKW Restore Default Press the X arrow button to automatically set all adjust ments back to their original settings LJKOLJKW Transparency Navigate using the W X ar row buttons to turn Off On the translucent effect of the User menu 2WKHU ODQJXDJHV LQFOXGH Spanish and French LJKOLJKW XVS ...

Page 23: ...ghlight Closed Caption then press the X arrow button to highlight CC Mode KLOH 0RGH LV RQ press down T arrow button to highlight Basic Selection Navigate using the W X ar row buttons to select CC 1 4 Text 1 4 3UHVV GRZQ T arrow button to highlight Option Press the X arrow button to enter a menu with options to customize text fonts colors and opacities 3UHVV GRZQ T arrow but ton to highlight Advanc...

Page 24: ...vigate using arrow W X buttons to select SETUP Gain access to position adjustment options by pressing the down T arrow button to highlight Advanced then press X arrow button to select from the following options LJKOLJKW V Pos Navigate using the W X arrow but tons to adjust the position of images displayed up and down LJKOLJKW Clock Navigate using the W X arrow buttons to control the width of the i...

Page 25: ...tons to highlight TV MPAA menu LJKOLJKW 79 WKHQ SUHVV WKH X arrow button to enter the TV Ratings menu and select your preference TV Y Appropriate for all children TV Y7 Appropriate for all children over 7 TV G General Audience TV PG Parental Guidance Suggested TV 14 Parents Strongly Cautioned TV MA Mature Audience Only LJKOLJKW 03 WKHQ SUHVV the X arrow button repeat edly to select your movie rati...

Page 26: ...he X arrow button repeatedly to select your ratings preference shown on right side of illustration E Appropriate for everyone C Appropriate for all children C8 Appropriate for everyone 8 years old and up G General Audience PG Parental Guidance 14 Appropriate for Children over 14 years old 18 Mature Audience Only E Appropriate for everyone G General Audience 8 ans Appropriate for Children 8 years o...

Page 27: ...added LJKOLJKW 11 to name or rename a broadcast channel Navigate using the X arrow button to enter the screen menu to re label a channel Use the TS arrow buttons to spell out each letter number or character Use W X arrow buttons to ad vance to the next space NOTE The DTV SIGNAL is a measurement of signal strength for the current channel viewed The TV menu provides for the setup of your television ...

Page 28: ...rtain 4 3 content and may reduce visible black bars 6WUHWFKHV WKH LPDJH ERWK YHUWLFDOO DQG KRUL RQWDOO WR OO WKH screen when viewing widescreen content The Zoom effect will crop images somewhat KHQ YLHZLQJ FRQWHQW LQHPD PRGH ZLOO OO WKH HQWLUH screen eliminating visible side black bars It may also eliminate or reduce black bars on certain widescreen movies 1 NORMAL 2 WIDE 3 ZOOM 4 CINEMA 27 Press ...

Page 29: ...DO 9LHZLQJ QJOH GHJUHHV 0D LPXP RORUV PLOOLRQV 5HVSRQVH 7LPH PV Audio Power Dimension with Pedestal Installed Weight with Pedestal Input Connections LCD TV 31 5 Diagonal 16 9 480i 480p 720p 1080i 1080p 1 366 x 768 400 30 000 1 176 176 16 7M 8 ms 2 X 7W 20 8 lbs RPSRVLWH 9LGHR XGLR 6 9LGHR RPSRQHQW 9LGHR XGLR 5 0 5 63 RD LDO LJLWDO 2XWSXW 3 9 3 XGLR 1 ...

Page 30: ...KHFN ZKHWKHU WKH FKDQQHO ZDV GHOHWHG 6HH SDJH KHFN SDUHQWDO FRQWURO VHWWLQJV 6HH SDJHV 5HVWRUH GHIDXOW VHWWLQJV 6HH SDJH KHFN WKDW FRQQHFWHG DXGLR FDEOHV DUH FRPSOHWHO LQVHUWHG 9HULI RX KDYH VHOHFWHG WKH FRUUHFW DXGLR VRXUFH IURP RXU amplifier See page 15 0XWH IXQFWLRQ PD EH HQDEOHG SUHVV PXWH RQ WKH UHPRWH 7KH 7H W RSWLRQ LV HQDEOHG DQG QR WH W LV DYDLODEOH 3UHVV WKH EXWWRQ RQ WKH UHPRWH FRQWURO ...

Page 31: ... Modes for PC 14 E Exit 7 F Favorite Channels 7 26 G Guide 7 H HDMI Input 11 Home Theater 15 I IR Receiver 6 8 Input 7 8 11 14 L Languages 19 21 Last 7 LED light 8 M Master Power 8 9 Menu 7 8 16 26 MTS 7 19 Mute 7 Movie Ratings 24 25 Movie mode 18 N Normal Zoom 27 Noise Reduction 21 Number buttons 7 P Parental Control 24 25 Password 24 25 Pedestal stand removal 9 PC 9 14 23 PCM 15 Phase 23 Picture...

Page 32: ...s in materials or workmanship as limited above and does not extend to any other products or parts accessories that have been lost discarded damaged by misuse accident neglect acts of God such as lightning voltage surges in the home improper installation rendered illegible Warranty does not cover cosmetic damage How to Obtain Warranty Service If after following the operating instructions and review...

Reviews: