background image

E N

Prior to Operating the Camera


2

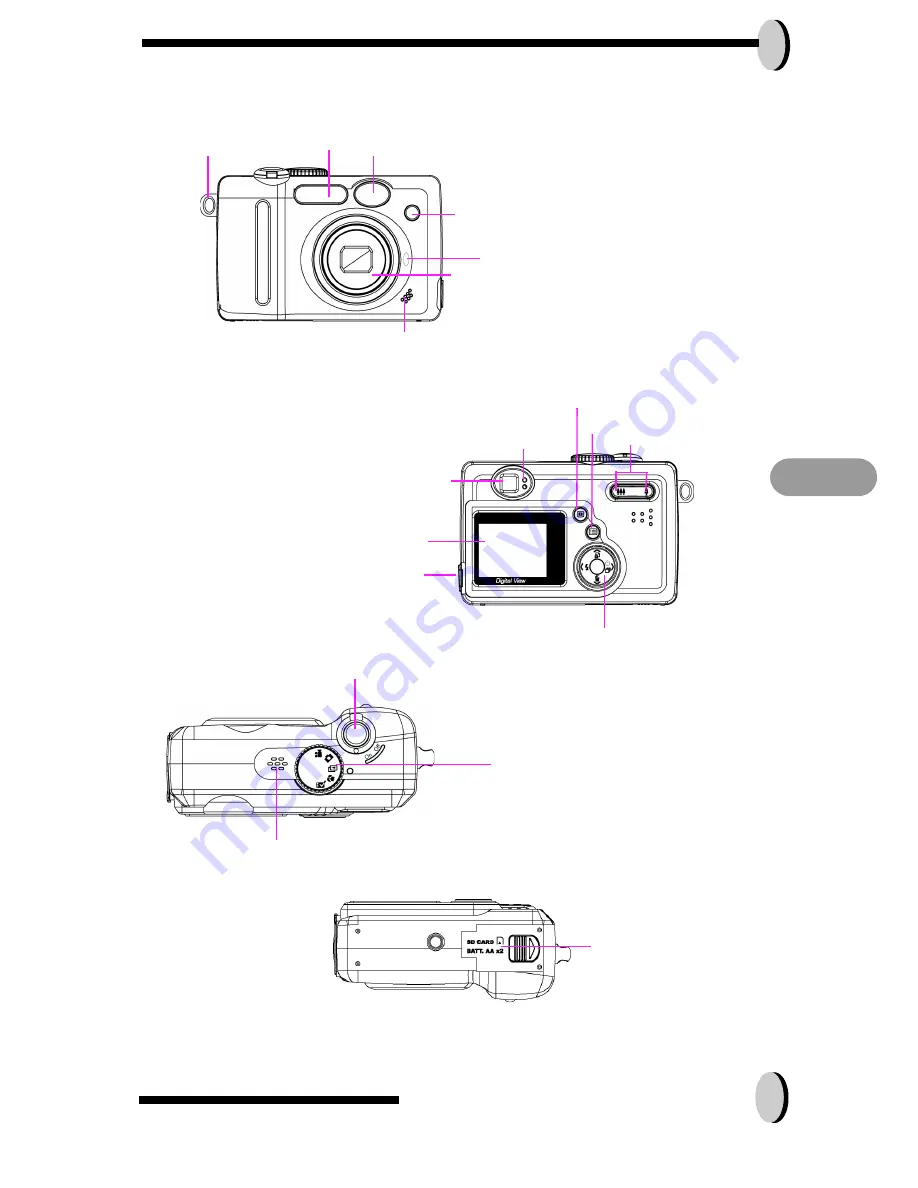
Identifying components                                  

Power/Flash LED 

Zoom Button

TFT LCD

DC-in & USB Connector

Strobe Viewfinder

.

Auto-Focus LED 

Zoom Lens

Handstrap Hook

Display Button

Five-way Switch

Viewfinder

Menu Selection

Mode Dial

Speaker

Power Switch

Battery & SD Card
Compartment

Microphone

Self timer LED

Summary of Contents for DSC-4500Z

Page 1: ...ise 12 x zoom 3 x optical plus 4 x digital The built in 16MB memory can store your images The stylish plastic case makes this camera light and portable Through a USB cable connection pictures can be easily transmitted from the camera to the PC Nine recorded images can be displayed on the high resoultion LCD Continuous shooting function is also available for users to take multiple frames of scenes ...

Page 2: ...nternal Memory and the SD Card 4 Basic Operating Procedure 5 Turning the Camera ON OFF 5 Basic Shooting 5 Auto Focus Function 6 Zooming In Out 6 Flash Setting 7 Playback 7 Five Main Camera Modes and Instructions 8 Video Mode 10 Capture Mode 11 Playback Mode 15 Macro Mode 17 Dsc Setup Mode 18 Making Connections 20 Installing software 20 Connecting through the mini USB 20 APPENDIX 22 Specifications ...

Page 3: ...owing these quick and simple instructions Unpacking the camera 1 Clear all items from the box It is highly recommended that the box and wrap pings are kept for future usage 2 Double check for the following items Pouch Camera Handstrap CD ROM Mini USB Cable Battery ...

Page 4: ...ts Power Flash LED Zoom Button TFT LCD DC in USB Connector Strobe Viewfinder Auto Focus LED Zoom Lens Handstrap Hook Display Button Five way Switch Viewfinder Menu Selection Mode Dial Speaker Power Switch Battery SD Card Compartment Microphone Self timer LED ...

Page 5: ...ance replace all installed batteries at the same time and keep battery away from heat 3 To abandon batteries please refer to index of battery manufacturer 4 Do not mix battery types or it may cause a fire or explosion Use only one battery type at one time 5 Batteries should be inserted in the battery compartment with the and sides facing correctly 6 While the camera indicates Low or Empty icon on ...

Page 6: ...ial to Playback Mode 2 Press the Menu button to enter Playback menu setting to select Erase and then Format 3 You will then be asked Format SD card on the LCD Display 4 Press the OK button to confirm and proceed with formatting 5 Push the Menu button to exit Playback menu setting As a result once you withdraw the SD Card from the camera the LCD dis play will show the following message for confirma...

Page 7: ...ack your pictures Turning the Camera ON OFF 1 Locate the power button on top of the camera 2 Turn the power switch to ON or OFF for turning on or off the camera The backside LED indicator will remain green while the power is turned ON Basic Shooting 1 Turn the mode dial to the capture mode 2 Look into the viewfinder LCD and try to align your subject in the crop mark 3 When you are set press the sh...

Page 8: ...ms users of the zoom sta tus while the zoom in or out button is pressed While the zoom button is pressed there would be 5 levels of optical zoom magnifications f0 f6 from W Wide to T Tele of zoom bar The zoom lens can automatically protrude and retract Then if you keep pressing the zoom button there are additional 8 levels of optical zoom magnification 0 5x each from T tele to 4x 4x Digital Zoom o...

Page 9: ...7 Flash Setting Please Refer to CAPTURE MODE page 11 Playback Please Refer back to PLAYBACK Mode page 15 ...

Page 10: ...these modes will be further described Here are the five main functions of this camera Camera Mode Function Setting Page Video Mode 1 Record Movies Page 10 Capture Mode 1 Resolution 2 Image Quality 3 Color Effect 4 White Balance 5 Scene 6 Metering 7 Sharpness 8 EV Adjust 9 ISO Page 11 Playback Mode 1 Erase Picture 2 Protect Picture 3 DPOF 4 Slide Show 5 Voice Memo Page 15 ...

Page 11: ...e 1 Date and Time 2 Auto Power Off 3 DPOF 4 Slide Show 5 Sound Effect 6 Languages 7 Restoring Page 18 NOTE 1 Press the display button once to delete the icons from the LCD display To turn the LCD display sim ply press the display button a second time To save your battery power it is best to not leave your dis play ON for a long period of time ...

Page 12: ... camera will start checking whether the memory is sufficient to record a movie If the memory is full a warning sign will display on the LCD and will automatically exit the movie recording state 3 If there are no warning messages with memory problems the camera will start recording itself To stop recording press the shutter button again 4 To set the self timer under the video mode press the right b...

Page 13: ...ore the image If it is full a warning Mem ory Full icon will display on the LCD 2 Once the picture is taken you can erase the image under instant review User can protect image when in playback mode 3 If you decide to erase this image press down An erase icon will appear on the LCD press OK to achieve this function Resolution Image Quality EV Icon Continuous Shot Self Timer Date Battery Status Rema...

Page 14: ...l be dis played on the LCD as well followed by a beep sound Shooting Continuously Setting Pictures can be shoot in successive orders 1 Keep pressing the right button twice until Shooting Continuously icon appears on the LCD Display 2 Keep pressing the shutter button to activate Shooting Continuously Then release the shutter after the three sequences have been taken Flash Off The Flash will not fir...

Page 15: ...ize of the pic ture The default size is 4 0 M but users will have the option of choosing VGA 1 3 M 2 0 M 4 0 M or 5 5 M Image Quality Users can select from the following quality Best Default Better Basic The quality of the picture The default is Best Color Effect User can select from the following color tones Normal Default Sepia Black and white It is the tone that will be applied in the pic ture ...

Page 16: ... 0 5 step increase This function allows users to control the exposure value to either lighten or darken images the camera is trying to focus The default is 0 Scene Users can select the fol lowing scene Auto Default Night Portrait Sport Landscape Night Portrait This pre defined set tings make it even more convient for users to take pic tures Users will not need to make any further adjustment to the...

Page 17: ... MB SD Card Storage Mode 2720 x 2040 5 5M 8 pictures 2304 x 1728 4 0M 10 pictures 1600 x 1200 2 0M 20 pictures 1280 x 960 1 3M 35 pictures 640 x 480 VGA 140 pictures Date Battery Status Remaining Number of Pictures Playback Mode The icon information can be removed by pressing the Thumbnail can be viewed after pressing the display button twice display button once Zoom Bar ...

Page 18: ...t Playback Mode Setup press the Menu button 3 While you are in the Playback Mode menu setting use the Five Way Switch to select Function Setting Selection Definition Protect Picture Users can select the fol lowing Protect all Uprotect current Unprotect all Protect current Protection setting for your pictures against accidental erasure Once you are set press OK to confirm Slide Show Users can selec...

Page 19: ...atible with the DPOF standard frame set set for one image reset all set for all Voice Memo You are allowed 20 sec onds to record voice memo Users can select from Record Erase Play 1 Select the picture you wish you add voice memo 2 Press menu button 3 Choose Voice Memo 4 Select record 4 Press the shutter to start or end recording Resolution Picture Quality EV Icon Continuous Shot Date Battery Statu...

Page 20: ... Reset date and time when change battery Auto Power Off Users can select the fol lowing minutes to Auto Power Off the camera 5 minute 3 minute 1 minute Never This setting automatically turns off the camera Prior to shutting off the LCD will shut itself auto matically DPOF Users can select the number of copies of images they want to print and whether turn the date and the no of files on or off in t...

Page 21: ...rom the following languages Deutsch English French Italian Japanese Korean Spanish Simplified Chinese Traditional Chinese There are a total of nine languages you can choose to navigate this camera Camera will keep your language set ting but users will need to reset when change bat tery Press the Up or Down button to select Press OK to confirm Restoring Reset back to default To revert the setting b...

Page 22: ...tallation 4 You will be able to use the application once it s installed Connecting through the mini USB This section will show you how to download images from camera to PC through mini USB cable While the station is connected through an USB port it will download pictures and video clips from the camera to the PC A Editing with ArcSoft 1 Turn the computer ON 2 Connect the camera and the computer wi...

Page 23: ...C Setup Mode under page 18 1 This camera allows users to move the images or movies from camera to PC by MSDC support 2 When the camera is connected to your PC there will be an external storage under My computer named 400_CAMERA 3 Simply click the folder named 1004MDSC you can find the images or movies you taken 4 Copy or remove these files to from camera to your PC You can start to edit the images...

Page 24: ...ession ratio 1 8 16MB SD card 5 5M 8 pictures 4 0M 10 pictures 2 0M 20 pictures 1 3M 35 pictures VGA 140 pictures Video mode display QVGA 15 fps Lens 3X Optical Zoom Lens F2 8 4 8 Focus Shooting dis tance Macro 15 50 cm Normal 50cm infinity Digital zoom 4x digital zoom View finder Virtual image viewfinder Flash mode Flash Off Auto Red Eye Reduction Flash Force On Night LCD monitor 1 6 TFT LCD 80 0...

Page 25: ...sh Japanese Traditional and Simplified Chi nese Korean Compatible Battery 2AA Alkaline Battery Level High Middle Low Empty AC Adapter optional 5 V 2A Dimension WxHxD 101 x 64 x 40 mm Weight 185 g without battery System requirements Windows Win98 WinME Win2000 WinXP Macintosh Mac 9 1 and above ...

Reviews: