background image

2

Saf

ety Instr

uctions

14. Lightning
For added protection for this product (receiver) during a lightning storm,
or when it is left unattended and unused for long periods of time, unplug
it from the wall outlet and disconnect the antenna or cable system. This
will prevent damage to the product due to lightning and power-line
surges.

15. Outdoor Antenna Grounding
If an outside antenna or cable system is connected to the product, be
sure the antenna or cable system is grounded so as to provide some
protection against voltage surges and built-up static charges. Article 810
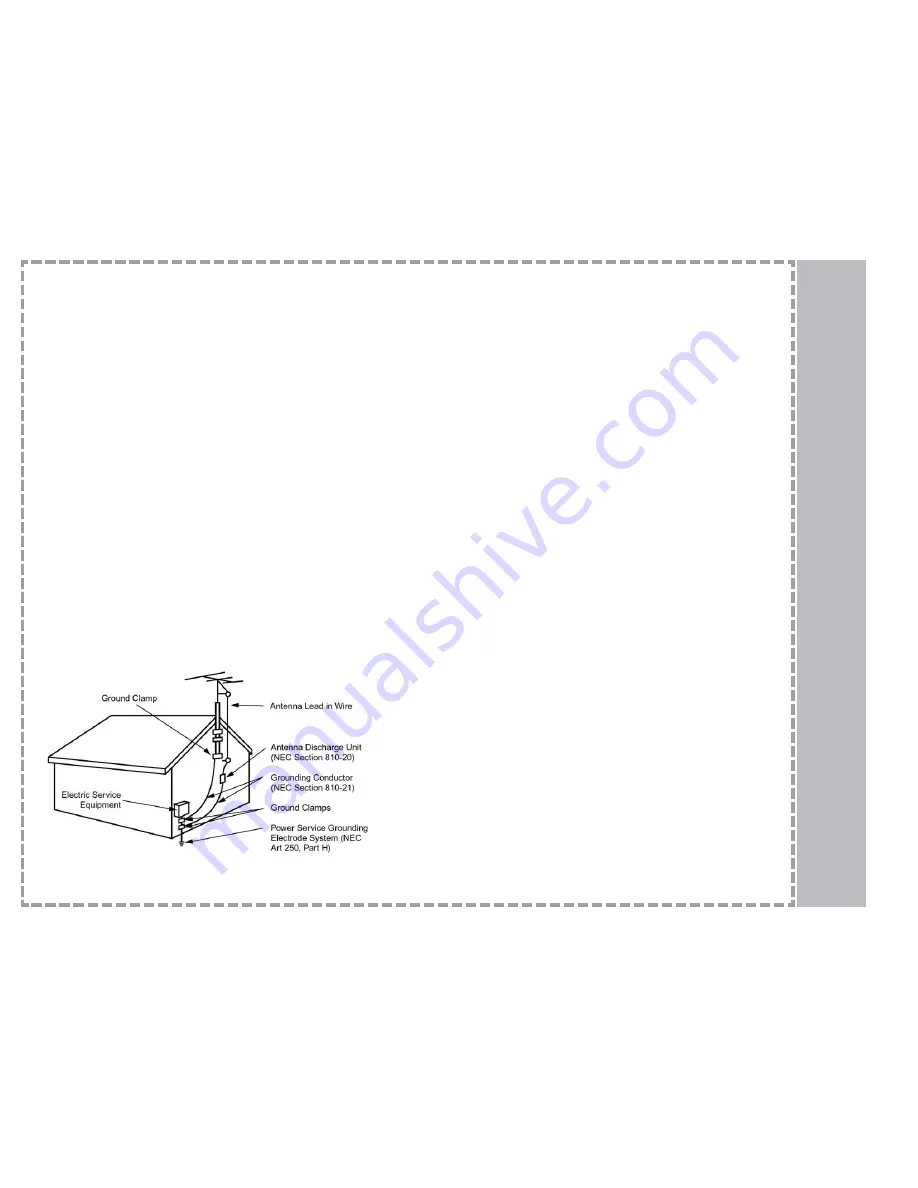
of the National Electrical Code (U.S.A.), ANSI/ NFPA 70 provides infor-
mation with regard to proper grounding of the mast and supporting struc-
ture, grounding of the lead-in wire to an antenna discharge unit, size of
grounding conductors, location of antenna-discharge unit, connection to
grounding electrodes, and requirements for the grounding electrode.

16. Power Lines
An outside antenna system should not be located in the vicinity of over-
head power lines or other electric light or power circuits, or where it can
fall into such power lines or circuits. When installing an outside antenna
system, extreme care should be taken to keep from touching such power
lines or circuits as contact with them might be fatal.

17. Overloading
Do not overload wall outlets and extension cords as this can
result in a risk of fire or electric shock.

18. Object and Liquid Entry
Never push objects of any kind into this product through
openings as they may touch dangerous voltage points or
short-out parts that could result in a fire or electric shock.
Never spill liquid of any kind on the product.

19. Servicing
Do not attempt to service this product yourself as opening or
removing covers may expose you to dangerous voltage or
other hazards. Refer all servicing to qualified service personnel.

20. Damage Requiring Service
Unplug this product from the wall outlet and refer servicing to qualified serv-
ice personnel under the following conditions:
a. If the power-supply cord or plug is damaged.
b. If liquid has been spilled, or objects have fallen into the product.
c. If the product has been exposed to rain or water.
d. If the product does not operate normally by following the operating instruc-
tions. Adjust only those controls that are covered by the operating instruc-
tions as an improper adjustment of other controls may result in damage and
will often require extensive work by a qualified technician to restore the prod-
uct to its normal operation.
e. If the product has been dropped or the cabinet has been
damaged.
f. If the product exhibits a distinct change in performance.

21. Replacement Parts
When replacement parts are required, be sure the service technician has
used replacement parts specified by the manufacturer or have the same
characteristics as the original part. Unauthorized substitutions may result in
fire, electricshock, or other hazards.

22. Safety Check
Upon completion of any service or repairs to this product, ask the service
technician to perform safety checks to determine that the product is in prop-
er operating condition.

23. Wall or Ceiling Mounting
The product should be mounted to a wall or ceiling only as recommended
by the manufacturer. The product may slide or fall, causing serious injury to
a child or adult, and serious damage to the product.

24. Heat
The product should be situated away from heat sources such as radiators,
heat registers, stoves, or other products (including amplifiers) that produce
heat.

NEC - National Electrical Code

Example of Grounding According to National Electrical
Code Instructions

Summary of Contents for AVL-2076

Page 1: ...20 LCD TV AVL 2076 Register your product to validate your warranty online ...

Page 2: ...he product Any mounting of the product should follow the manufacturer s instructions and should use a mounting accessory recommended by the manufacturer 8 Attachments Do not use attachments not recommended by the product manufacturer as they may cause hazards 9 Transporting Product A product and cart combination should be moved with care Quick stops excessive force and uneven surfaces may cause th...

Page 3: ...product yourself as opening or removing covers may expose you to dangerous voltage or other hazards Refer all servicing to qualified service personnel 20 Damage Requiring Service Unplug this product from the wall outlet and refer servicing to qualified serv ice personnel under the following conditions a If the power supply cord or plug is damaged b If liquid has been spilled or objects have fallen...

Page 4: ...he point of the cable entry as practical REGULATORY INFORMATION This equipment has been tested and found to comply with the limits for a Class B digital device pursuant to Part 15 of the FCC Rules These limits are designed to provide reasonable protection against harmful interference in a residential installation This equipment gen erates uses and can radiate radio frequency energy and if not inst...

Page 5: ...te ends If any of these items are missing please contact your retail er immediately Please keep the original carton and packing materials as they are the best method of transportation for your LCD TV in case of moving or warranty repair Warning 1 Safety Instructions 2 3 Table of Contents 4 Remote Control Functions 5 Remote Control Battery Installation 6 Top Panel Controls 7 Rear Panel Connections ...

Page 6: ... Available options are TV AV S Video YPbPr VGA 9 SWAP VIDEO AUDIO Changes the active video or audio source Pressing AUDIO will swap the audio being heard on the speakers between the main display and ther PIP window Pressing VIDEO will swap the images being seen between the main display and PIP window 10 NUMERIC KEYPAD 0 9 Allows direct entry of channel numbers up to 99 11 100 Allows entry of chann...

Page 7: ...ive signs on the remote control and the batteries line up Remove the rear cover by pressing firm ly in the middle of the cover and sliding it down towards to bottom of the remote Then lift the cover off of the remote control To avoid damage from possible battery leakage remove the batteries if you do not plan to use the remote control for an extended period of time Do not mix batteries of differen...

Page 8: ...e INPUT button to cycle between the various inputs They are TV AV S VIDEO YPbPr VGA D sub 15 pin 3 MENU Press the MENU button to activate the on screen menu Use the remote control or the channel volume buttons on the panel to navigate the on screen menu 4 CHANNEL Press the button to select the channel in TV mode or to navigate in MENU mode 5 VOLUME Press button to adjust volume These buttons are a...

Page 9: ...ite 5 AUDIO IN 2 Stereo audio connection for device connected to COMPONENT 6 COMPONENT Component video connection cable not included best possible quality 7 VGA VGA connection for set top box or PC 8 PC AUDIO IN PC Audio input for VGA connection 9 AUDIO OUT PC Speaker connection for audio output 10 DC 12V DC 12V connection for LCD display power supply 1 5 2 4 3 6 7 8 9 10 These inputs are found on...

Page 10: ...mposite video cable yellow connect the video output of the device to the VIDEO input on the back of the LCD TV Most devices including the LCD TV use a yellow jack for the composite video connection S VIDEO Using an S video cable not inclued connect the S video output of the device to the S VIDEO input on the LCD TV Please note the placement of the pins as improper installation may result in bent p...

Page 11: ...y Using a VGA D sub 15 pin cable connect the VGA output of your PC to the VGA input on the LCD TV Be careful to match the shape of the connector to the connection and not to bend any of the pins when installing NOTE For best performance set the resolution on your PC to 640x480 AUDIO The VGA audio connection is a single wire PC type connection Connect the 3 5mm stereo cable from the sound output of...

Page 12: ...se Highlight Treble to Increase or decrease Highlight Reset to return all Audio items to default Highlight OSD Timer to select the time to be shown on the menu 5 sec 15 sec 20 sec 25 sec 30 sec Highlight Language to select English French Spanish German Italian Japanese Chinese Traditional Chinese Simplified Highlight PIP Size to select the size of small picture 5 size Use this func tion under PIP ...

Page 13: ...olors towards a red or green tint Highlight Sharpness to make the pic ture sharper or softer Highlight Reset button to restore all setups of the Display to the default Highlight Volume to adjust the vol ume to the level you want Highlight Bass to Increase or decrease Highlight Treble Increase or decrease Highlight Reset to return all Audio items to default Highlight OSD Timer to select the time to...

Page 14: ...PIP Size to select the size of small picture 5 size Use this function under PIP Mode Highlight PIP Position to move the small picture to upper left upper right center lower left or lower right Use this function under PIP Mode Highlight Reset to return all Miscellaneous items to default Highlight Volume to adjust the volume to the level you want Highlight Bass to Increase or decrease Highlight Treb...

Page 15: ...ghlight White Balance to have the LCD TV self adjust the white bal ance You will need to display a 2 x2 square in the center of the screen Special home video cali braiton DVDs can do this Check with your retailer for further informa tion Highlight Clock to stabilize the dis play of VGA images Highlight Phase to adjust the focus and sharpness of VGA images Highlight H Position to adjust the horizon...

Page 16: ...he remote then MENU button Then press button once Use button to select each sub menu Once you ve selected your desired menu you may then use the buttons to adjust the setting TV Rating MPAA Rating G PG PG 13 R NC 17 X Y7 PG TV 14 MA FV D L S V Directed Towards Older Children Parental Guidance Suggested Parents Strongly Cautioned Mature Audiences Only Fantasy Violence Sexual Dialogue Adult Language...

Page 17: ...ture For example say you are watching TV in TV mode While your main signal TV is displayed press PIP from the remote An OSD will appear with the source input options available to display in the PIP box Press PIP Input on your remote to select an input option Press Swap to switch the PIP screen to the main screen and the main screen to the PIP screen PIP Modes That Function Together are Checked bel...

Page 18: ...view the Customer Support and FAQ s page for updates to this list You should register to validate your warranty at this website You can also order accessories for all of your Apex products Problems Solutions Cannot receive cer tain channels through antenna Video noise or chop py picture TV blocked at certain channels Overlapping images or ghost image Black box on screen Remote control does not ope...

Page 19: ... a coaxial cable for TV input Make sure the connection is secure and grounded You may need an electrician to check this for you Reception is best from cable TV satel lite dish or a high powered rooftop antenna Q Why is the screen too light dark when in VGA mode A You may need to adjust the white balance See White Balance on page 14 Also try adjusting the brightness You can also find this on page 1...

Page 20: ...Frequency 56 Hz 75 Hz Signal I O Ports Composite Video RCA type x1 S Video x1 Component Video RCA type YPbPr x1 RF w NTSC Tuner x1 VGA 15 pin D sub x1 Stereo Audio RCA type L R ch x2 PC Audio In x1 TV Systems NTSC 480 i p SDTV PIP Function De Interlace Support 3D noise reduction filter SAP MTS V chip CCD Power Consumption off 8W Power Source 12 VDC 5A 60W Speakers 5W maximum x 2 Unit Dimensions 23...

Page 21: ...ded attached or printed to shipping carton along with an enclosed bill of sale You will be responsible for all tariffs and taxes imposed to ship or receive warranty or warranty replace ment units to and from the U S These warranties are effective only if product is purchased through an Authorized North American retail reseller and the unit is operated in North America Labor service charges for set...

Reviews: