Apeks Supercritical: The Duplex
™
Installation Manual
16
Revision Date 04/11/2019
3.3.2.3.1. Once the water line connections and electrical connections have been made, fill the
chiller reservoir with 95/5 mix of water/propylene glycol.
3.3.2.3.2. From the manual screen, start the desired chiller.
3.3.2.3.3. Continue to fill the chiller reservoir with the same fluid mix as the chiller pump fills the
system with fluid.
3.3.2.3.4. Once the reservoir has stopped receding, top off reservoir and allow the chiller to
continue to run as the chiller pump primes.
3.3.2.3.5. This priming should continue until the pressure in the chiller reaches operational
level: 45psi for the extractor chiller, 78psi for the separator chiller.
Note
: if chiller over
pressurizes, partially close the ball valve on the back of the chiller to reduce pressure
to the operating pressure.
3.3.2.3.6. As the pressure increases the reservoir level may decrease so top off as necessary.
3.3.2.3.7. Once the chillers are up to pressure, the extractor chiller is ready to run and can be
turned off.
3.3.2.3.8. The separator chiller loop will need separator bank 2 filled with fluid
3.3.2.3.8.1. Go to the manual screen and click the “Fill Separator Bank 2 WATER” button.
Note
: If this button does not appear on the screen click on the “Manual Mode”
button.
3.3.2.3.8.2. As the pump fills the second separator bank the reservoir will need to be filled
again and the pump may need to re-primed if the pressure drops.
3.3.3.
CO
2
Connections
– There are four CO
2
lines to be connected on the Duplex system, two
between the Extractor and Separator Stands and one each between those stands and the
Diaphragm Compressor.
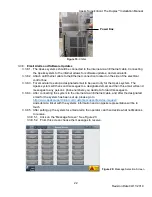
3.3.3.1.
Separator Vessel Stand to Diaphragm Compressor
– This connection is a 36
"
long
stainless steel braided flexible line with ¾
"
compression fittings.
Figure 8:
Separator Stand to Compressor


