


PM1122-INT DIGITAL INTERFACE REMOTE
WWW.APART-AUDIO.COM / [email protected]
Overview
The
PM1122
Pre
‐
amp
can
be
remote
controlled
by
the
PM1122
‐
INT.
The
PM1122
‐
INT
can
be
controlled
in
3
different
ways:
•
Using
RS
‐
232
•
Using
the
contacts
to
recall
presets
•
Using
the
optional
RF
module
For
control
using
the
RS
‐
232
port,
the
PM1122
‐
INT
accepts
strings
of
ASCII
characters
to
control
and
read
settings
of
music
level,
microphone
mix
level
and
the
input
selector
of
both
zones.
Further,
the
RS
‐
232
port
will
have
to
be
used
to
store
presets,
adjust
minimum
and
maximum
level
settings.
Strings
can
be
sent
via
third
‐
party
software
like
Hilgraeve’s
Hyperterminal
or
the
freeware
utility
“
Hercules
SETUP
utility”
from
HW
‐
group.
For
preset
control
using
contacts,
it’s
needed
to
store
the
presets
using
RS
‐
232.
It
can
be
done
using
terminal
software
(Hyperterminal,
Hercules,
...)
or
with
the
APart
PM1122
Control
Panel
software.
Please
note
the
APart
software
runs
only
on
Windows®
platforms,
it’s
freely
downloadable
but
no
support
or
guaranties
are
given.
Once
the
presets
are
stored,
no
RS
‐
232
communication
is
needed
anymore.
Refer
to
the
chapter
Presets
for
more
information.
For
control
using
the
optional
RF
module,
no
configuration
with
RS
‐
232
is
needed.
Once
the
module
is
mounted
(see
chapter
“
Easywave
”
on
page
9),
the
push
buttons
at
the
front
side
are
enough
to
assign
a
switch
to
a
zone.
Please
note
there
are
some
features
which
can
be
configured
using
RS
‐
232
but
for
normal
operation,
it’s
not
needed!
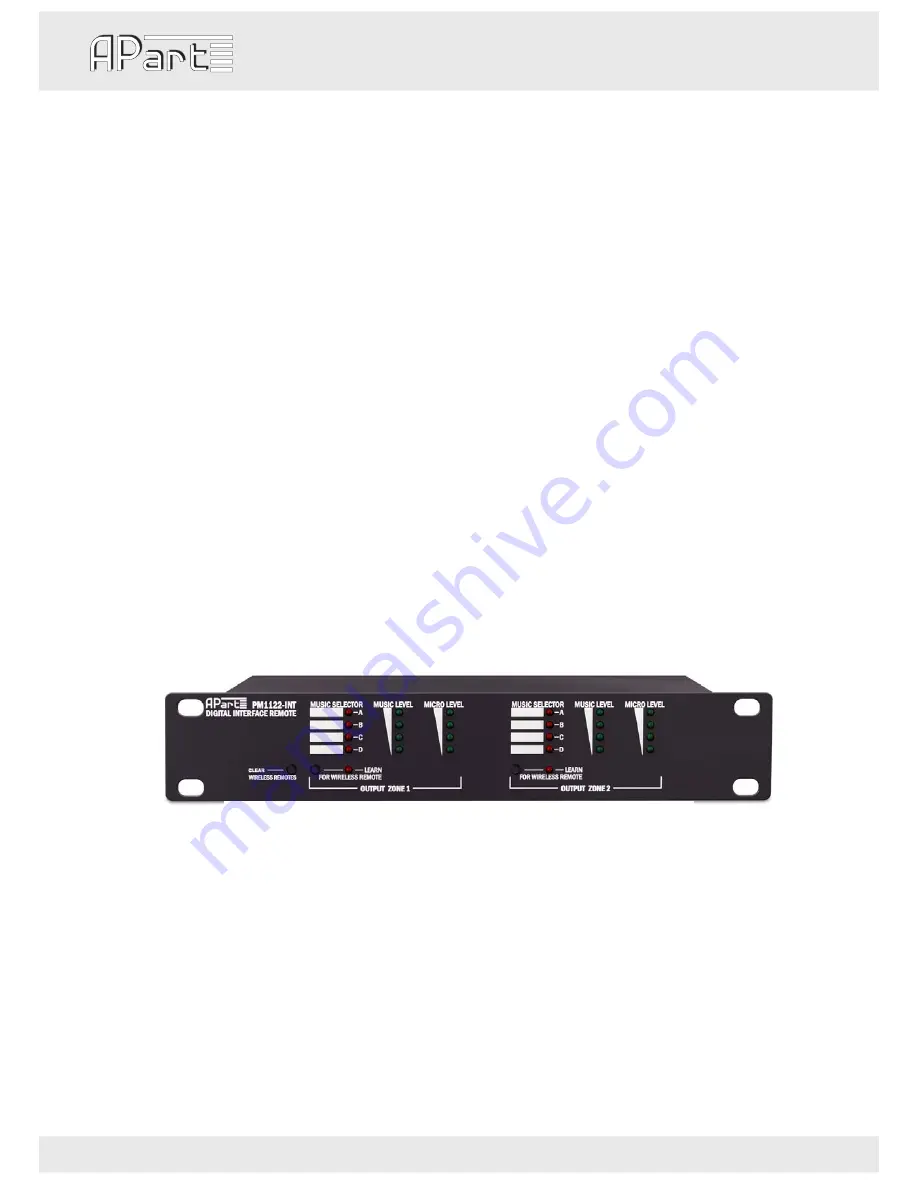
PM1122
INT
front
panel
description
6
7
8
9
10
11
1.
Clear
wireless
remotes
knob
2.
Wireless
remote
learn
button
for
zone
1
3.
Learn
led
for
zone
1
4.
Wireless
remote
learn
button
for
zone
2
5.
Learn
led
for
zone
2
At
power
up,
LED
bar
11
will
show
the
current
baud
rate.
See
above
for
the
possible
values.
1
2
3
4
5
19200
9600
4800
2400
6.
Music
selector
indicator
for
zone
1
7.
Music
level
indicator
for
zone
1.
Note:
buttons
1,
2
and
4
have
been
mounted
slightly
recessed
to
avoid
unintended
operation.
If
necessary,
use
a
pen
or
pencil
to
push
these
buttons.
8.
Microphone
mix
level
indicator
for
zone
1
9.
Music
selector
indicator
for
zone
2
10.
Music
level
indicator
for
zone
2
11.
Microphone
mix
level
indicator
for
zone
2
3


