background image

9

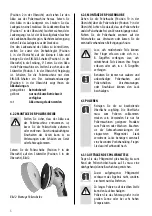
•  The warning triangle indicates all 

instructions which are important for 

safety. Always follow these otherwise 

you could injure yourself or damage 

the device.

•  Children may not play with the device.

•  Cleaning and user maintenance may 

not be carried out by children without 

supervision.

•  Do not treat packaging material 

carelessly. This may become a 

dangerous plaything for a child!

•  Only use this product for its designated 

purpose!

•  Do not manipulate or disassemble the 

device!

•  For your own safety, only use 

accessories and spare parts that are 

stated in these instructions or that are 

recommended by the manufacturer!

•  Remove the battery from the 

polishing machine before carrying out 

installation or cleaning work on the 

device.

•  Make sure that the switch is in the ‘0’ 

position before using the battery. This 

will prevent the machine from starting 

accidentally.

•  Do not use the device if it is damaged.

•  Do not overload the device.

•  Remove the battery from the device 

when not in use. Protect the battery 

contact points from short circuiting.

•  Wear suitable clothing. Do not wear 

loose clothing or jewellery. Keep 

hair, clothing and gloves well away 

from moving parts. Loose clothing, 

jewellery or long hair may be caught 

by moving parts.

4. SAFETY PRECAUTIONS

Battery:

Voltage: 

12 V

Battery capacity: 2 Ah  24 Wh

Charger:

Input voltage:  230 V AC, 50 Hz

Output voltage:  12 V DC

Charging current: 2.4 A 

Power: 50 W

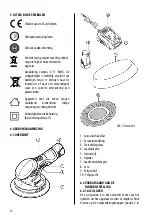
•  Wear goggles.

•  Wearing personal protective 

equipment such as a dust mask, 

non-slip safety shoes, or hard hat, 

according to the type of polishing 

machine and the usage, will reduce 

the risk of injuries.

•  Only switch the polishing machine on 

when it is placed on the surface to be 

treated.

•  If using the polishing hood, do not 

allow parts of the polishing hood to 

come loose, especially the fixing cords. 

Hide or shorten the fixing cords. Loose, 

rotating parts may catch your fingers 

or, for example, get caught in door 

handles.

•  Work very carefully around corners 

and sharp edges. The rotating tool 

may bounce off or get trapped. This 

will lead to a loss of control and may 

result in injuries.

•  Follow the manufacturer’s instructions 

for the polish you are using.

•  Do not expose the polishing machine 

to rain or wet conditions.

•  Clean the device after each use.

•  Also observe the safety precautions 

in the individual sections of the 

operating instructions.

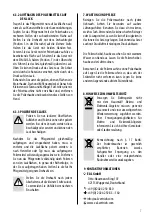
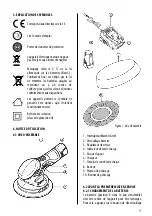
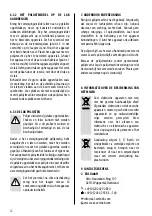
Complies with EC directives

Read the operating instructions

Wear eye protection

Labelled electrical products may not be 

disposed of in the household waste

5. EXPLANATION OF SYMBOLS

Summary of Contents for 20999

Page 1: ...Rechargeable professional polishing machine Operating instructions 8 Réf 20999 Polisseuserechargeableprofessionnelle Manuel de l opérateur 13 Cod art 20999 Lucidatriceprofessionalericaricabile Istruzioni per l uso 23 Art nr 20999 Professioneleoplaadbarepolijstmachine Gebruiksaanwijzing 18 ...

Page 2: ...2 ...
Page 3: ..._______________________________3 3 SPEZIFIKATIONEN________________________________________________________3 4 SICHERHEITSHINWEISE____________________________________________________4 5 SYMBOLERKLÄRUNG______________________________________________________5 6 BEDIENUNGSANLEITUNG___________________________________________________5 6 1 ÜBERSICHT_________________________________________________________...

Page 4: ...strom 2 4 A Leistung 50W Entfernen Sie den Akku aus dem Gerät wenn es nicht gebraucht wird Schützen Sie die Kontakte des Akkus vor Kurzschluss Tragen Sie geeignete Kleidung Tragen Sie keine weite Kleidung oder Schmuck Halten Sie Haare Kleidung und Handschuhe fern von sich bewegendenTeilen LockereKleidung Schmuck oder lange Haare können von sich bewegenden Teilen erfasst werden Tragen Sie eine Schu...

Page 5: ... ist gesetzlich verpflichtet Batterien zwecks fachgerechter Entsorgung an den Händler oder eine entsprechenden Rücknahmestelle zurückzugeben 5 SYMBOLERKLÄRUNG 1 EIN AUS Schalter 2 Akku Verriegelung 3 Drehzahlregler 4 Ladezustandsanzeiger 5 Stützteller 6 Ladegerät 7 Ladekontrollleuchten 8 Akku 9 Polierscheibe 10 Polierhaube 6 BEDIENUNGSANLEITUNG 6 1 ÜBERSICHT 6 2 VOR DER INBETRIEBNAHME 6 2 1 LADEN ...

Page 6: ... in der Übersicht über die Polierscheibe Position 9 in der Übersicht Achten Sie darauf dass der Polierscheibe und die Polierhaube frei vonVerunreinigungen sind Richten Sie die Polierhaube zentriert auf der Polierscheibe aus Verstauen oder kürzen Sie die eventuell vorhandenen Befestigungsschnüre Position 2 in der Übersicht und ziehen Sie den Akku aus der Poliermaschine heraus Setzen Sie den Akku in...

Page 7: ... die Polierhaube und bearbeiten diese Stellen von Hand Reinigen Sie die Poliermaschine nach jedem Gebrauch Achten Sie besonders auf saubere Lüftungsschlitze Benutzen Sie dazu ein trockenes weichesTuch VerwendenSiekeinescharfenReiniger oder Lösungsmittel Lassen Sie keine Flüssigkeiten in dasInneredesGerätsgelangen SiekönnendasGerät auch mit Druckluft mit niedrigem Druck abblasen Die Polierscheibe h...

Page 8: ...rvanceof the safety instructions Any other utilisation is con sidered to be contrary to the intended purpose and may lead to material damage or personal injuries EAL GmbH assumes no liability for damage resulting from improper use 1 PROPER USE OFTHE PRODUCT________________________________________________8 2 SCOPE OF DELIVERY______________________________________________________8 3 SPECIFICATIONS__...

Page 9: ...arts Loose clothing jewellery or long hair may be caught by moving parts 4 SAFETY PRECAUTIONS Battery Voltage 12V Battery capacity 2 Ah 24Wh Charger Input voltage 230V AC 50 Hz Output voltage 12V DC Charging current 2 4 A Power 50W Wear goggles Wearing personal protective equipment such as a dust mask non slip safety shoes or hard hat according to the type of polishing machine and the usage will r...

Page 10: ...UCTIONS 6 1 OVERVIEW 6 2 PRIOR TO STARTING UP 6 2 1 PRIOR TO STARTING UP The rechargeable battery number 8 in the overview must be removed from the device for charging To do this press the release button number 2 in the overview andremovethebatteryfromthepolishing machine Insert the battery into the charger Plug the charger into a socket The charging indicator light number 7 in the overview will l...

Page 11: ...shorten any fixing cords 6 3 1 APPLYING POLISH Apply the care product evenly up to the edges of the polishing plate hood A continuous thin coating must be ensured Applying excess care product will not improve the results it will just make it more difficult to remove the overview to the 0 position Insert the battery into the polishing machine Make sure that the support plate number 5 in the overvie...

Page 12: ...rm water Leave the polishing plate hood to air dry Store the polishing machine without the hood Position the polishing machine in such a way that the support plate is not distorted Do not place other objects on the support plate 6 3 3 POLISHING THE PAINTWORK Only polish painted areas Labels and film cannot be polished If you attempt to polish them they will be damaged or destroyed and may damage t...

Page 13: ...ct des consignes de sécurité Toute autre utilisation est considérée comme non conformeetpeutentraînerdesdommagesmatérielsou corporels La société EAL GmbH décline toute responsabilité en cas de dommages découlant d une utilisation non conforme à l emploi prévu 1xPlateaudepolissageenmousse 1xBonnetdepolissage 1xModed emploi 1 UTILISATION CONFORME__________________________________________________ 13 ...

Page 14: ...0 Hz Tension de sortie 12V DC Courant de charge 2 4 A Puissance 50W contacts de la batterie contre les courts circuits Portez des vêtements adaptés Ne portez pas d autres vêtements ou de bijoux Gardez les cheveux vêtements etgantsàdistancedespiècesmobiles Les vêtements amples les bijoux et les cheveux longs peuvent se prendre dans les pièces mobiles Portez des lunettes de protection Leportd unéqui...

Page 15: ...remettre les batteries usagées au revendeur ou à un service de collecte pour qu elles soient éliminées conformément aux dispositions 5 EXPLICATION DES SYMBOLES 1 Interrupteur Marche Arrêt 2 Verrouillage batterie 3 Régulateur de vitesse 4 Indicateur d état de charge 5 Disque d appui 6 Chargeur 7 Témoin de contrôle de charge 8 Batterie 9 Plateau de polissage 10 Bonnet de polissage 6 NOTICE D UTILISA...

Page 16: ...au depolissageetlebonnetdepolissagesoientexempts de salissures Placez le bonnet de polissage au milieu du plateau de polissage Rangez ou raccourcissez les ficelles de fixation position 2 dans la vue d ensemble et retirez la batterie de la polisseuse Insérez la batterie dans le chargeur Branchez le chargeur à une prise Le témoin de contrôle de charge position 7 dans la vue d ensemble s allume en ro...

Page 17: ...itsquinesontpasaccessiblesaveclapolisseuse retirez le bonnet et traitez ces endroits à la main Nettoyezlapolisseuseaprèschaqueutilisation Faites particulièrement attention aux fentes d aération Pour cela utilisez un chiffon sec et doux N utilisez Le plateau bonnet de polissage doit être nettoyé à la main avec de l eau tiède Laissez le plateau bonnet de polissage sécher à l air Rangez la polisseuse...

Page 18: ...zondervandeveiligheidsvoorschriften Elk ander gebruik geldt als niet reglementair en kan materiële schade of persoonlijk letsel veroorzaken EAL GmbH is niet aansprakelijk voor schade als ge volg van niet reglementair gebruik 1 EGLEMENTAIR GEBRUIK___________________________________________________ 18 2 LEVERINGSOMVANG_____________________________________________________ 18 3 SPECIFICATIES__________...

Page 19: ...V AC 50 Hz Uitgangsspanning 12V DC Laadstroom 2 4 A Vermogen 50W Bescherm de accucontacten tegen kortsluiting Draag geschikte kleding Draag geen wijde kleding of sieraden Houd het haar kleding en handschoenen uit de buurt van bewegende delen Losse kleding sieraden of lang haar kunnen worden gegrepen door bewegende onderdelen Draag een veiligheidsbril Het dragen van persoonlijke b e s c h e r m i n...

Page 20: ...telijk verplicht om batterijen terug te brengen naar de leverancier of naar een verzamelpunt waar een correcte verwijdering kan plaatsvinden 5 UITLEG BIJ DE SYMBOLEN 1 Aan uitschakelaar 2 Accuvergrendeling 3 Toerentalregelaar 4 Laadindicator 5 Steunschijf 6 Oplader 7 Laadcontrolelampjes 8 Accu 9 Polijstschijf 10 Polijstvacht 6 GEBRUIKSAANWIJZING 6 1 OVERZICHT 6 2 VOORAFGAAND AAN DE INBEDRIJFSTELLI...

Page 21: ...araat of voertuig Losse meedraaiende delen kunnen uw vingersgrijpenofvastkomentezittenin bijv portiergrepen Te lang polijsten op dezelfde plaats kan de lak beschadigen Polijst het voertuig niet in fel zonlicht of bij zeer hoge temperaturen Gebruik altijd schone en onbeschadigde polijstvachten en polijstschijven Vuil of vastzittende deeltjes kunnen de lak beschadigen Reinig het te behandelen opperv...

Page 22: ...ijk zijn met de polijstmachine verwijdert u de polijstvacht en bewerkt u deze plekken met de hand Reinig de polijstmachine na elk gebruik Zorg daarbij dat vooral de luchtspleten schoon zijn Gebruik daarvoor een vochtige zachte doek Gebruik geen scherpe reinigings of oplosmiddelen Laat nooit vloeistoffen in de behuizing van het apparaat binnendringen U kunt het apparaat ook uitblazen met perslucht ...

Page 23: ...fornite in queste istruzioni soprattut to delle avvertenze sulla sicurezza Ogni altro utiliz zo viene considerato improprio e può causare danni a persone o cose EAL GmbH non risponde dei danni derivanti da un uso improprio 1 USO CONFORME________________________________________________________ 23 2 FORNITURA__________________________________________________________ 23 3 SPECIFICHE__________________...

Page 24: ...po ampi né gioielli Tenere i 4 AVVERTENZE DI SICUREZZA Batteria ricaricabile Tensione 12V Capacità della batteria 2 Ah 24Wh Caricabatteria Tensione in ingresso 230V AC 50 Hz Tensione in uscita 12V DC Corrente di carica 2 4 A Potenza 50W capelli ivestitieiguantilontanodalle parti in movimento I vestiti larghi i gioielli o i capelli lunghi possono impigliarsi nelle parti in movimento Indossare occhi...

Page 25: ... il consumatore finale è obbligato per legge a smaltirle correttamente restituendole al rivendi tore o a un apposito centro di raccolta 5 SPIEGAZIONE DEI SIMBOLI 1 Interruttore ON OFF 2 Bloccaggio batteria 3 Regolatore di velocità 4 Indicatore di carica 5 Platorello 6 Caricabatteria 7 Spie di controllo ricarica 8 Batteria 9 Disco per lucidare 10 Calotta di lucidatura 6 ISTRUZIONI PER L USO 6 1 SCH...

Page 26: ...10 dello schema sul disco per lucidare pos 9 dello schema Assicurarsi che il disco e la calotta non siano sporchi Disporre la calotta al centro del disco Sistemare o accorciare i cordini di fissaggio eventualmente presenti ed estrarre la batteria dalla levigatrice Inserire la batterianelcaricabatteria Collegareilcaricabatteriaa unapresadicorrente Laspiadicontrollo pos 7dello schema si accende a lu...

Page 27: ...igatrice rimuovere la calotta di lucidatura e lavorare questi punti a mano Pulire la lucidatrice dopo ogni impiego Accertarsi soprattuttochelefessurediventilazionesianopulite Utilizzare a tale scopo un panno umido e morbido Non utilizzare detergenti aggressivi o solventi Evitare sempre che i liquidi penetrino all interno del dispositivo È possibile anche pulire il dispositivo con aria compressa a ...

Page 28: ...28 EAL GmbH 20999 04 2020 EAL GmbH Otto Hausmann Ring 107 42115Wuppertal Deutschland 49 0 202 42 92 83 0 49 0 202 42 92 83 160 info eal vertrieb com www eal vertrieb com ...

Reviews: