background image

9

Safety use

- Do not use in the street, on the road or near slopes and ditches. 
- Do not change the wire or add electrical devices to the car. 
- Use in a dry area, keeping away from wet conditions. Keep away from open flames. 
- Suitable for 1-2 children. Do not overload. 
- Maximum capacity is 40kg. 
- When not in use, switch off the power. If not in use for a long period, unplug the 

battery. 

- Check battery, charger and other parts regularly. If damages are found, ensure they 

are fixed before using. 

- Before the first use, charge for 8-12 hours. 
- Place the charger into the hole under the seat, then plug the charger into the socket. 
- The car cannot be used when charging. 
- Do not charge for more than 20 hours. 
- When charging, it is normal for the battery and charger to be warm. 
- Do not charge if the plug is wet to avoid electrical hazards or a short circuit. 
- Only use the charger provided by the manufacturer. Any other charger can damage 

the battery or cause a short circuit. 

- If not in use for a long period, ensure it gets charged once a month. 

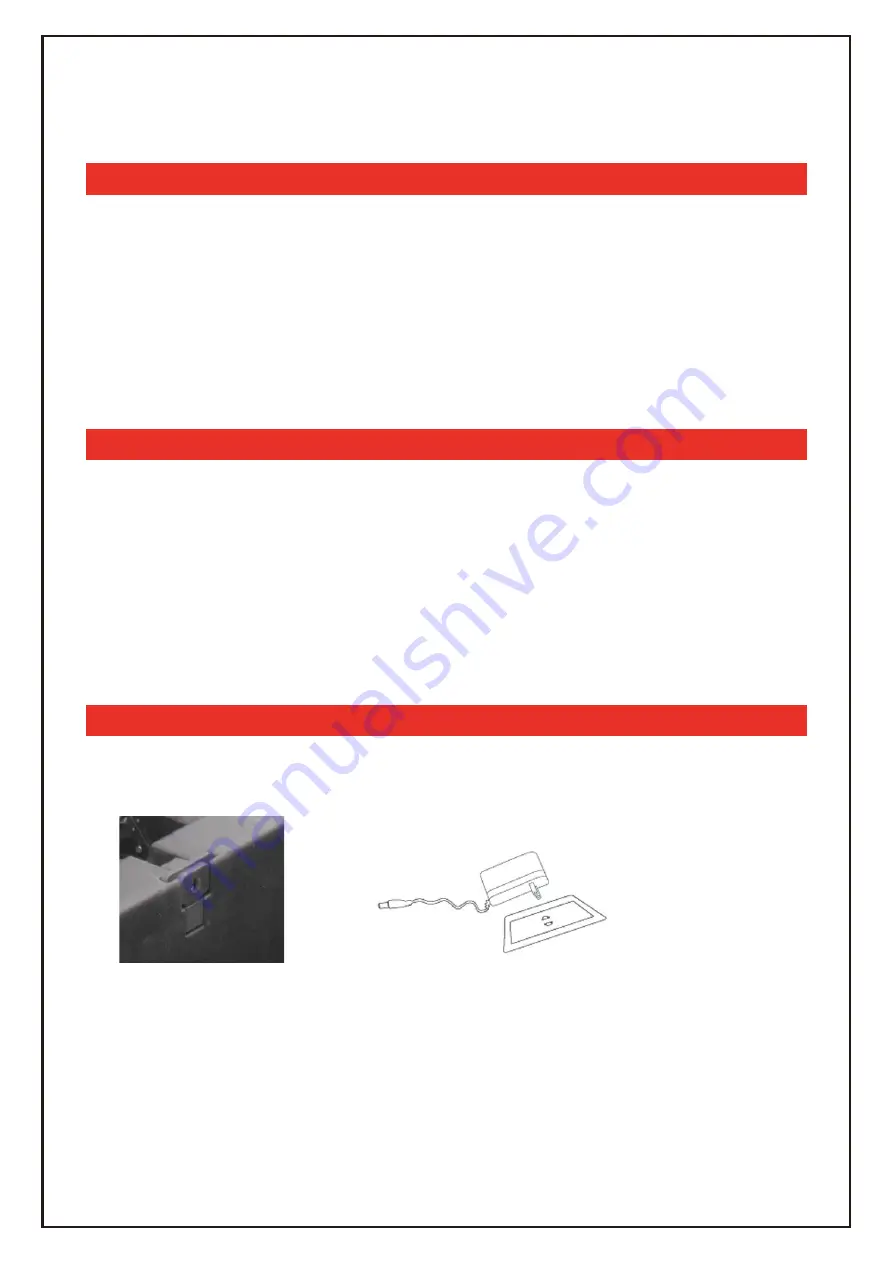
Charging notification


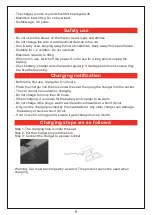
Charging steps are as follows:

Step 1: The charging hole is under the seat. 
Step 2: Put the charger plug into the hole. 
Step 3: Connect the charger to a power socket. 

Warning: Car must be charged by an adult. This product cannot be used when 
charging. 

- The charger is not a toy and shouldn't be played with. 
- Maximum load: 40kg. Do not overload. 
- Suitable age: 3-6 years. 

Summary of Contents for 370-218V80

Page 1: ... Power display Music High and low speed Forward and backward Volume adjustment Wireless connection WARNING This product must be assembled by an adult When unassembled there are small and sharp parts which could be choked on if swallowed Keep out the reach of small children Warning Do not use in traffic EN Assembly video please scan the QR code Vidéo d assemblage veuillez scanner le code QR ...

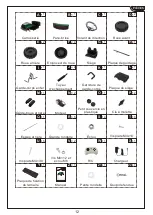
Page 2: ...lebar decoration M 1 N 2 Small plastic cover Spanner O 1 P 2 Rear axle Big washer Car body Front wheel Wheel cover Seat Rear wheel Steering plate Rear fender T 8 S 4 R 6 Q 1 Nut M4x14 flat screw M4 30 flat screw M6 12 screw and M6 nut R C Charger Trunk fixing plate Manual Small washer Cotter pin Z 1 Y 1 X 1 W 1 V 2 U 6 Z1 1 Z2 1 ...

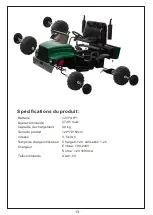
Page 3: ...able age Loading capacity Product size Speed Charge Use time Charger Remote control 12V7AH 1 37 95 months 40kg 120 78 69cm 3 5 km h Charge 8 12h use 1 2h Input 100 240V Output 12V 1000mA AAA1 5V Product Specifications ...

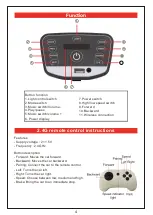
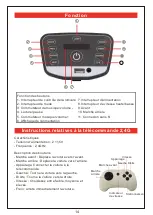
Page 4: ...orward 10 Backward 11 Wireless connection Features Supply voltage 2 1 5V Frequency 2 4GHz 2 4G remote control instructions Button description Forward Moves the car forward Backward Moves the car backward Pairing Connect the car to the remote control Left Turns the car left Right Turns the car right Speed Choose between low medium and high Brake Bring the car to an immediate stop ...

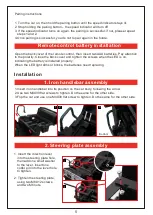
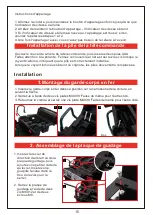
Page 5: ...the back cover and tighten the screws when the LED is on indicating the battery is installed properly When the LED light dims or blinks the batteries need replacing 1 Iron handlebar assembly Installation 1 Insert iron handlebar into its position on the car body following the arrow 2 Use two M4X30 flat screws to tighten Do the same for the other side 3 Flip the car and use one M4X30 flat screw to tig...

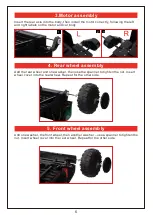
Page 6: ... body 1 2 3 4 Rear wheel assembly Add the rear wheel and one washer then use the spanner to tighten the nut Insert wheel cover into the rear wheel Repeat for the other side 5 Front wheel assembly Add one washer the front wheel then another washer use a spanner to tighten the nut Insert wheel cover into the rear wheel Repeat for the other side ...

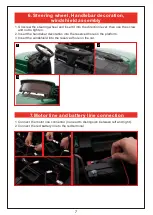
Page 7: ...ert it into the direction lever then use the screw and nut to tighten 2 Insert the handlebar decoration into the reserved hole on the platform 3 Insert the windshield into the reserved hole on the car 1 2 3 1 Connect the motor line connector no need to distinguish between left and right 2 Connect the red battery line to the red terminal ...

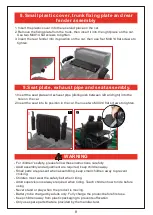
Page 8: ...Insert the seat into its position in the car then use two M4X14 flat screws to tighten R 1 L 2 WARNING For children s safety please follow these instructions carefully Adult assembly and adjustment are required keep children away Small parts are present when assembling keep small children away to prevent choking Children must wear the safety belt when riding Adult supervision is always required whe...

Page 9: ...the socket The car cannot be used when charging Do not charge for more than 20 hours When charging it is normal for the battery and charger to be warm Do not charge if the plug is wet to avoid electrical hazards or a short circuit Only use the charger provided by the manufacturer Any other charger can damage the battery or cause a short circuit If not in use for a long period ensure it gets charge...

Page 10: ...d use a water resistant cover Keep away from flammable materials to avoid fire hazards Charge the product after each use Clean with a dry cloth Do not use chemical solvents to wipe plastic parts Do not wash with water Do not use when raining or snowing water can damage the motor electric system or battery Switch off the power after each use Only use the charger provided by the manufacturer Do not mod...

Page 11: ...umière Affichage de puissance Musique Vitesse élevée et faible Marche avant et marche arrière Réglage du volume sonore Connexion sans fil AVERTISSEMENT Ce produit doit être assemblé par un adulte À l état non assemblé il présente des pièces de petite taille et tranchantes qui risquent de provoquer un étouffement en cas d ingestion Tenez le hors de portée des jeunes enfants Avertissement À ne pas utili...

Page 12: ...Petit couvercle en plastique Clé à molette O 1 P 2 Essieu arrière Grande rondelle Carrosserie Roue avant Enjoliveur de roue Siège Roue arrière Plaque de guidage Garde boue arrière T 8 S 4 R 6 Q 1 Écrou Vis plate M4x14 Vis plate M4 30 Vis M6 12 et écrou M6 R C Chargeur Plaque de fixation de la malle Manuel Petite rondelle Goupille fendue Z 1 Y 1 X 1 W 1 V 2 U 6 Z1 1 Z2 1 PIÈCES ...

Page 13: ...é de chargement Taille du produit Vitesse Temps de charge utilisation Chargeur Télécommande 12V7AH 1 37 95 mois 40 kg 120 78 69cm 3 5 km h Charge 8 12h utilisation 1 2h Entrée 100 240V Sortie 12V 1000mA AAA1 5V Spécifications du produit ...

Page 14: ...iques Tension d alimentation 2 1 5V Fréquence 2 4GHz Instructions relatives à la télécommande 2 4G Stationnement Indicateur de vitesse Marche arrière Appairage Marche avant Vitesse Gauche Droite Description des boutons Marche avant Déplace la voiture vers l avant Marche arrière Déplace la voiture vers l arrière Appairage Connecter la voiture à la télécommande Gauche Tourne la voiture vers la gauch...

Page 15: ... et serrez les vis lorsque le voyant s allume indiquant que la pile est correctement installée Lorsque le voyant lumineux s éteint ou clignote les piles doivent être remplacées 1 Montage du garde corps en fer Installation 1 Insérez le garde corps en fer dans sa position sur la carrosserie de la voiture en suivant la flèche 2 Serrez le à l aide de deux vis plates M4X30 Faites de même pour l autre cô...

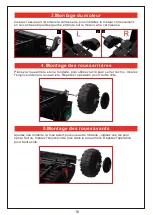
Page 16: ...tage des roues arrières Placez la roue arrière et une rondelle puis utilisez la clé pour serrer l écrou Insérez l enjoliveur dans la roue arrière Répétez l opération pour l autre côté 5 Montage des roues avants Ajoutez une rondelle la roue avant puis une autre rondelle utilisez une clé pour serrer l écrou Insérez l enjoliveur de roue dans la roue arrière Répétez l opération pour l autre côté ...

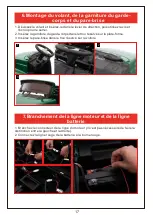
Page 17: ...direction puis utilisez la vis et l écrou pour le serrer 2 Insérez la garniture du garde corps dans le trou réservé sur la plate forme 3 Insérez le pare brise dans le trou réservé sur la voiture 1 2 3 1 Branchez le connecteur de la ligne du moteur il n est pas nécessaire de faire la distinction entre la gauche et la droite 2 Connectez la ligne rouge de la batterie à la borne rouge ...

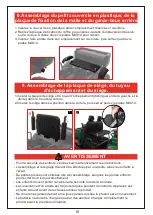
Page 18: ...la voiture 2 Insérez le siège dans sa position dans la voiture puis serrez deux vis plates M4X14 1 2 AVERTISSEMENT Pour la sécurité des enfants veuillez suivre attentivement ces instructions L assemblage et le réglage doivent être effectués par un adulte tenez les enfants à l écart De petites pièces sont utilisées lors de l assemblage éloignez les jeunes enfants pour éviter tout risque d étouffement...

Page 19: ...est normal que la batterie et le chargeur soient chauds Ne chargez pas la batterie si la prise est mouillée afin d éviter les risques électriques ou un court circuit Utilisez uniquement le chargeur fourni par le fabricant Tout autre chargeur peut endommager la batterie ou provoquer un court circuit Si vous n utilisez pas le produit pendant une longue période veillez à le recharger une fois par mois...

Page 20: ...à l écart des matériaux inflammables pour prévenir les risques d incendie Chargez le produit après chaque utilisation Nettoyez l appareil à l aide d un chiffon sec N utilisez pas de solvants chimiques pour essuyer les pièces en plastique Ne pas laver avec de l eau Ne l utilisez pas lorsqu il pleut ou qu il neige l eau peut endommager le moteur le système électrique ou la batterie Mettez l appareil h...

Page 21: ...21 ...

Reviews: