background image

5

®

P/N 1011446 Rev. I 12/18

INSTALLATION

1.  Remove unit and all packing mate-

rials from shipping carton.

2.  Open the Accessories Box. It should 

contain the following:
a.  Chute
b.   Feeder
c.  Owner’s Manual

NOTE:

  If any parts are missing or dam-

aged, contact Antunes Cus-

tomer Service IMMEDIATELY at 

+1-877-392-7856 (toll free).

3.  Remove all packing materials and 

protective coverings from the unit 

and accessories.

4.  With assistance, place the unit in 

the proper location.

5.  Remove the top cover. Wipe the 

top cover, chute, and feeder with a 

clean sanitizer soaked towel. Allow 

to air dry.

6.  Wipe the entire exterior of the unit 

with a clean sanitizer soaked towel. 

Allow to air dry.

NOTE:

  Do NOT use a dripping wet 

cloth. Wring out before use.

7.  Attach the top cover, feeder and 

chute (Figure 3).

8.  Unlock and open the side panel 

according to figure 2. Cut and 

remove the wire ties indicated in 

Figure 2.

When placing the toaster into service, pay 

attention to the following guidelines.


y

Make sure the unit is off and the 

unit is at room temperature before 

plugging in the power cord.


y

Do not block or cover any 

openings on the unit.


y

Do not immerse the power 

cord or plug in water.


y

Keep the power cord away 

from heated surfaces.


y

Do not allow the power cord to 

hang over edge of table or counter.


y

Place the unit on a sturdy, level 

table or other work surface.

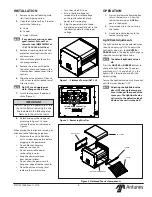
Figure 1.  - Flatbread Toaster (GST-1H)

OPERATION

1.  Press and release the Power button 

to turn the toaster on.  Allow the 

toaster to warm up until USE ap-

pears in the display

2.  Insert product into the unit using 

the  feeder.

3.  Finished product drops onto the 

heated landing zone.

Light/Dark Adjustments

The light/dark value can be adjusted when 

the unit is displaying “USE”. To adjust the 

light/dark value, press the LIGHTER or 

DARKER button. The display will change to 

show the current light/dark value.

NOTE:

  The default light/dark value is 

d0.

Press the LIGHTER or DARKER buttons to 

change the light/dark value. The adjust-

ment range is L1-L9 and d0-d9. L9 is the 

lightest, d0 is the middle, and d9 is the 

darkest setting.

To save the light/dark value, wait 5 seconds 

until the screen displays “USE”.

NOTE:

  Adjusting the light/dark value 

does NOT change the tempera-

ture. It changes the speed of the 

conveyors. The light/dark value 

will reset to the default value of 

d0 when the unit is turned off.

TOP COVER

FEEDER

CHUTE

BACK PANEL

Figure 3. Flatbread Toaster Components

HEATED LANDING ZONE

IMPORTANT

Do NOT plug in the power cord or turn 

the unit on before removing the wire 

ties indicated in the following step. 

Damage to the unit may result.


y

Turn the unit off if it is on.


y

Ensure the line voltage cor-

responds to the stated voltage 

on the specification label and 

power cord warning tag.

9.  Plug the power cord into the ap-

propriate power outlet. Refer to the 

specification plate for the proper 

voltage.

CUT AND REMOVE WIRE TIES

BEFORE OPERATING UNIT

   Figure 2.   Removing Wire Ties

Summary of Contents for GST-1H

Page 1: ...P N 1011446 Rev I 12 18 Flatbread Toaster Model GST 1H Manufacturing Numbers 9210970 9210971 and 9210972 www antunes com ...

Page 2: ...ut lined in this manual y y Malfunction resulting from improper maintenance y y Damage caused by abuse or careless handling y y Damage from moisture into electrical components y y Damage from tampering with removal of or changing any pre set control or safety device TABLE OF CONTENTS Purchased From Date of Purchase Model Number Serial Number Manufacturing Number IMPORTANT Antunes reserves the righ...

Page 3: ...ply cord plug If it does not fit the outlet have a proper outlet installed by a qualified electrician y y Do not use an extension cord with this appliance y y Electrical ground is re quired on this appliance y y Check with a qualified electrician if you are in doubt as to whether the appliance is properly grounded y y When using a chemical cleaner be sure it is safe to use on cast aluminum Observe...

Page 4: ... 12 18 SPECIFICATIONS Model Mfg No Volts Watts Hertz Plug Description GST 1H 9210970 9210971 9210972 208 4600 60 L6 30P 30 Amp 250 Volt Straight Twist Lock 23 4 593 4 mm 17 5 443 3 mm 17 25 438 mm 26 661 8 mm 20 510 7 mm ...

Page 5: ...1 Flatbread Toaster GST 1H OPERATION 1 Press and release the Power button to turn the toaster on Allow the toaster to warm up until USE ap pears in the display 2 Insert product into the unit using the feeder 3 Finished product drops onto the heated landing zone Light Dark Adjustments The light dark value can be adjusted when the unit is displaying USE To adjust the light dark value press the LIGHT...

Page 6: ...ve any changes NOTE The unit exits Manager Mode after 30 seconds of keypad inac tivity SAFETY FEATURES Hi Limit Control A Hi Limit Control turns off electrical power to the heaters and control circuits and displays HL if the unit overheats To reset the control 1 Let the unit cool for 15 minutes 2 Locate the Hi Limit Controls on the rear of the unit Remove the black protective cap 3 Press and relea...

Page 7: ...owel and allow to air dry 6 Reinstall all accessories Figure 3 7 Turn the unit on and test the unit before returning it to operation IMPORTANT DO NOT INSERT HANDS BETWEEN THE BELTS USE CARE WHEN CLEANING THE BELTS AS THEY ARE MOVING PERSONAL INJURY MAY RESULT Replacing Belts NOTE Be sure to clean and sanitize the Belts completely Failure to properly clean the Belts will shorten the life of the Bel...

Page 8: ...f the belt is away from the direction of belt travel 5 Restore tension on the bottom belt by pushing UP and OUT Figure 4 6 Restore the tension on the top belt by pushing DOWN and OUT Figure 4 7 Lock the brackets shown in Figure 7 by rotating the highlighted pin so the brackets drop down into place Push down on each bracket to ensure they are in position 8 Reinstall the clips as shown in Figure 7 9...

Page 9: ...of Damaged Belt Figure 10 Example of Damaged Belt Figure 11 Example of Damaged Belt Figure 12 Example of Damaged Belt BELT IS TORN AND FOLDED REPLACE BELT BELT IS MISSING SNAPS AND IS DAMAGED REPLACE BELT BELT IS TORN IN THE CENTER REPLACE BELT ...

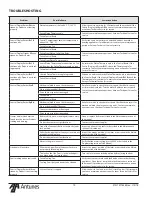
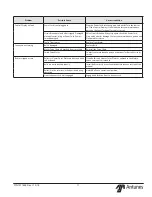
Page 10: ...es Technical Service for service Worn or damaged Ball Bearings Drive chain or sprockets damaged Failed Motor Failed Control Board Control Display flashes SpEd Mechanical bind in one or both conveyors Enter user mode to check motor speed Check both conveyors for mechanical binds Replace necessary parts Contact your mainte nance person or Antunes Technical Service for service Worn or damaged Ball Be...

Page 11: ...trician for service Faulty Transformer Replace Transformer Conveyors not turning Belt is damaged Replace Belts Motor Drive Chain is detached from sprockets Reinstall the Drive Chain Failed Drive Motor Contact your maintenance person or Antunes Technical Service for service Belts are ripped or torn Rollers or Heater Cover Plates are dirty and need to be cleaned Clean Rollers and Heater Cover Plates...

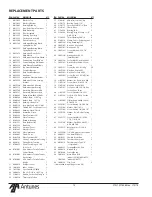
Page 12: ...age 1 50 0701003 Wire Harness Tortilla Toaster Heater 1 51 0800438 Rod Belt Cover 4 52 1001658 Label Control 1 53 1031306 Spec Label 9210970 1 54 2000259 Tube O D 1 4 X 1 625 Lg 4 55 2100212 Handle Pocket Pull Snap In 2 56 2100334 Thrust Strip Teflon 4 TEM PART NO DESCRIPTION QTY 57 2140101 Adhesive Sealant Rtv 1 58 2150172 Bearing Shaft 1 4 2 59 2150179 Sprocket 25B14 1 2 Bore 4 60 2150187 Chain ...

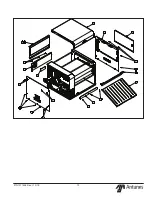
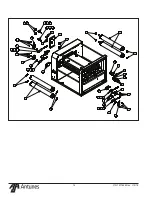
Page 13: ...13 P N 1011446 Rev I 12 18 18 6 19 55 20 43 72 72 14 40 72 7 72 72 39 72 72 72 72 53 ...

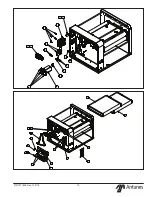
Page 14: ...14 P N 1011446 Rev I 12 18 59 79 24 62 78 78 78 62 37 2 62 11 56 46 35 44 10 46 56 78 1 62 78 3 3 10 46 56 36 12 13 11 56 46 62 78 59 65 61 59 65 61 78 62 37 78 62 36 63 63 63 63 ...

Page 15: ...15 P N 1011446 Rev I 12 18 9 47 32 31 67 68 95 77 91 92 69 70 96 81 93 52 97 66 8 71 73 73 73 94 64 69 60 98 98 64 75 ...

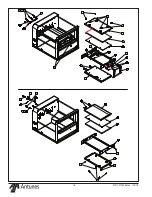
Page 16: ...16 P N 1011446 Rev I 12 18 89 41 75 74 75 42 34 21 22 27 54 89 25 17 89 26 83 86 84 80 99 99 90 27 54 21 34 16 89 42 74 87 45 89 85 86 84 4 75 75 88 ...

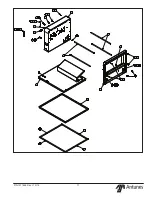
Page 17: ...17 P N 1011446 Rev I 12 18 28 29 28 29 38 5 15 51 33 81 76 81 76 81 76 81 76 51 82 81 76 85 86 84 85 86 84 75 82 81 76 23 75 75 85 86 84 85 86 84 30 ...

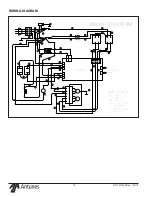
Page 18: ...27 26 31 32 29 30 9 6 7 5 25 16 WHT 5 20 POWER MOV CORD WIRING DIAGRAM GRN YEL 12 1 2 3 5 6 YEL BLK YEL BRN J6 BLK BRN SSR 2 SSR 1 BOTTOM TOP WHT WHT RED BLU BOTTOM TOP 4070280 J8 J4 BLU BLK TOP BOT HIGH LIMITS BLU BLK C1 RED ORG BLK BRN ORG BLK BLK RED BLK ORG BLK GRN YEL RED BLU ORG BRN RED YEL BLK RED BLK BRN 14 7 8 9 10 18 4 34 20 11 12 13 14 15 16 17 18 19 20 21 22 25 33 22 23 24 26 27 28 29 ...

Page 19: ...19 P N 1011446 Rev I 12 18 NOTES ...

Page 20: ...not cover water contamination problems such as foreign material in water lines or inside solenoid valves It does not cover water pressure problems or failures resulting from improper incorrect volt age supply This warranty does not cover Travel Time Mileage in excess of 2 hours 100 miles 160 km round trip from the nearest authorized service agency 2 Antunes reserves the right to make changes in de...

Reviews: