Anova CC251T Instructions Manual Download Page 17

17 


CAUTION!

Do not drain gasoline in closed spaces, near a fireplace, etc. Do not smoke! Gasoline vapors 

can cause explosion or fire.


B) Start the engine and let it run until all the gasoline has been used up.


C) Remove the spark plug. Use an oil container to fill approx. 20 ml of oil in the combustion chamber. Run the 

starter motor to evenly distribute the oil in the combustion chamber. Replace spark plug.


2. Carefully clean and oil mower as described under "Lubrication" above.


3. Lightly oil the cutter to prevent corrosion.


4. Store the mower in a dry, clean and frost-protected place, out of reach of unauthorized persons. 


CAUTION!

Engine must be completely cool before mower is stored.


NOTE:

- When storing any type of power equipment in a storage shed without ventilation or material,


-  Equipment  anti-corrosion precautions should be taken. Using a light oil or silicone, coat the equipment, 

especially the cables and all moving parts.


- Be careful not to bend the cables.


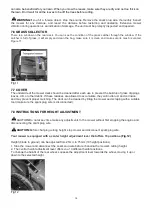
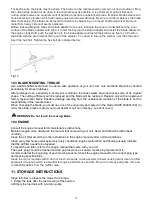
-  If the starter cable becomes disconnected from the cable guide, disconnect and  ground the spark plug 

cable. Squeeze the blade control handle and pull the starter cable slowly. Slide the starter cable onto the 

cable guide pin on the handle.


Transportation


Shut off the engine and let the engine cool down. Next, disconnect the spark plug wire and drain the fuel tank 

according to the instructions in the engine manual. Make sure not to bend or damage the mower when 

pushing it over obstacles.


12.


TROUBLESHOOTING


ISSUE


CAUSE OF THE PROBLEM


CORRECTIVE ACTION


The motor does not 

start.


The throttle choke is not in the 

correct position for the prevailing 

conditions.


Move primer to correct position.


The fuel tank is empty.


Fill tank with fuel: See ENGINE OWNER'S 

MANUAL.


The air filter element is dirty.


Clean air cleaner element: Refer to ENGINE 

OWNER'S MANUAL.


Loose spark plug.


Tighten spark plug: refer to ENGINE OWNER'S 

MANUAL


Spark plug wire is loose or 

disconnected from plug.


Install the spark plug wire on the spark plug.


Spark plug gap is incorrect.


Electrode gap adjustment: refer to ENGINE 

OWNER'S MANUAL


The spark plug is defective.


Install a new properly capped spark plug - refer 

to ENGINE OWNER'S MANUAL


The carburetor is flooded with fuel.


Remove the air cleaner element and pull the 

starter cable continuously until the carburetor 

comes off and install the air cleaner element.


Defective ignition module.


Contact your service representative.


Engine starts hard or 

loses power.


Dirt, water or dirty fuel tank.


Drain fuel and clean tank. Fill the tank with 

clean, fresh fuel.


The vent hole in the fuel tank cap is 

plugged.


Clean or replace fuel tank cap.


The air filter is dirty


Clean the air filter.


Summary of Contents for CC251T

Page 1: ...Instructions CC251T Millasur SL Rúa Eduardo Pondal nº 23 Pol Ind Sigüeiro 15688 Oroso A Coruña 981 696465 www millasur com EN ...

Page 2: ...d maintenance Take this manual with you when you go to work with the machine The contents are correct at the time of printing The rights to make changes at any time are reserved without affecting our legal responsibilities This manual is considered an integral part of the product and must remain with it in case of loan or resale Ask your dealer for a new manual in case of loss or damage READ THIS ...

Page 3: ...ime the machine is primarily used for maintaining residential gardens and small scale home hobby gardens Public facilities sports halls and agricultural forestry applications are excluded Please note that our equipment is not designed for use in commercial or industrial applications Our guarantee will be void if the machine is used under the conditions mentioned above or for equivalent purposes Th...

Page 4: ...CTION 4 TECHNICAL INFORMATION SECTION 5 ASSEMBLY SECTION 6 3 IN 1 SECTION 7 OPERATING INSTRUCTIONS SECTION 8 MAINTENANCE INSTRUCTIONS SECTION 9 LUBRICATION SECTION 10 CLEANING SECTION 11 STORAGE INSTRUCTIONS SECTION 12 TROUBLESHOOTING SECTION 13 WARRANTY SECTION 14 ENVIRONMENT SECTION 15 EC DECLARATION OF CONFORMITY ...

Page 5: ...perate inside the house B 6 When mowing please wear the goggles and earplugs to defend the operator B 7 When repairing please take the spark plug and then repair it according to the operational manual B 8 Caution The engine is hot Figure B Safety label found on mower KEEP HANDS AND FEET OUT Caveat Keep safety signs clear and visible on equipment Replace safety signs if they are missing or illegibl...

Page 6: ...and do not smoke during the refilling process Add fuel before starting the engine Never remove the fuel tank cap or add gasoline while the engine is running or when the engine is hot If gasoline is spilled do not try to start the engine but move the machine away from the spill area and avoid creating any source of ignition until the gasoline vapors have dissipated Replace all fuel tank and contain...

Page 7: ...he mower starts to vibrate abnormally check immediately Stop the engine and disconnect the spark plug wire make sure all moving parts have stopped completely and if there is a key remove the key Whenever you leave the lawn mower Before adding fuel Reduce the throttle setting during engine shutdown and if the engine is equipped with a shutoff valve shut off fuel at the end of mowing Maintenance and...

Page 8: ...rake control handle 3 Choke throttle lever 4 Rope guide 5 Grass catcher 6 Height adjustment lever 7 Oil cap 8 Cover 9 Side flap 10 Spark plug eleven boot handle 12 Fuel cap 13 Lock lever 14 Side discharge channel 15 Quilting Wedge It includes Spark plug wrench ...

Page 9: ... A 98dB A Vibration According to EN ISO 5395 1 Annex G EN ISO 5395 2 4 489m s K 1 5m s 5 ASSEMBLY 5 1 FOLDING HANDLE 1 Fix the lower handlebar on the body of the unit with a suitable wrench Fig 2A two Lift the two lock levers to release the upper handlebar for folding Fig 2B 3 Push the lock lever to lock the handlebar in the operating position Fig 2B Four Adjust the tension by turning the lock nut...

Page 10: ...ion based on the purpose of the application From rear discharge mower to 1 Collection mower or its equivalent 2 Side discharge mower What is compost When you want to fertilize the grass is cut in one step then finely cut and spread again as natural fertilizer Tips for compost mowing Cut regularly by max 2cm from 6cm to 4cm tall grass Use a sharp blade Do not cut wet grass Set to maximum engine spe...

Page 11: ...flap support pin Figure7B 5 Lower side flap flap rests in discharge chute Fig 7C Fig 7A Fig 7B Fig 7C THREE Cut with the grass catcher To mow with the grass catcher remove the spreader wedge and side discharge chute and mount the grass catcher 1 Extraction of the subscriber wedge Raise the rear cover and remove the spreader wedge 2 Side Discharge Chute Extraction for Side Discharge Lift the side f...

Page 12: ... at least 15 minutes after running 7 1 TO START THE MOTOR AND ENGAGE THE CUT 1 Unit is equipped with a socket on the spark plug end make sure the metal loop on the end of the spark plug wire inside the socket is secured over the metal tip of the spark plug 2 When starting the cold engine turn the throttle lever to the position Fig 9A When warming up the engine while running turn the throttle lever...

Page 13: ...dle the mower will stop moving Fig 10 7 5 FOR THE BEST RESULTS IN MOWING Clean up debris on the lawn Make sure the lawn is clear of stones sticks wire or other foreign objects that could be accidentally thrown by the mower in any direction and cause serious personal injury to the operator and others as well as damage to property and surrounding objects Do not cut wet grass For effective mowing do ...

Page 14: ... buildup of grass clippings leaves dirt or other debris If these residues are allowed to accumulate they will invite rust and corrosion and may prevent proper mulching The deck can be cleaned by tilting the mower and scraping with a suitable tool make sure the spark plug wire is disconnected 7 8 INSTRUCTIONS FOR HEIGHT ADJUSTMENT CAUTION Do not at any time make any adjustments to the mower without...

Page 15: ...urs of normal mowing The filter must be cleaned regularly if the mower is used in dry and dusty conditions TO CLEAN ENGINE AIR FILTER 1 Press down on the two tabs at the top of the filter cover Fig 13A 2 Remove filter cover 3 Wash the filter element with soapy water DO NOT USE GASOLINE 4 Blow out the filter element with air 5 Put a few drops of SAE30 oil on the foam filter and squeeze vigorously t...

Page 16: ... be reduced and the blade will be replaced Replace only with an approved factory replacement blade Possible damage resulting from the unbalanced condition of the blade is not the responsibility of the manufacturer When changing the blade you must use one of the original type marked on the blade DAYE 263001330 to order the blade please contact your local dealer or call our company see front cover W...

Page 17: ...engine and let the engine cool down Next disconnect the spark plug wire and drain the fuel tank according to the instructions in the engine manual Make sure not to bend or damage the mower when pushing it over obstacles 12 TROUBLESHOOTING ISSUE CAUSE OF THE PROBLEM CORRECTIVE ACTION The motor does not start The throttle choke is not in the correct position for the prevailing conditions Move primer...

Page 18: ... mower vibrates abnormally The cutting assembly is loose Adjust the blade The cutting assembly is out of balance Balance the blade 13 WARRANTY This product is guaranteed in accordance with legal regulations for a period of 12 months from the date of purchase by the first user This warranty covers all material or production faults does not include defects in normal wear parts such as bearings brush...

Page 19: ...nd fundamental health and safety requirements of the aforementioned EC directives This declaration validates the product to display the CE symbol In the event that the machine is modified and this modification is not approved by the manufacturer and communicated to the distributor this declaration will lose its value and validity Machine name LAWNMOWER Model CC251T Recognized and approved standard...

Reviews: