background image

Page 9 of 12 

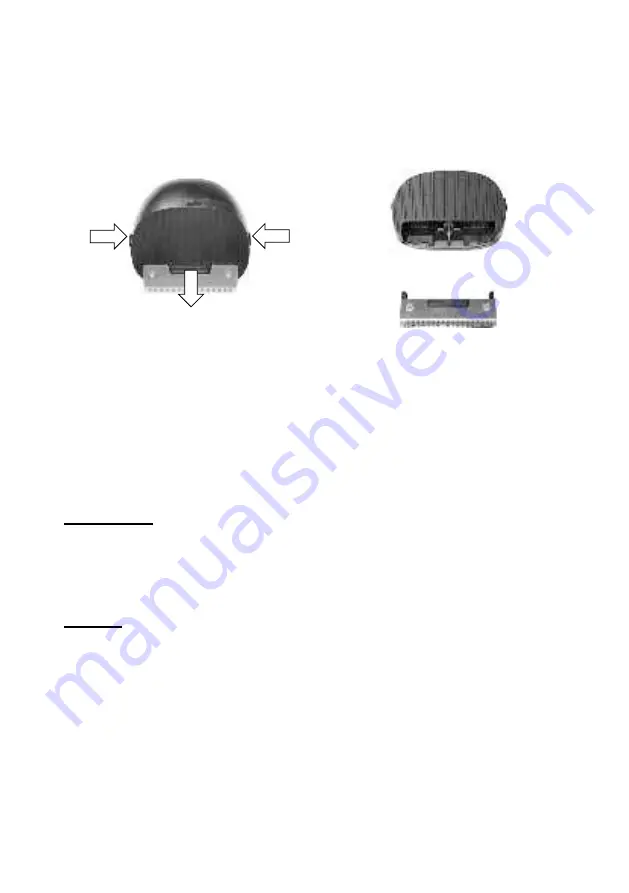
5  Blade Removal 

  The Blade assembly can be removed for deep cleaning or for replacing a 

worn blade. 
 
To remove, press the side buttons inward, and at the same time, slide the 
blade assembly forward and out 

 
To replace, align the blade assembly with the opening and push in all the 
way until it locks in place. 
 

6  Care and Cleaning 


6.1  Cleaning the Clipper 

 
To ensure optimal trimming efficiency, the Clipper must be cleaned regularly. 
 

IMPORTANT: Do Not

 use flammable liquids, chemicals, abrasive creams, steel 

wool or scouring pads for cleaning. 
 
The easiest  way to clean the Clipper  is to brush  off  the  hairs  with the small 
cleaning brush. 
 

DO NOT

 use water or any other liquids to clean. 


6.2  Cleaning the Combs 


The Combs can be cleaned using a mild detergent and warm water. 


Rinse off in clean water and dry thoroughly before use. 
 

NOTE

: Cleaning and user maintenance shall not be made by children without 

supervision 


Summary of Contents for RMT-668

Page 1: ...Hair Clipper User Manual Model No RMT 668 Rev 1 Note The specifications and or components of this appliance are subject to change without prior notice...

Page 2: ...Charging the Appliance 7 4 Operation 8 4 1 Attaching the Height Combs 8 4 2 To use the Clipper 8 5 Blade Removal 9 6 Care and Cleaning 9 6 1 Cleaning the Clipper 9 6 2 Cleaning the Combs 9 6 3 Lubric...

Page 3: ...ock do not immerse the appliance cord or charger in water or other liquids DO NOT use or store the product near sinks baths or showers containing water or near running water DO NOT use in the bath sho...

Page 4: ...at produce heat Do not operate or charge the Appliance underneath or near flammable or combustible materials e g curtains Always switch off and unplug the USB charger cable when finished charging the...

Page 5: ...rechargeable batteries as they may explode or catch on fire or cause personal injury and or damage to property Batteries may explode if disposed of in fire The battery is not replaceable Do Not open...

Page 6: ...Page 6 of 12 2 Components 1 Hair Clipper 5 On Off Slide Switch 2 Height Combs 6 Oil Bottle 3 Charging port 7 USB Cable 4 Charging indicator Light 8 Cleaning Brush 1 2 8 7 6 3 4 5...

Page 7: ...nect the USB cable Return the product to Kmart for replacement Any repairs to the product outside the warranty should be carried out by qualified electrical person only or the product must be disposed...

Page 8: ...pper blade then rotate backwards then push down on the back of the comb until it clicks in place To remove push the small tab down at the back and swing down and forward 4 2 To use the Clipper Once th...

Page 9: ...ipper To ensure optimal trimming efficiency the Clipper must be cleaned regularly IMPORTANT Do Not use flammable liquids chemicals abrasive creams steel wool or scouring pads for cleaning The easiest...

Page 10: ...use directly onto the trimming blades 7 Storage Switch off and unplug the appliance Coil the USB cable loosely Do not kink or pull the cable tight Ensure all parts are completely dry Store your appli...

Page 11: ...nd contact our Customer Service Centre 1800 124 125 Australia or 0800 945 995 New Zealand or alternatively via Customer Help at Kmart com au for any difficulties with your product Warranty claims and...

Page 12: ...Page 12 of 12...

Reviews: