background image

                                                                                                                                     ANITA © 


GP-137-448 MH/L33, GP-237-448 MH/L33 


18 

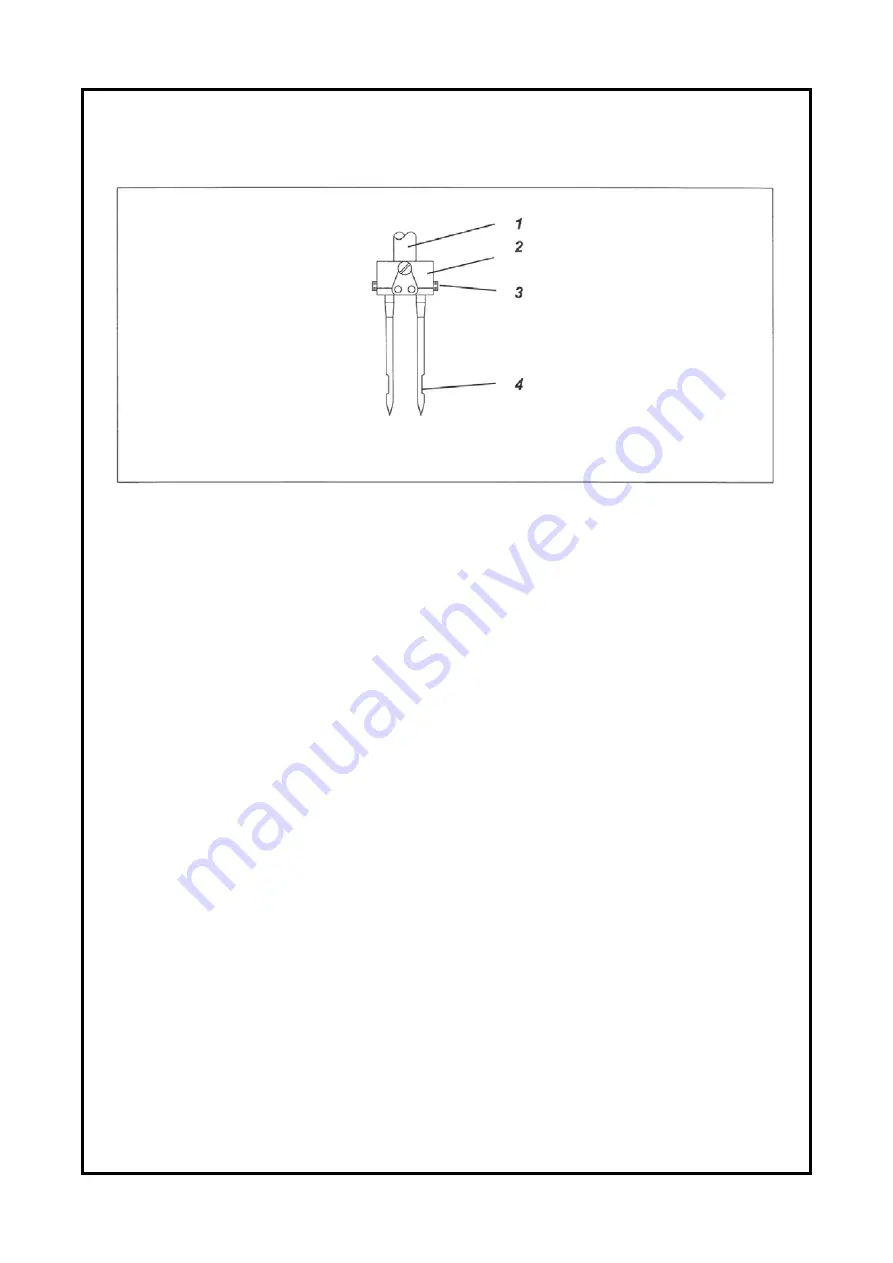
13. CHANGING THE NEEDLE IN 2-NEEDLE MACHINES 


Turn off the main switch. Needle may only be changed if the machine is switched off. Turn 
the handwhell until the needle bar 1 reached its upper end position. Loosen screw 3. Take out 
needle from the needle bar holder 2. Insert the new needle properly into the needle bar hole 2, 
aligning it so that from view of operator the right needle groove 4 points to the right and left 
needle groove to the left (see picture above). Tighten screw 3. 
If needle with a different size is inserted, distance between hook and needle must be adjusted, 
otherwise following  faults can occur: 
 
If thinner needle is used: 

Missing stitches 

Thread damage 

 
If thicker needle is used: 

Damage of hook tip 

Damage of needles 


www.garudan.cz

Summary of Contents for GARUDAN GP-137-448 MH/L33

Page 1: ...Manual GP 137 448 MH L33 GP 237 448 MH L33 ANITA B s r o Pr myslov 2453 7 680 01 Boskovice Czech Republic tel 420 516 454 774 420 516 453 496 fax 420 516 452 751 e mail info anita cz w w w g a r u d a...

Page 2: ...MH L33 GP 237 448 MH L33 2 All rights reserved Property of Anita B s r o and protected by copyright The use of this content without written permission is prohibited Copyright Anita B s r o 2015 w w w...

Page 3: ...SSER FOOT PRESSURE 20 17 SETTING THE PRESSER FOOT STROKE 21 18 SETTING THE STITCH LENGTH 22 19 KEY PANEL ON THE MACHINE ARM 23 20 SEWING 24 21 MAIN SHAFT POSITIONER 1 2 26 22 MAIN SHAFT POSITIONER 2 2...

Page 4: ...ING SETTING 45 41 THREAD AND HOOK POSITION RELATION 46 42 THREAD AND HOOK POSITION RELATION 47 43 THREAD TRIMMER TIMING SETTING 48 44 THREAD TRIMMER POSITION SETTING 49 45 PRESSER FOOT INTERACTION AMO...

Page 5: ...8mm 135x17 110 160 20 mm GP 237 448 MH L33 medium heavy 2 500 8mm 135x17 110 160 20 mm Weight Complete 110 kg Dimension Complete 55x120x120cm General description and usage Twins needle sewing machine...

Page 6: ...motors without a fuse preventing the machine from being started with the pedal watt until the motor stops 7 1 Threading the needle thread threads threading the looper thread etc 7 2 Replacing needles...

Page 7: ...sewing machines needle presser foot throat plate feed dog and bobbin must be disconnected main switch 5 Only experts can do wiring 3 COMMISSIONING THE MACHINE To avoid disorders and damages of the mac...

Page 8: ...fter turning off the power before disassembling H When an error comes along verify the error code first and turn the power on again to use it I Make sure to hold the connector edge facing the arrow ma...

Page 9: ...H L33 GP 237 448 MH L33 9 6 THREADING OF UPPER THREAD 6 1 Threading scheme Single needle machine Double needle machine 1 2 3 4 5 6 7 8 9 10 11 12 13 14 15 16 17 18 19 20 26 27 28 21 22 23 24 25 w w w...

Page 10: ...reels Left needle thread the same as for single needle machines Insert the thread cones on the stand and lead the upper thread through the unwinder arm The arm must be in vertical position above the...

Page 11: ...ANITA GP 137 448 MH L33 GP 237 448 MH L33 11 7 SETTING UPPER THREAD TENSION 4 5 1 2 3 w w w g a r u d a n c z...

Page 12: ...l with the pin 5 Turn the plate 4 clockwise Longer threads ens for start of sewing Turn the plate 4 counter clockwise Main tensioner It is necesary to set minimum tension on main tensioner 2 Crossing...

Page 13: ...orrect setting the needle thread loop must slide with low tension over the thickest point of the hook Loosen screw 1 adjust position of the thread regulator 2 thread regulator to the left more thread...

Page 14: ...obbin Start sewing Winder levet will stop the process of winding when the bobbin is full The winder alaways stops when the knife 3 is in the upper position like indicated on the right picture Take out...

Page 15: ...out the empty bobbin Inserting the full bobbin Insert the bobbin 2 in a way that it moves in counter clockwise direction against the hook when unwinding the thread Conduct the lower thread through the...

Page 16: ...n switch Lower thread tension may only be adjusted only if the machine is switched off Adjustment of tension spring 2 Set the tension spring 2 by the regulating screw 1 Increase the tension turn screw...

Page 17: ...rew 2 Take out needle from the needle bar 1 Insert the new needle properly into the needle bar hole aligning it so that the needle groove 3 points to the hook Tighten screw 2 If needle with a differen...

Page 18: ...older 2 Insert the new needle properly into the needle bar hole 2 aligning it so that from view of operator the right needle groove 4 points to the right and left needle groove to the left see picture...

Page 19: ...rder to move material correcting its position press the knee lever to the right Presser feet will remain lifted all the time when knee lever 1 is pressed Electropneumatic lifting of presser feet pedal...

Page 20: ...pneumaticaly by the foot pedal or mechanically by the knee lever The lever 1 will turn back to its initial position 16 SETTING THE PRESSER FOOT PRESSURE Required pressure of presser foot can be adjust...

Page 21: ...ber of stitches are interdependent The potenciometer is mechanically connected with the dials and the control unit can thus recognize the set presser foot stroke limiting the sewing speed number of st...

Page 22: ...Position 12 maximum stitch length Lower knob 2 sets shorter stitch length Position 1 minimum stitch length Position 12 maximum stitch length Stitch lengths for sewing forward and backwards are identic...

Page 23: ...lower knob is activated 4 Activating or surpressing the initial or final bartack If the initial and final bartacks are switched on by pressing the key the following bartack will be switched off If th...

Page 24: ...ress the pedal halfway back Lift the presser feer Place the sewn material under the needles Sewing Press the pedal forward and keep it pressed The machine continues to sew at speed controlled by the p...

Page 25: ...00 spm Operation modes of maximum presser foot stroke Press the knee switch to activate the maximum presser foot stroke Press the knee switch again to deactivate maximum presser foot stroke Sewing wit...

Page 26: ...ANITA GP 137 448 MH L33 GP 237 448 MH L33 26 21 MAIN SHAFT POSITIONER 1 2 3 screw 10 of the cam 4 need tight on the flat 11 of the shaft 11 w w w g a r u d a n c z...

Page 27: ...e stipulate 1 3 mm one end go through the positioner hole 5 of the machine inserting the notch 3 of the cam 4 loose the fixed screw 6 of the hand wheel 2 removing the and wheel 2 make the dialing 0 al...

Page 28: ...448 MH L33 GP 237 448 MH L33 28 23 NEDDLE POSITION SETTING Use the fixture 1 with outer presser foot 2 inner presser foot 3 needle bar 4 and make the needle bar 4 to pre setting position w w w g a r...

Page 29: ...24 FEED DOG RELATIVE WITH NEEDLE POSITION SETTING Release the screw 1 2 3 move the feeding block 6 and make the needle 4 to center the feed dog 7 hole 5 then tie the screw 1 2 3 notice make the gap 8...

Page 30: ...DING TRANSFER POSITION SETTING Release the screws 1 2 3 move the block 6 and make the block 6 position same as shaft 7 slot 5 Tie the screws 3 2 1 in an order remember to reduce the gap as small as po...

Page 31: ...and link 4 as same as 5 like the diagram Release the screw 6 rotate the eccentric wheel 7 make the notch 8 become horizontal tie the screw 6 Rotate block 9 and make link 10 aligned tie the screw 1 Che...

Page 32: ...scale 4 to aligned with the mark 3 Release the screw 5 and take off the knob 6 use a tool to rotate the top of the rope 7 make the rope 7 to touch plate 8 rote the scale plate 9 and make the scale 4 t...

Page 33: ...33 28 FEEDING TIME ADJUSTMENT Make hand wheel scale 190 aligned with the mark 5 sbake the manual reverse stitch knob 1 up and down adjust the eccentric 7 until the connected unit 6 without any movemen...

Page 34: ...Use the fixture 1 to make the needle bar 2 to pre setting position rotate the hand wheel and make the scale 190 aligned with the mark 3 Release the screw 7 make the distance between the link 4 center...

Page 35: ...GP 237 448 MH L33 35 30 FEED DOG POSITION SETTING Rotate hand wheel 1 and make the scale 190 aligned with the mark 2 Move the feed dog 3 and make needle 4 on the center of the hole 5 tie the screw 6...

Page 36: ...33 GP 237 448 MH L33 36 31 FEED DOG MOVEMENT TIMING SETTING Rotate driving eccentric 2 make the screw 1 aligned with the screw 3 of feeding eccentric 4 Tie the screw 1 adjust the feeding eccentric w w...

Page 37: ...237 448 MH L33 37 32 FEED DOG HEIGHT RELATIVE WITH NEEDLE PLATE SETTING Rotate hand wheel 1 and make the scale 190 aligned with the mark 2 feed dog 3 is 0 8 mm higher than needle plate 4 tie the screw...

Page 38: ...448 MH L33 38 33 COUNTERWEIGHT BLOCK SETTING Rotate hand wheel 1 and make the scale 210 aligned with the mark 2 adjust the screw 3 of the counterweight block and make the screw 3 horizontal with the p...

Page 39: ...R FOOT AMOUNT INTERACTION SETTING Move the shaft 2 make the touch point 3 and positioned screw 4 aligned move the block 1 and put it in the center of the space tie the screw 6 notice don t touch shaft...

Page 40: ...e hand wheel 1 and make the scale 95 aligned with the mark 2 Use tool to rotate the block 5 and adjust the driving eccentric 3 at the same time until the connected unit 6 without any movement tie the...

Page 41: ...36 THE GAP BETWEEN NEEDLE AND HOOK SETTING Rotate the knob 1 make the scale 0 to aligned with the mark 3 release the screw 4 5 6 move the hook set 7 and make the gap 0 1 mm between needle 10 and hook...

Page 42: ...MH L33 GP 237 448 MH L33 42 37 HOOK HEIGHT SETTING Release the screw 1 and move hook 2 make the gap 1 1 2 mm between hook positioned slot surface and needle plate bottom surface tie the screw 1 w w w...

Page 43: ...K THREAD TIMING SETTING Rotate the knob 1 make the scale 0 to aligned with the mark 3 put the fixture 4 5 mm into slot 6 of the eccentric 5 Rotate hook 7 make the hook tip 8 aligned with center of the...

Page 44: ...237 448 MH L33 44 39 NEEDLE PROTECTED PLATE SETTING Use allen key 1 and adjust the screw 2 make the needle protected plate and needle just touched The gap between needle 3 and hook tip 5 would be 0 1...

Page 45: ...33 45 40 INNER HOOK DRIVING TIMING SETTING Rotate the hand wheel 1 make the scale 75 to aligned with the mark 2 release the screw 3 and make the alley key 4 to be vertical with the bottom of the hook...

Page 46: ...he distance between A surface of positioned slot 4 and positioned slot 5 must be more that 1 5 mm so the thread can go through smoothly the distance between the B surface of hook positioned hook and p...

Page 47: ...e the hand wheel 1 make the scale 340 to aligned with the mark 2 then the distance between inner hook opener 4 and inner hook 3 must be more than 1 2 mm release the screw 5 if necessary Make sure that...

Page 48: ...ut the angle of the eccentric 5 maket he flexible knife 5 go according to the arrow direction tie the screw 4 After the flexible knife cutting the thread make the top of the flexible knife and the top...

Page 49: ...ection the stroke will become small and the opposite side will become bigger tie the screw 5 after adjustment Electromagnet 7 and the inner shaft 8 retractable strength is around 0 5 kg tie the nut 10...

Page 50: ...45 PRESSER FOOT INTERACTION AMOUNT SETTING Rotate the hand wheel 1 mke the scale 90 to aligned with the mark 2 move the link 3 forvard to R direction until touch the inner presser foot 4 and needle p...

Page 51: ...ANITA GP 137 448 MH L33 GP 237 448 MH L33 51 46 PRESSER FOOT DRIVING HANDLE SETTING The gap between foot driving handle 1 and holder 2 is0 5 mm tie the screw 3 w w w g a r u d a n c z...

Page 52: ...e more it will become less when move to right tie the screw after adjustment Release the screw 3 rotate the supporter 4 clockwise the thread spring stroke becomes less rotate counterclockwise it would...

Page 53: ...4 adjust the block 5 position make it touch the steel plate 7 as the diagram 6 tie the screw 4 Adjust the positioned hook 8 and put into the eccentric 9 make the gap between the winding plate 2 and bo...

Page 54: ...cts the machine from damage and technical problems Always turn off the main switch before leaning the machine head Maintenance work Description Operation period Machine head Remove sewing dust and thr...

Page 55: ...or Clean filter insert Check if the system is well sealed Level of water must not rise as far as the level of filter 3 Drain water by turning the screw 5 under pressure from water separator 4 Filter i...

Page 56: ...ation system Bearings are lubricated by oil from the oil tank Level of oil must be maintained above the mark of minimum oil level 1 on the oil tank Fill the oil to the tank up to the mark of maximum o...

Reviews: