background image


User manual 

Guangzhou Andea Electronics Technology Co., Ltd.                                                          4/15 
http://www.gzandea.com                   

the  configuration  tool  and  find  the  file 

  in  the  folder  directory. 

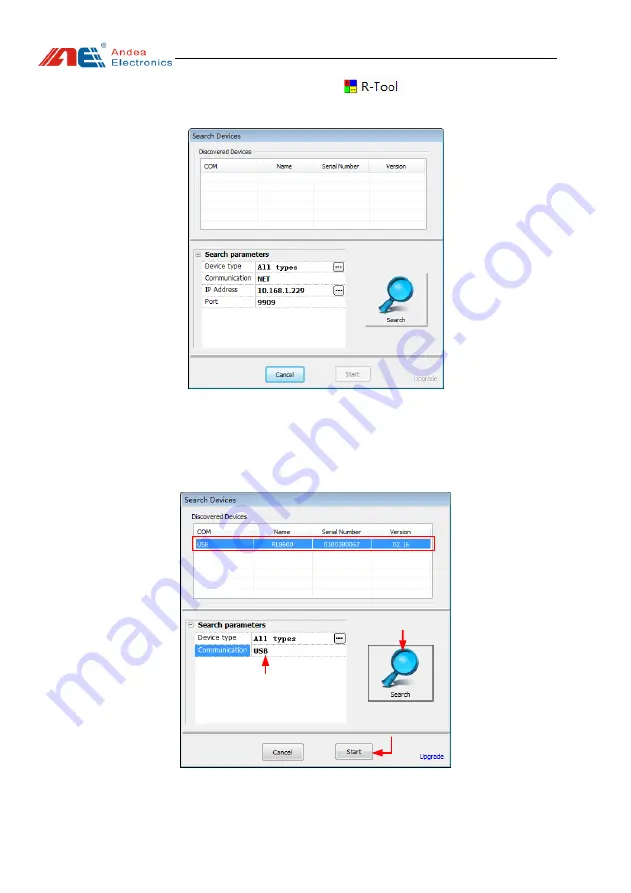
Double-click this file to open the configuration tool, as shown below: 


Figure 5


R-Tool connection interface 

Since  the  device  is  connected  via  USB,  you  need  to  select  "USB"  in  the 

[Communication  Interface]  item  under  [Search  Parameters].  The  search  steps  are  as 

follows: 


Select “USB” for the 

communication interface

 Click the "Search" 

button to search devices

 Select the searched device

 Click the start button to enter the 

device configuration and test interface


Figure 6


Connection steps 

Summary of Contents for RL865

Page 1: ...please read this manual carefully and properly keep it for future reference As our products continue improving they may be changed without advanced notice The copyright of this manual belongs to our c...

Page 2: ...Version V1 0...

Page 3: ...Light 3 4 Device Connection Instructions 3 4 1 Device Connection Instructions 3 4 2 Configuration Description Of Parameters 5 4 2 1 Communication Interface 5 4 2 2 Buzzer Default Parameters 6 4 2 3 RF...

Page 4: ...f various protocols at the same time This product is widely used in desktop card issuance access control electronic bills Libraries and other fields 1 2 Product Features Operating frequency 13 56MHz S...

Page 5: ...6Mhz Support Standard ISO 15693 ISO 14443A ISO 18000 3M3 Communication Interface USB Voltage 150mA 5V Maximum Recognition Distance ISO 15693 11cm ISO 14443A 7cm Standard Sizes 54 34 5mm Maximum Operat...

Page 6: ...light After the device is powered on and the performance is normal the light flashes red slow flashing and the light is not bright when it is abnormal when the device is performing inventory work the...

Page 7: ...below Figure 5 R Tool connection interface Since the device is connected via USB you need to select USB in the Communication Interface item under Search Parameters The search steps are as follows Sel...

Page 8: ...r the device configuration and test interface 4 2 Configuration Description Of Parameters 4 2 1 Communication Interface Figure 8 Configuration interface for communication interface Bus Address between...

Page 9: ...Frequency value range from 0 to 255 only applicable for the Flash type Active time the frequency of buzzer only applicable for the Flash type Note The device V00 02 and above including V00 02 version...

Page 10: ...O14443A Enable to count tags of ISO14443A air protocol 3 ISO18000p3m3 Enable to count tags of ISO18000p3m3 air protocol 4 ISO14443B Enable to count tags of ISO14443B air protocol ISO15693 1 Data codin...

Page 11: ...ed 3 Only read new tags each tag is only read once when it does not leave the antenna sensing area 4 Stop Trigger Try N times when no tags set the number of attempts if no new tags are found Max Timeo...

Page 12: ...ventory can be automatically completed even if the host software does not send commands scan setting in the scan mode should be configured in advance Scan Mode Configuration 1 Filtered time of duplica...

Page 13: ...bytes UID length 0 8 0 for unlimited length output of a complete UID 4 Parameter of reading block with ISO15693 Byte offset the offset of the first byte to be read Byte count the number of bytes to b...

Page 14: ...interface of the software Step 2 Select the Inventory in the drop down list above the Start button Step 3 Click the Start button to carry out the inventory testing 4 3 2 Single Tag Operation Testing I...

Page 15: ...r multiple tags in UID drop down box select the tags required to be operated and then click the Connect button The green area represents the set operating area Figure 15 Single tag reading and writing...

Page 16: ...d 13 15 http www gzandea com 5 Technical Support Download link for development data and testing https www gzandea com download php Call for equipment debugging and technical support Mobile phone 138 0...

Page 17: ...and if not installed and used in accordance with the instructions may cause harmful interference to radio communications However there is no guarantee that interference will not occur in a particular...

Page 18: ...the device into which the module is installed must also display a label referring to the module The final end device must be labeled in a visible area with the following Contains FCC ID 2AFI8 RL865 Co...

Reviews: