40’
CLASSIC PLUS FRAME TENTS
|
ASSEMBLY INSTRUCTIONS
STAKES AND GUY ROPES
17.
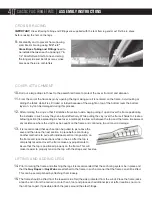
Place Stakes approximately 5-feet out from each leg. Drive each
Stake vertically into the ground so that approximately 6” of the
stake is showing.
(See staking diagram)
18.
Attach Guy Ropes or Ratchet Straps to each Leg and Stake.
Secure corner legs first and then the side legs.
GUY ROPES: Loop the rope through the exterior ring on each
Corner and Mid-Rafter Fitting. Tie the bottom ends of the rope
to the stake using a Double Loop Clove Hitch knot
(See knot
diagram). Tighten by pulling on the excess rope. Fold and secure
excess rope to the stake. Repeat at each leg and stake.
RATCHET STRAPS: Attach the ratchet buckle with the loop
strap to the stakes by turning the 6” loop at the end of the
ratchet inside out and pull the strap through the loop to create
a noose and pull tight over the stake. Take the loose strap and
run it through the ring on Corner Fitting and pull it through the
reel bars slot of the ratchet (ratchet buckle needs to have the
handle facing upward). Pull the loop strap back towards the tent
approximately 18”. Hold the strap with one hand and begin to
crank the ratchet handle back and forth. Roll excess strapping
and secure in the ratchet buckle. Repeat at each leg and stake.
16.
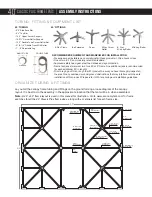
When raising the frame off the ground, be sure to lift as evenly as possible. Do not allow the frame to be
higher in the center than at the ends. Do not lift the frame any higher than necessary to attach the Legs in
their 7-foot position. It is recommended that you raise the legs to their 8-foot or 9-foot position after the
cover is squared and strapped to the frame.
5” to 6”
5’ to 6’
CORRECT ANGLE INCORRECT ANGLE
DOUBLE LOOK CLOVE HITCH KNOT
RATCHET STRAP
PLACEMENTS
19.
For securing the tent on a hard surface, such as concrete, where stakes cannot be used, secure the tent legs
to a ringed sandbag cover filled with a 60 lb. sand bag or a filled 55-gallon barrel. Secure with same guy rope
or ratchet procedure as outlined above.
The installation of the tent framing and cover is now complete. If desired, Sidewalls, Liners and Drapes may be
installed.


