


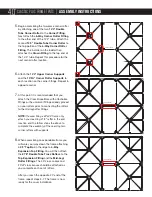


1.
Beginning in a corner slide the Side Eave
Bars
over the pre-positioned Corner, Mid-Leg
Rafter,
and 6-Way Mid-Leg Rafter fittings.
Lock them into place using the snap buttons
creating a ridged perimeter.
2.
After completing the eave build place your 10’
step ladder in the center of the frame 20’ in
from the end. This will be used to help support
the crown weldment during rafter assembly.
3.
While still on the ground and at the first 6-Way
Mid-Leg/Rafter Fitting
location on the 40’
side attach one end of the 21’8” Double
Truss Rafter
to the Crown Fitting making
sure it is attached to the correct location on
the fitting (hip rafter location angle is less than
intermediate rafter location angle). Hand the
end of the rafter with the attached fitting to
the installer on the ladder and then attach the
opposite end to the 6-Way Mid Leg/Rafter
Fitting
on the ground. The ladder can help
support the rafter at the top. A tent jack may
also be used to elevate and hold the rafters in
place while assembling from the ladder.
4.
Now proceed to the first 21’8” Double Truss
Rafter
location down the side (20’ from the
corner) where another 6-Way Mid-Leg/Rafter
Fitting
is located and hand the end of the
rafter to the installer on the ladder. After the
installer attaches the top end of the rafter to
the Crown Fitting connect the bottom of the
rafter to the 6-Way Mid-Leg/Rafter Fitting. If
you are using the universal cross brace fitting
be sure to slide the fitting into position before
attaching the rafter to the 6-Way Mid-Leg/
Rafter Fitting. Repeat this step on the opposite
side.
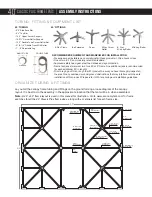
EAVE ASSEMBLY
40’
CLASSIC PLUS FRAME TENTS
|
ASSEMBLY INSTRUCTIONS
10’ Step Ladder
RAFTER / PEAK ASSEMBLY
10’ Step Ladder
10’ Step Ladder


