background image


OPTIMIZER HD 


PAGE 20


Chapter 5 : REMOTE CONTROL SOFTWARE 

Your device is shipped with a Windows compatible 

Remote Control Software

. This software allows you to control and make 

all adjustments by a simple mouse click. 

NOTE:

 Preferably use Windows NT, 2000 or XP for LAN operation. 


5-1. CONNECTIONS 

c


CONNECTING TO THE RS-232 PORT: 

- Connect the serial port of your control device to the 

RS-232

 port (DB9 Female connector) of the device with a 

straight

 cable (DB9 Female / DB9 Male). 

- Speed transmission:

 9600 bauds, 8 data bits, 1 stop bit, no parity bit, and no flow control. 

- Pin-out:  

PIN # 

FUNCTIONS 

2 TRANSMIT 

DATA 

(Tx)


3 RECEIVE 

DATA 

(Rx)


5 GROUND 

(Gnd)


d


CONNECTING TO THE LAN PORT (optional): 

- Connect the LAN port (RJ45 connector) of the device to your network according to your installation. 


5-2. SOFTWARE INSTALLATION: 

c

  Turn your computer ON and wait for Windows to completely start. 

d

  Insert the CD-ROM into your drive: the ANALOG WAY home window will open automatically. 

e

  Select the language of the CD-ROM menus, then click on "Install a Remote Control Software" and select the name 

of your device. 

IMPORTANT:

  If the Autorun is not enabled: From the Windows desktop, open My Computer and select the CD-

ROM drive. Select the Autorun folder, and then select the autorun.exe file. 

f

  Follow the Windows installation instructions.  


5-3. COMMUNICATION SETUP 

c

  Connect the RS-232 or RJ45 cable between the device and the control device as indicated in the section 5-1.  

d

  Then only power ON all of the devices. 

e

  Click on the program files 

Optimizer HD

 in 

Start>program>Analogway>Optimizer HD

 to run the software. 

f

 Click on 

Controls 

menu and select 

RS232/LAN setup

, then: 


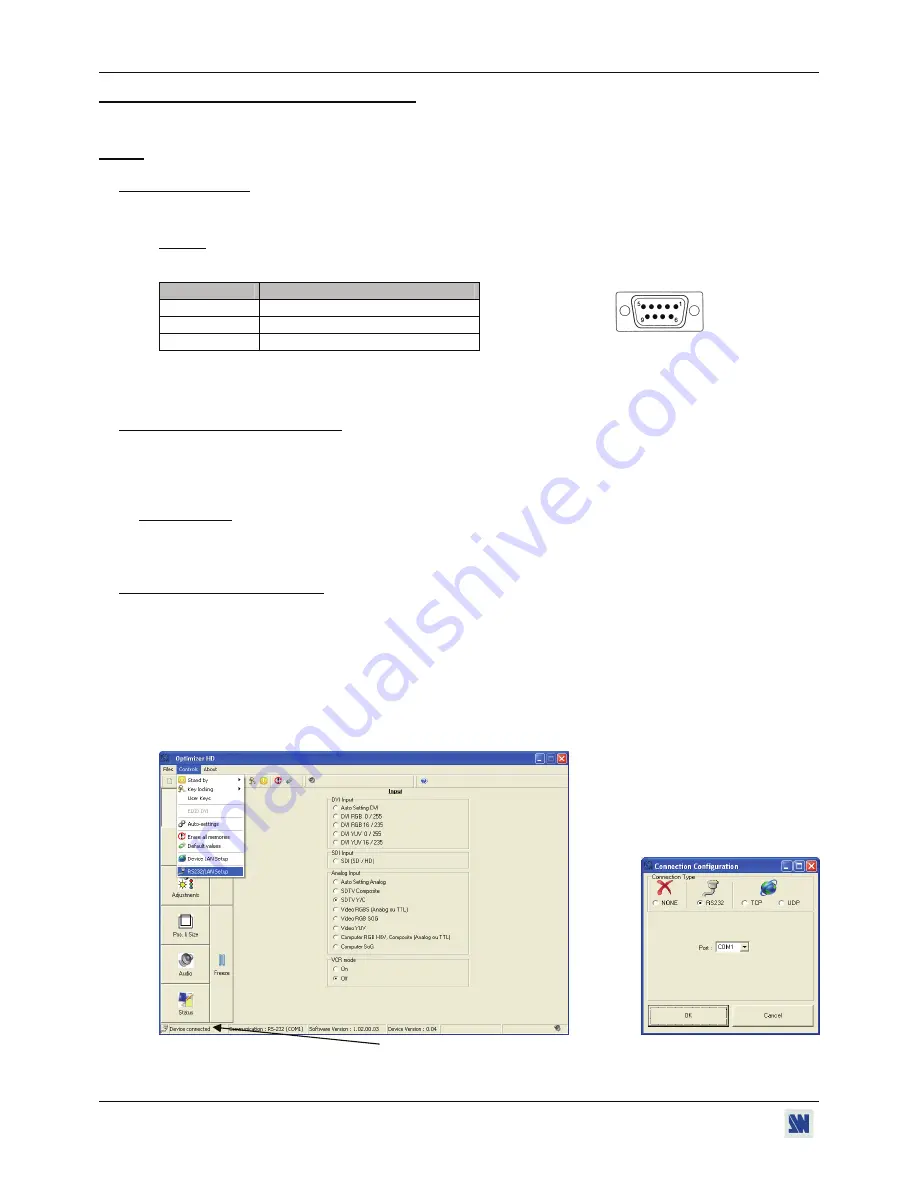
CASE OF RS-232 PORT:


- With the front panel display menu of the device, verify that the RS-232 port is activate (

CONTROL > 

RS232/LAN port > RS232

).


- With the 

Controls

 menu of the software, select 

RS232/LAN setup, 

then select RS232 and select the 

COM

 port 

number corresponding to the connection of the device in the 

Port

 field. 


DB9 female (Rear panel of the device) 

If the communication is OK, the message "

Device connected

" is 

displayed as well as the model in the windows title bar. 

Summary of Contents for Optimizer HD OHD888

Page 1: ...ANALOG WAY OPTIMIZER HD AW 5073 EDITION 03 08 User s Manual MODELS OHD888 OHD888 AG...

Page 2: ...ed from wall outlet In both cases please follow these instructions The power cord of the device should be unplugged from the outlet when left unused for several days To unplug the device do not pull o...

Page 3: ...bstruer ses ouvertures Si un liquide ou un objet p n tre l int rieur de l appareil d branchez imm diatement l appareil et faites le contr ler par un personnel qualifi avant de le remettre en service I...

Page 4: ...ue lea cuidadosamente todas las consignas de seguridad y de funcionamiento del aparato antes de usarlo Conserve las instrucciones de seguridad y de funcionamiento para que pueda consultarlas posterior...

Page 5: ...N 12 3 1 INTRODUCTION 12 3 2 CONTROL BUTTONS 12 3 3 STATUS MODE 12 3 4 CONTROL MODE 13 3 5 FUNCTIONS DESCRIPTION 15 Chapter 4 UPDATING THE DEVICE 19 4 1 UPDATE SOFTWARE INSTALLATION 19 4 2 DEVICES CON...

Page 6: ...l OHD888 AG 2 5 4 4 3 3 3 OR Analog TV HDTV source connection RGBS video Component Y Cr Cb or S VIDEO Y C source Composite Video source connection RGsB source connection connection source connection S...

Page 7: ...ng path is preserved by state of the art over sampling 12 bits A D converters It features real time Motion Adaptive de interlacing correction of compression artefact noise removal 3 2 and 2 2 Pull Dow...

Page 8: ...ional IP LAN communication port 1 4 INSTALLATION IMPORTANT Please read all the safety instructions pages 2 to 4 before starting Table Top Mounting The device can be used directly on a table the unit i...

Page 9: ...st image adjustment SHARPNESS Sharpness image adjustment HUE Hue image adjustment GAMMA Gamma image adjustment ASPECT RATIO Aspect ratio selection 1 1 The image and aspect ratio of the source are pres...

Page 10: ...COMPUTER TV HDTV Computer or video source on a HD15 female connector RGBS Y Cr Cb Y C C V Computer RGBS or RGsB source RGBS video source Component SDTV or HDTV source S VIDEO Y C source or Composite V...

Page 11: ...AG 2 5 4 4 3 3 3 OR Analog TV HDTV source connection RGBS video Component Y Cr Cb or S VIDEO Y C source Composite Video source connection RGsB source connection connection source connection 2 2 SETTI...

Page 12: ...adjust the audio level ENTER button From the STATUS MODE press this button to enter in the CONTROL MODE From the CONTROL MODE press this button to confirm a selected item EXIT MENU button From the ST...

Page 13: ...ble with a Computer source 2 Available with a Video source 3 Available with a EDTV HDTV source 4 Available with a NTSC source Aspect in 4 3 Standard V position H size V size H position RGB YUV 0 255 1...

Page 14: ...dress Sync loss time Stand by time EDID Format EDID Rate OFF Auto after Audio Embed On Off Mute On Off Level Balance Preset Control Versions Comm port select 5 Only if LAN Option installed RS232 LAN 5...

Page 15: ...improving the image contour of low quality VHS tapes OUTPUT Status Displays the output status Output format Output format selection Genlock Output format synchronized onto the signal connected to the...

Page 16: ...ut Select one of the following output aspect ratio between 1 1 The entire image and the aspect ratio are preserved Crop The image is zoomed without deformation to fill the screen but some borders of t...

Page 17: ...or adjustment Hue Hue adjustment NTSC only Gamma Gamma adjustment Sharpness Sharpness adjustment Preset Reset all the image parameters to the factory settings AUDIO Embed Allows embedding analog audio...

Page 18: ...fault value 10500 remote port You must set the remote TCP port number for the unit to make outgoing connections This parameter defines the port number on the target host to which a connection is attem...

Page 19: ...the serial port of your computer with a DB9 M F straight cable Then with the front panel display menu activate the RS232 communication port CONTROL RS232 LAN RS232 For the LAN communication port Conn...

Page 20: ...Select the language of the CD ROM menus then click on Install a Remote Control Software and select the name of your device IMPORTANT If the Autorun is not enabled From the Windows desktop open My Comp...

Page 21: ...t CONTROL LAN setup then activate the LAN communication port CONTROL RS232 LAN port LAN With the Controls menu of the software select RS232 LAN Setup and select UDP or TCP Then configure the Local por...

Page 22: ...d OPTIMIZER HD PAGE 22 5 4 USING THE SOFTWARE continued d Click on the Output button and adjust your output e Click on the Image button and then adjust all the needed image parameters NOTE Image param...

Page 23: ...Y 1 Vp p 0 7 V Luma 0 3 V Sync Cr 0 7 Vp p Cb 0 7 Vp p Impedance Y Cr Cb 75 ohms HD YUV Connectors BNC x3 or HD15 Formats 720p 1035i 1080i 1080p 1080sF Levels Y Cr and Cb 1 Vp p 0 7 V sync Sync Tri l...

Page 24: ...Hz 1080p 30 29 97 25 24 23 98 Hz 1080sF 30 29 97 25 Hz 6 2 OUTPUTS SD SDI HD SDI Connectors BNC x2 Data rate Serial Digital Interface SD SDI YUV 4 2 2 10 bits 270 Mb s HD SDI YUV 4 2 2 10 bits 1 485 G...

Page 25: ...or Data Rate 9600 Bauds 8 data bits 1 stop bit no parity bit and no flow control LAN Optional on RJ45 connector Protocol TCP Transmission Control Protocol UDP User Datagram Protocol Data Rate 10 100 M...

Page 26: ...uding free materials and labor This warranty does not apply if the product has been improperly installed or abused handled with improper care used or stocked in abnormal conditions modified opened dam...

Reviews: