background image

UG-1615 

EVAL-AD7386FMCZ


User Guide 


Rev. A | Page 14 of 21 

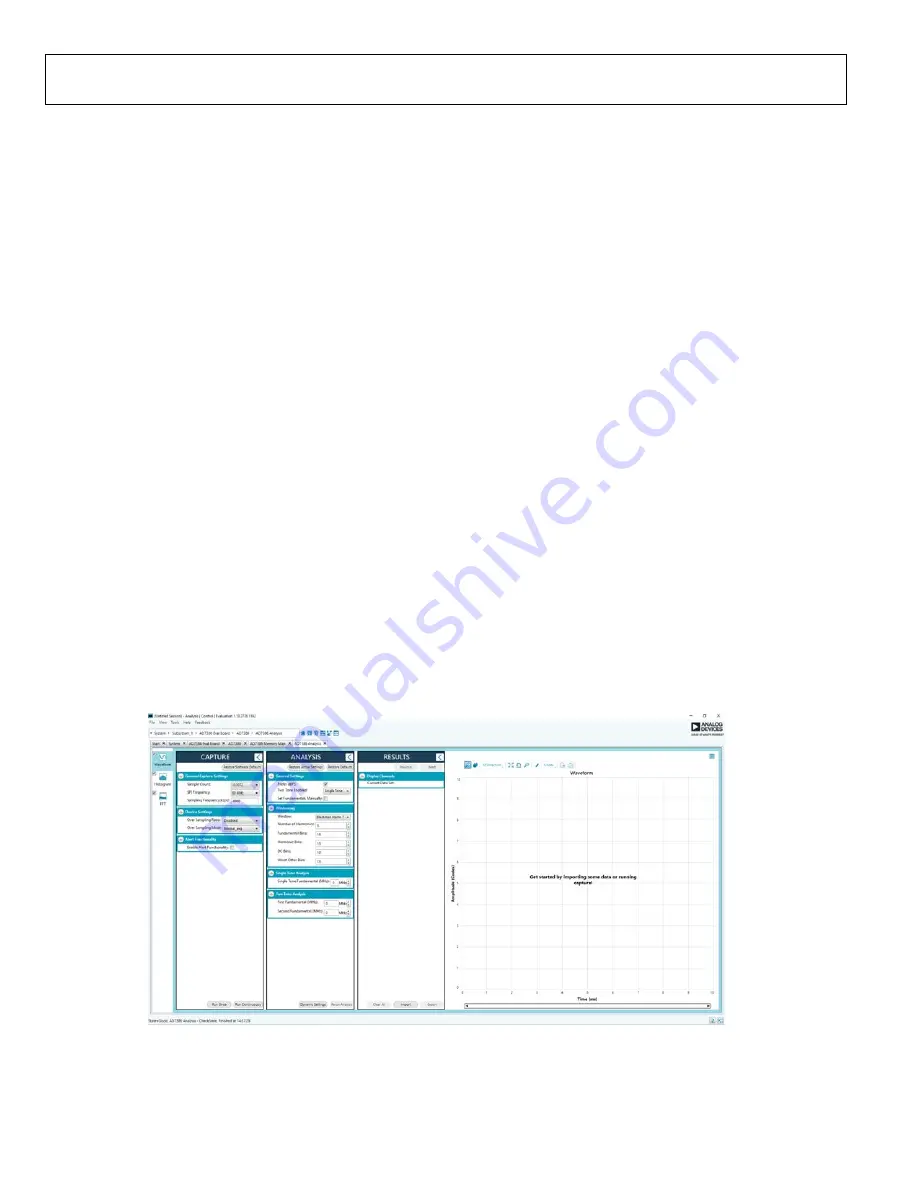
DESCRIPTION OF ANALYSIS WINDOW 

Click 

Proceed to Analysis

 in the chip view to open the window 

shown in Figure 18. The analysis view contains the 

Waveform


tab, 

Histogram

 tab, and 

FFT

 tab. 

Waveform Tab 

The 

Waveform

 tab displays data in the form of time vs. discrete 

data values with the results (see Figure 19). The 

CAPTURE


pane contains capture settings that apply to the registers 
automatically before data capture. 

CAPTURE Pane 
General Capture Settings 

The 

Sample Count 

dropdown list allows the user to select the 

number of samples per channel per capture. 
The 

SPI Frequency (MHz) 

dropdown list allows the user to 

select the SPI clock frequency used to transfer data between the 
FPGA device and th

AD7386

 during device register reads and 

writes and during data capture. This frequency must be set 
relatively higher than the set throughput rate. 
The user can enter the input sample frequency in kSPS in the 

Sampling Frequency(ksps)

 box. Refer to the 

AD7386

 data 

sheet to determine the maximum sampling frequency for the 
selected mode. 


Device Settings 

The 

Over Sampling Ratio 

box includes options to disable the 

oversampling ratio function (

Disabled

) or to set the oversampling 

ratio between 2 and 32, which, when selected, automatically 
enables the oversampling ratio function and provides improved 
signal to noise ratio (SNR) performance. Refer to the 

AD7386


data sheet to determine the maximum oversampling ratio for 
the selected over sampling mode. 
When an option other than 

Disabled

 is selected, a drop down 

list appears. Select 

18-Bit Resolution 

to enter 18-bit resolution 

mode. The resolution boost is used in conjunction with the 
oversampling rate to provide two extra bits of resolution. 
The 

Over Sampling Mode

 dropdown list allows the user to 

select the mode of oversampling. This setting is only applicable 
when oversampling is enabled.  

Run Once 

Click 

Run Once 

to start a data capture of the samples at the 

sample rate specified in the 

Sample Count

 dropdown list box. 

These samples are stored on the FPGA device and are 
transferred to the PC only when the sample frame is complete. 

Run Continuously 

Click 

Run Continuously 

to start a data capture that gathers 

samples continuously with one batch of data at a time. This 
option runs the 

Run Once

 operation continuously. 

RESULTS Pane 
Display Channels 
Display Channels 

allows the user to select the channels to 

capture. The channel data is shown only if that channel is 
selected before the capture. 

2

1

193-

018


Figure 18. Analysis View 


Summary of Contents for EVAL-AD7386FMCZ

Page 1: ...s of the AD7386 analog to digital converter ADC The evaluation board can be controlled by the EVAL SDP CH1Z via the 160 way system demonstration platform connector P7 The EVAL SDP CH1Z board controls the evaluation board through the USB port of the PC using the Analysis Control Evaluation ACE software which is available for download from the ACE software page The EVAL AD7386FMCZ can evaluate the A...

Page 2: ...ors 6 Test Points 6 Evaluation Board Software 7 Software Installation Procedures 7 Evaluation Board Setup Procedures 8 Evaluation Software Operation 10 Launching the Software 10 Description of Chip View 10 Description of Chip View Window 12 Channel Selection 12 Oversampling 12 Reference 12 Serial Mode 13 Description of Memory Map Window 13 Description of Analysis Window 14 Exiting the Software 16 ...

Page 3: ...start after installation 2 Ensure that the link options are configured as detailed in Table 2 3 Connect the EVAL SDP CH1Z board to the EVAL AD7386FMCZ as shown in Figure 2 4 Connect the EVAL SDP CH1Z board to the PC via the USB cable If using Windows XP search for the EVAL SDP CH1Z drivers Choose to automatically search for the drivers for the EVAL SDP CH1Z board if prompted by the operating syste...

Page 4: ...k positions are set according to the required operating mode before applying power and signals to the EVAL AD7386FMCZ See Table 2 for the complete list of link options The EVAL AD7386FMCZ is powered by the EVAL SDP CH1Z board by default External power supplies can be applied to the board See Table 1 for a description of the connectors used and Table 2 for the link configurations required Table 1 O...

Page 5: ...LK4 Selection for external voltage reference VREF of ADC 3 4 Use the internal 3 3 V from the ADR4533 for VREF Change to Position 1 2 link shorted on Pin 1 and Pin 2 to use the external reference Change to Position 5 6 link shorted on Pin 5 and Pin 6 to use the ADR4525 LK5 Selection for logic voltage VLOGIC of ADC 3 4 Use internal 2 3 V from the ADP166 for VLOGIC Change to Position 1 2 to use the e...

Page 6: ...L AD7386FMCZ These test points provide easy access to the signals from the evaluation board for probing evaluation and debugging Table 3 On Board Connectors Connector Function J1 Negative analog input for Channel A J2 Positive analog input for Channel A J3 Negative analog input for Channel B J4 Positive analog input for Channel B P1 Amplifier mezzanine card inputs P2 Amplifier mezzanine card outpu...

Page 7: ...talling the ACE Evaluation Software To install the ACE evaluation software 1 Download the ACE evaluation software to a Windows based PC 2 Double click the ACEInstall exe file to begin the installation By default the software is saved to the following location C Program Files x86 Analog Devices ACE 3 A dialog box appears asking for permission to allow the program to make changes to the PC Click Yes...

Page 8: ...ftware Installation Procedures section set up the EVAL AD7386FMCZ and the EVAL SDP CH1Z as detailed in the Connecting the EVAL AD7386FMCZ and EVAL SDP CH1Z to a PC section The evaluation software and drivers must be installed before connecting the EVAL AD7386FMCZ and EVAL SDP CH1Z to the USB port of the PC Installing the software and drivers prior to connection ensures that the evaluation system i...

Page 9: ...ce Manager window A dialog box may appear asking for permission to allow the program to make changes to the computer Click Yes The Computer Management window will appear From the System Tools list click Device Manager 3 If the EVAL SDP CH1Z driver software is installed and the EVAL SDP CH1Z board is connected to the PC correctly Analog Devices SDP H1 appears nested under the ADI Development Tools ...

Page 10: ...Board icon to view the board view see Figure 13 3 Double click the AD7386 chip icon to open the chip view window see Figure 14 4 Click Software Defaults and then click Apply Changes DESCRIPTION OF CHIP VIEW After completing the steps in the Software Installation Procedures section and the Evaluation Board Setup Procedures section set up the system for data capture as follows 1 Block icons that are...

Page 11: ...EVAL AD7386FMCZ User Guide UG 1615 Rev A Page 11 of 21 21193 013 Figure 13 Board View 21193 014 Figure 14 Chip View ...

Page 12: ... AD7386 CHANNEL SELECTION Click the multiplexer icons circled in red see Figure 15 to select the ADC channel pairs for conversion AINA0 AINB0 and AINA1 AINB1 OVERSAMPLING The AD7386 offers an oversampling function on chip and has two user configurable oversampling modes normal average and rolling average Click the OSC block to configure the oversampling ratio REFERENCE Click the REF block to selec...

Page 13: ...DESCRIPTION OF MEMORY MAP WINDOW Click Proceed to Memory Map in the bottom right corner of the chip view window to open the window shown in Figure 17 The memory map shows all registers of the AD7386 Apply Changes The registers are populated with default values when powered up To implement the values changed in all the registers click Apply Changes to write to the registers Apply Selected To implem...

Page 14: ...rsampling ratio function Disabled or to set the oversampling ratio between 2 and 32 which when selected automatically enables the oversampling ratio function and provides improved signal to noise ratio SNR performance Refer to the AD7386 data sheet to determine the maximum oversampling ratio for the selected over sampling mode When an option other than Disabled is selected a drop down list appears...

Page 15: ...s and Axis Controls Click the display units dropdown list to select whether the data graph displays in units of hexadecimal volts or codes The axis controls are dynamic When selecting either y scale dynamic or x scale dynamic the corresponding axis width automatically adjusts to show the entire range of the ADC results after each batch of samples Histogram Tab The Histogram tab contains the histog...

Page 16: ... bins and fundamental bins that must be included in the analysis are also set up in this section Single Tone Analysis and Two Tone Analysis These sections set up the fundamental frequency included in the FFT analysis Type in the values for the Two Tone Analysis section when two frequencies are analyzed RESULTS Pane Signal Signal displays the sample frequency fundamental frequency and fundamental p...

Page 17: ...1UF 0 1UF TBD TBD TBD TBD TBD RED RED RED RED ADA4896 2ARMZ ADA4896 2ARMZ ADA4896 2ARMZ ADA4896 2ARMZ ADA4896 2ARMZ ADA4896 2ARMZ ADA4896 2ARMZ JP1 R66 R39 R76 R34 C13 R31 C25 R65 R68 R67 R37 R63 C16 R43 R54 R56 R50 R52 A3 R18 R22 R21 R25 R23 R27 R55 C23 C22 C30 C29 C18 C24 C31 C1 C36 R61 R64 R9 R41 R58 R11 R2 C2 R35 C10 J3 R5 C8 A1 R57 REFCAP R84 R83 R82 R81 R80 R79 R78 R77 R75 R74 R73 R72 R71 R7...

Page 18: ... RED RED 10K 10K 2V5REF 3V3REF 3V3 A5 A6 C55 C56 C57 C58 C59 C60 C61 C62 C63 C64 C65 C66 C67 C68 C69 C70 C71 C72 C73 EXTREF GND3 GND4 JP5 LK4 LK5 R3 R86 R88 R89 R90 R91 REF REFIN REFOUT U2 U3 U5 U6 VCM VLOGIC R85 R87 AMP_PWR AMP_PWR 5V EXT_VCC AMP_PWR VCC 5V REFIN VCM AMP_PWR REFOUT 5V EXT_VLOGIC SDP_VADJ VLOGIC 5 1 2 4 3 6 2 8 7 5 3 1 4 6 2 8 7 5 3 1 4 1 42 3 1 6 5 4 3 2 1 6 5 4 3 2 1 2 3 1 1 5 2...

Page 19: ...EXT_AMP_PWR EXT_VCC C_PG 5V VREG VREG 1 1 1 2 3 1 2 3 1 2 3 1 2 1 2 3 1 2 3 C1 C2 C3 C4 C5 C6 C7 C8 C9 C10 C11 C12 C13 C14 C15 C16 C17 C18 C19 C20 C21 C22 C23 C24 C25 C26 C27 C28 C29 C30 C31 C32 C33 C34 C35 C36 C37 C38 C39 C40 D1 D2 D3 D4 D5 D6 D7 D8 D9 D10 D11 D12 D13 D14 D15 D16 D17 D18 D19 D20 D21 D22 D23 D24 D25 D26 D27 D28 D29 D30 D31 D32 D33 D34 D35 D36 D37 D38 D39 D40 G1 G2 G3 G4 G5 G6 G7 G...

Page 20: ...mic chip multilayer X7R Vishay VJ0603Y104KXAAC31X C22 C23 C29 C30 330 pF ceramic capacitors NP0 0603 Kemet C0603C331J5GACTU C27 C28 C34 C35 C41 C42 C49 C50 10 μF ceramic capacitors multilayer X5R TDK C2012X5R1E106K085AC C31 C63 C64 2 2 μF multilayer ceramic capacitors X5R 0805 TaiyoYuden LMK212BJ225KD T C37 C46 C52 C56 C60 C65 C68 C78 C84 1 μF chip ceramic capacitors X7R Murata GCM21BR71E105KA56L ...

Page 21: ...ermore the license granted is expressly made subject to the following additional limitations Customer shall not i rent lease display sell transfer assign sublicense or distribute the Evaluation Board and ii permit any Third Party to access the Evaluation Board As used herein the term Third Party includes any entity other than ADI Customer their employees affiliates and in house consultants The Eva...

Reviews: