background image

UG-1888 

ADP8860SHIELD-EVALZ

/

ADP8861SHIELD-EVALZ

 User Guide


Rev. 0 | Page 6 of 16 

GUI 

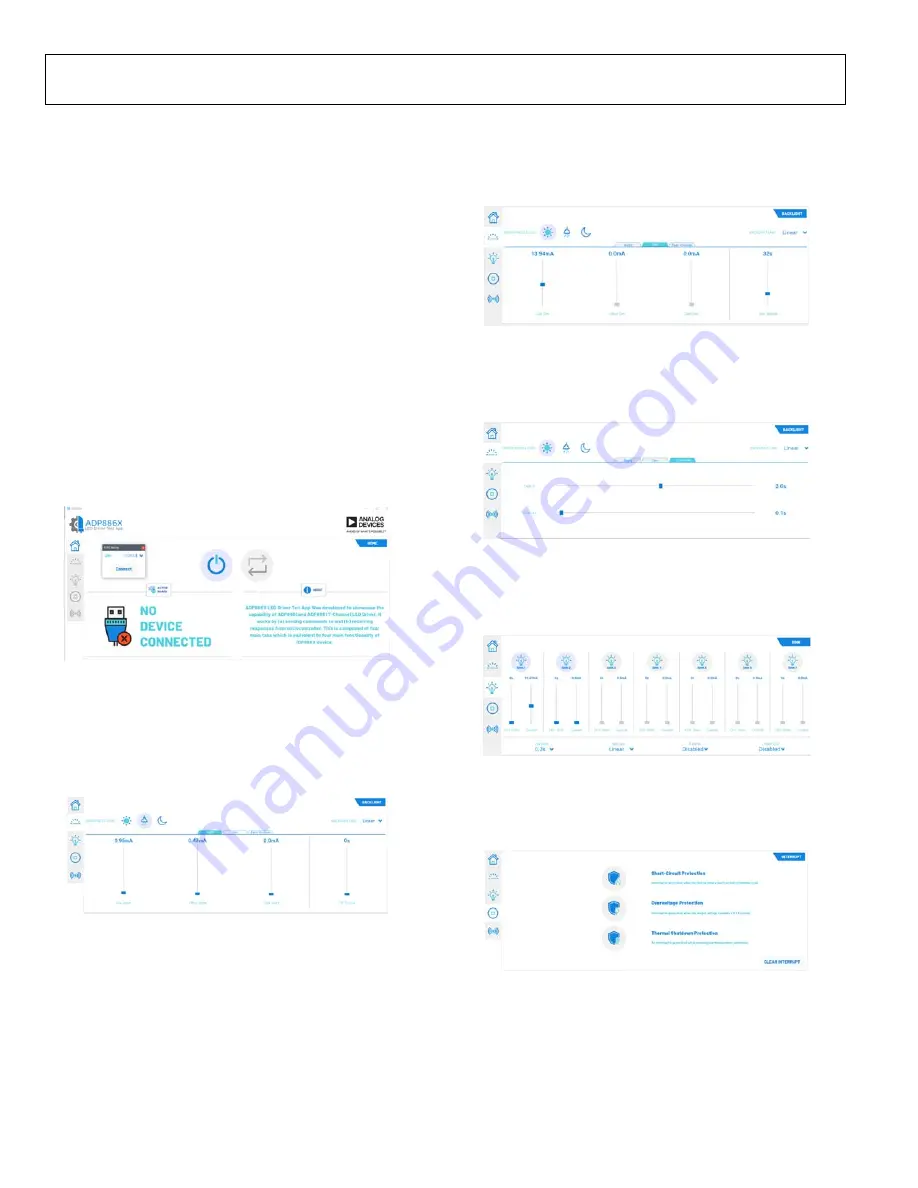
To connect the ADP8860SHIELD-EVALZ or the 
ADP8861SHIELD-EVALZ to Windows, take the following 
steps: 

1.


Run and install the 

ADP886X_LDTA_v2.0.0_Installer.exe


file, which can be downloaded from the ADP8860SHIELD-
EVALZ or the ADP8861SHIELD-EVALZ webpage. 

2.


After the installation completes, run the 

ADP886X_Release_v2.0.0.exe

 file that was installed during 

Step 1 to open the GUI window. 

3.


Click 

Connect

. UART connect settings then prompt the 

user on the COM port (see Figure 8).  
Note that the default baud rate is 115200. 
Once UART connection is established, this automatically 
activates the 

ADP8860

 or th

ADP8861

 device and reads 

what type of the device is connected. Users can use the 
four main functionalities: backlight, sink, interrupt, and 
ambient light sensing for the ADP8860, while the ADP8861 
has no ambient light sensing. 

251

86-

00

9


Figure 8. Configure the COM Port 

4.


In the 

BACKLIGHT

 main tab for Windows, users can 

select the 

BRIGHTNESS LEVEL

 and type of 

BACKLIGHT 

LAW

 (see Figure 9). Under the 

Bright

 tab within this main 

tab, users can configure the maximum current for 

Day Bright

Office Bright

Dark Bright

, and 

Off Timeout Bright

251

86

-0

10


Figure 9. 

BACKLIGHT

 Main Tab for Windows 


5.


Under the 

Dim

 tab within the 

BACKLIGHT

 main tab for 

Windows, users can configure the dim current for 

Day 

Dim

Office Dim

Dark Dim

, and 

Off Timeout Dim

 (see 

Figure 10). 

25

186-

01

1


Figure 10. 

BACKLIGHT

 Dim Tab for Windows 

6.


Under the 

Fade Override

 tab within the 

BACKLIGHT


main tab for Windows, users can configure the 

Fade In


and 

Fade Out

 (see Figure 11). 

25

18

6-

01

2


Figure 11. 

BACKLIGHT

 Fade Tab for Windows 

7.


Under the 

SINK

 main tab for Windows, users can select 

sink independently and configure 

Sink Law

Current

ON 

Time

OFF Time

Fade In

, and 

Fade Out

 (see Figure 12). 

25

186-

013


Figure 12. 

SINK 

Tab for Windows 

8.


In the 

Interrupt

 main tab for Windows, users can enable 

device protection as well as clear interrupts when triggered 
(see Figure 13). 

251

86-

014


Figure 13. 

INTERRUPT

 Tab for Windows 


Summary of Contents for ADP8860SHIELD-EVALZ

Page 1: ...D EVALZ has dual light intensity sensors The ADP8860SHIELD EVALZ and the ADP8861SHIELD EVALZ follow the form factor of a regular Arduino shield to allow compatibility with microcontroller boards that...

Page 2: ...on History 2 Evaluation Board Functional Block Diagrams and Photograph 3 Evaluation Board Setup 4 Quick Start Procedure 4 Evaluating the ADP8860SHIELD EVALZ or the ADP8861SHIELD EVALZ 5 Evaluation Sum...

Page 3: ...Z ADP8860SHIELD EVALZ ADP8861SHIELD EVALZ Micro USB 25186 030 Figure 1 Functional Block Diagram for Windows PC 25186 031 5V USB SOURCE EV COG AD3029LZ WITH EV GEAR EXPANDER1Z ADP8860SHIELD EVALZ ADP88...

Page 4: ...acklight LEDs are only tied to the D7 pin of either chip via the P13 header To enable the keypad backlight LEDs for either the ADP8860SHIELD EVALZ or the ADP8861SHIELD EVALZ connect a jumper to P14 an...

Page 5: ...are and GUI steps to evaluate the ADP8860SHEILD EVALZ or the ADP8861SHEILD EVALZ Flashing Firmware To flash the firmware take the following steps 1 Open the CrossCore Serial Flash Programmer 1 5 0 app...

Page 6: ...8 Configure the COM Port 4 In the BACKLIGHT main tab for Windows users can select the BRIGHTNESS LEVEL and type of BACKLIGHT LAW see Figure 9 Under the Bright tab within this main tab users can confi...

Page 7: ...ware and Android app steps to connect the ADP8860SHEILD EVALZ or the ADP8861SHEILD EVALZ to the Android app Flashing Firmware Windows Only To flash the firmware take the following steps 1 Open the Cro...

Page 8: ...EVALZ or the ADP8861SHIELD EVALZ webpage on an Android smartphone that has Bluetooth 4 3 or higher 2 After installation completes run the ADP886X LED DRIVER TEST APP see Figure 17 25186 018 Figure 17...

Page 9: ...hed the ADP8860 or ADP8861 automatically activates and reads the device type Users can use four main functionals backlight sink interrupt and ambient light sensing for the ADP8860 while the ADP8861 ha...

Page 10: ...ndependently and can configure sink Law Current On Time Off Time Fade In and Fade Out see Figure 21 25186 022 Figure 21 Sink Tab for the Android App 8 In the Interrupt main tab users can enable device...

Page 11: ...reshold and hysteresis current configuration see Figure 23 Note that this feature is only available for the ADP8860 To utilize the secondary photo sensor move P5 to the other position see Figure 25 an...

Page 12: ...49 9 R15 100 R14 P24 1 2 P25 1 2 DS16 100 R23 DS17 P21 DS13 100 R16 P29 P19 NINT 3 1 2 6 SSQ 108 03 G S 8 5 SSQ 106 03 G S 3 4 B6 B5 B4 B3 B2 B1 P35 A6 A5 A4 A3 A2 A1 P35 C6 C8 0 1 F C2 C1 C5 R3 2 2 1...

Page 13: ...1 1 2 C A 49 9 R15 100 R14 P24 1 2 P25 1 2 DS16 100 R23 DS17 P21 DS13 100 R16 P29 P19 NINT 3 1 2 6 SSQ 108 03 G S 8 5 SSQ 106 03 G S 3 4 B6 B5 B4 B3 B2 B1 P35 A6 A5 A4 A3 A2 A1 P35 C6 C8 C1 C5 2 2 1 P...

Page 14: ...G 1888 ADP8860SHIELD EVALZ ADP8861SHIELD EVALZ User Guide Rev 0 Page 14 of 16 25186 028 Figure 27 ADP8860 ADP8861 Evaluation Board Primary 25186 029 Figure 28 ADP8860 ADP8861 Evaluation Board Secondar...

Page 15: ...n receptacle 2 54 mm pitch header SSQ 110 03 G S 1 P35 12 pin receptacle 2 54 mm pitch header 98414 G06 12ULF 2 D1 D2 Diodes ambient light photosensor APDS 9005 020 1 U1 Charge pump 7 channel smart LE...

Page 16: ...to any other party for any reason Upon discontinuation of use of the Evaluation Board or termination of this Agreement Customer agrees to promptly return the Evaluation Board to ADI ADDITIONAL RESTRI...

Reviews: