background image

Operating the Thermostat

34

ViewStat Color Communicating Thermostat User Guide

8.

Use the navigation buttons to select 

Temperature Lock

, and press 

Mode/Select

 to toggle the 

temperature lockout setting between Yes and No.

9.

Use the navigation buttons to select 

Temperature Lock Time Limit

, and press 

Mode/Select


activate it.

10.

Press 

Mode/Select

 multiple times until you reach the time limit value you want.

11.

Use the navigation buttons to select 

Temperature Lock Range Limit

, and press 

Mode/Select


activate it.

12.

Press 

Mode/Select

 multiple times until you reach the range limit value you want.

Locking the Fan Settings

You can lock the fan settings on the thermostat so no one can change them. When you lock the fan 
settings, you must set an amount of time for the settings to be locked. You can set the time limit to any 
amount of time between 0 and 60 minutes. After the time limit expires, the fan settings automatically 
unlock and can be changed again. Perform the following steps to lock the fan settings:

1.

From the Main screen, press and hold 

Mode/Select

 for three seconds to access the Settings screen.

2.

Use the navigation buttons to select 

Advanced Setup

.

3.

Press 

Mode/Select

 to access the Security Code screen.

4.

Enter the security code, and select 

Enter

 to access the User Preferences screen. See the 

Entering the 

Security Code 

section on page 28 for more information.

5.

Use the navigation buttons to highlight 

More

, and press 

Mode/Select

 to access the second User 

Preferences screen.

6.

Use the navigation buttons to highlight 

Button Lockout

.

7.

Press 

Mode/Select

 to access the Button Lockout screen.

8.

Use the navigation buttons to highlight 

More

, and press 

Mode/Select

 to access the second Button 

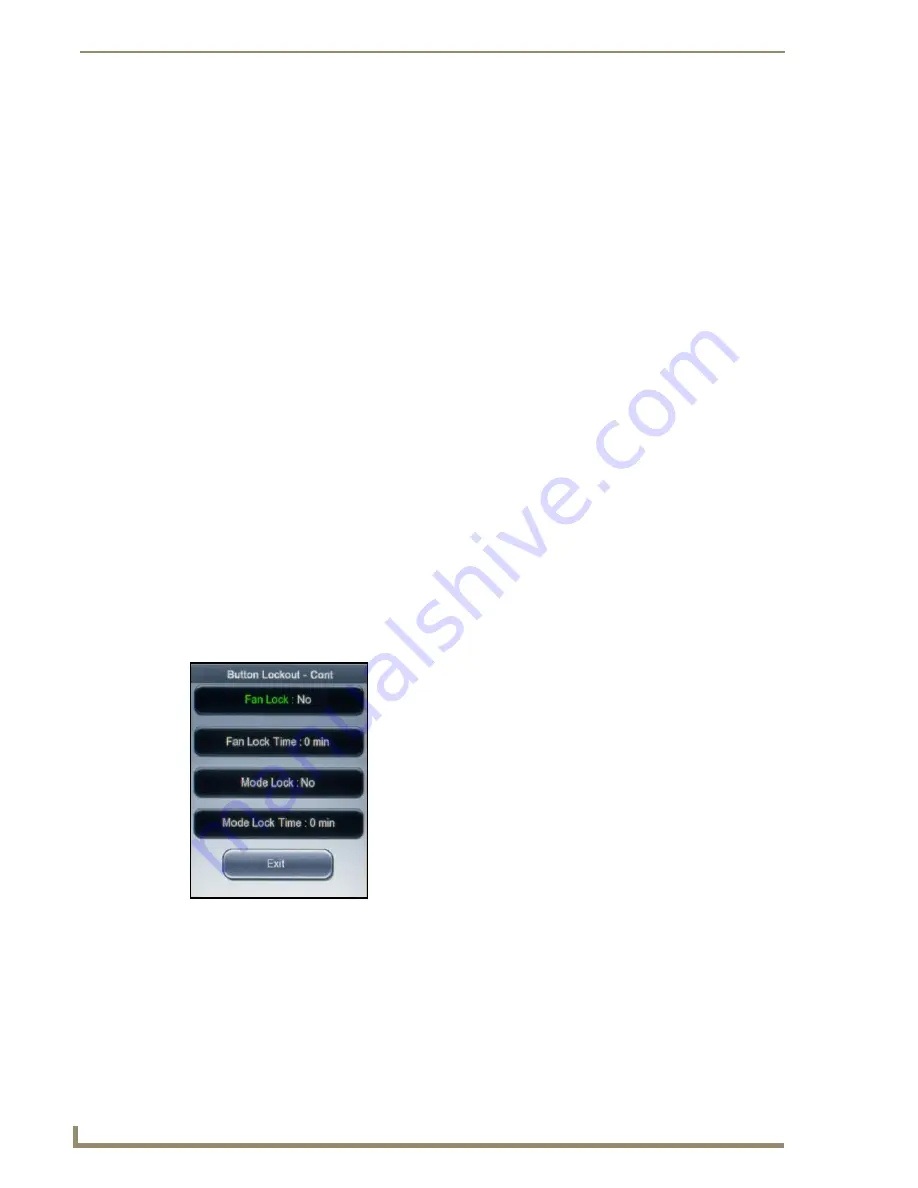
Lockout screen (see FIG. 31).

9.

Use the navigation buttons to select 

Fan Lock

, and press 

Mode/Select

 to toggle the fan lockout 

setting between Yes and No.

10.

Use the navigation buttons to select 

Fan Lock Time

, and press 

Mode/Select

 activate it.

11.

Press 

Mode/Select

 multiple times until you reach the fan lock time value you want.

FIG. 31  

Button Lockout screen (2 of 2)

Summary of Contents for ViewStat ENV-VST-C

Page 1: ...User Guide HVAC Controls ViewStat Color Communicating Thermostat ENV VST C Last Updated 10 19 2009 ENV VST C ViewStat Color Communicating Thermostat User Guide...

Page 2: ...whichever is greater Products that are returned and exhibit signs of damage or unauthorized use will be processed under the Non Warranty Repair Policy AMX will continue to provide Warranty Repair Serv...

Page 3: ...LIED WARRANTIES OF MERCHANTABILITY AND FITNESS FOR A PARTICULAR PURPOSE WITH REGARD TO THE AMX SOFTWARE THIS LIM ITED WARRANTY GIVES LICENSEE SPECIFIC LEGAL RIGHTS Any supplements or updates to the AM...

Page 4: ......

Page 5: ...Preferences Screen 13 Button Lockout Screen 14 Change Security Code Screen 15 Advanced Setup Screen 16 AxLink Communications Screen 18 Thermostat Setup Screen 19 Operating the Thermostat 21 Viewing th...

Page 6: ...Locking the Temperature Settings 33 Locking the Fan Settings 34 Locking the Mode Settings 35 Changing the Type of HVAC System 35 Changing the Type of Fossil Fuel 36 Activating the External Sensor 37...

Page 7: ...er provides information about the different screens on the ViewStat Color Communicating Thermostat how to navigate through them and how to establish settings on each screen Front Panel Components This...

Page 8: ...ion from AMX s i Weather service This screen is view only Pressing Mode Select for the first time takes the display from an Inactive state to an Active state Pressing Mode Select again takes you to th...

Page 9: ...ercent humidity the dew point and barometric pressure The ViewStat Color Communicating Thermostat receives this information from AMX s i Weather service This screen is view only You can disable this s...

Page 10: ...t Color Communicating Thermostat receives this information from AMX s i Weather service This screen is view only You can disable this screen so it does not appear when you navigate through the thermos...

Page 11: ...tons to move through the highlighted options The Mode Select button selects the highlighted item This screen returns to the main screen after a 20 second timeout The following table lists the options...

Page 12: ...n buttons to move through the highlighted options The Mode Select button selects the highlighted item You can then use the navigation buttons to change the setting of the highlighted option Pressing M...

Page 13: ...ndations Pressing Mode Select again highlights the next available option The following table lists the options on the Program Mode Setting screen FIG 8 Program Mode Setting screen Program Mode Setting...

Page 14: ...n the Vacation Party Settings screen FIG 9 Vacation Party Settings screen Vacation Party Settings Screen Options Days The number of days you want the settings to last Hours The number of hours you wan...

Page 15: ...Fan Speed Toggles the fan speed between High Medium and Low Filter Enables you to indicate how often you want the thermostat to remind you that the filter for your HVAC system needs to be changed You...

Page 16: ...n arrow buttons increases or decreases the numeric value in the highlighted box Pressing the Mode Select button highlights the next box in the sequence or highlights Enter if pressed while the fourth...

Page 17: ...it is inactive You can choose Dim or Off Filter Change Reminder Enables the reminder to periodically change the air filter When you enable this feature the thermostat monitors the operation time of th...

Page 18: ...kout screen See Button Lockout Screen section on page 14 for more information Config Security Code Enables you to change the security code for the thermostat Opens the Config Security Code screen Adva...

Page 19: ...in the sequence or highlights Enter if pressed while the fourth box is highlighted Use Up Down arrow buttons to move between Enter and Cancel Press the Mode Select button while Enter is highlighted t...

Page 20: ...at The thermostat automatically computes the day of the week based on the date you input These settings should be set when the thermostat is initially installed and should not need to be updated with...

Page 21: ...s you to indicate whether you want to turn on or turn off the onboard temperature sensor If you activate both this sensor and the External Temperature sensor the thermostat reports an average temperat...

Page 22: ...Address 0 belongs to the Master The default setting for the ViewStat Color Communicating Thermostat is 1 Pressing the Up Down arrow buttons increases or decreases the numeric value in the highlighted...

Page 23: ...e differential You can choose from 1 0 F 2 0 F 3 0 F 4 0 F 5 0 F and 6 0 F or 0 5 C 1 0 C 1 5 C 2 0 C 2 5 C 3 0 C The default value is 2 0 F 1 0 C Deadband The Deadband is the temperature difference b...

Page 24: ...Setup and Configuration 20 ViewStat Color Communicating Thermostat User Guide...

Page 25: ...scription of the day s weather forecast This screen includes the outdoor temperature the expected high and low temperatures for the current day the wind chill heat index temperature the wind direction...

Page 26: ...oints enabled If you want you can create more detailed temperature settings for the thermostat See the Programming the Thermostat section on page 24 for more information Perform the following steps to...

Page 27: ...se the navigation buttons to select Program and press Mode Select to access the Program Mode Setting screen see FIG 22 11 Use the navigation buttons to select Enable and press Mode Select to indicate...

Page 28: ...ect the hour in which you want these settings to take effect and press Mode Select 10 Use the navigation buttons to select the minutes in which you want these settings to take effect and press Mode Se...

Page 29: ...number of days you want the settings to last then press Mode Select 6 Press Mode Select while Hours is selected Use the navigation buttons to indicate the number of hours you want the settings to las...

Page 30: ...he fan settings 1 From the Main screen press and hold Mode Select for three seconds to access the Settings screen see FIG 24 2 Use the navigation buttons to toggle the Fan State between On and Auto 3...

Page 31: ...mergency heat setting between On and Off This option is only available if your thermostat is configured to operate as a heat pump Perform the following steps to turn on emergency heat 1 From the Main...

Page 32: ...orm the following steps to change the security code 1 From the Main screen press and hold Mode Select for three seconds to access the Settings screen 2 Use the navigation buttons to select Advanced Se...

Page 33: ...hanging the Date and Time Format The thermostat allows you to choose one of three formats for displaying the date You can choose between MMDDYY DDMMYY and YYDDMM You can also choose a 12 or 24 hour ti...

Page 34: ...tup 3 Press Mode Select to access the Security Code screen 4 Enter the security code and select Enter to access the User Preferences screen see FIG 27 See the Entering the Security Code section on pag...

Page 35: ...the second User Preferences screen see FIG 28 6 Use the navigation buttons to highlight Filter Change Reminder 7 Press Mode Select to toggle the Filter Change Reminder setting between Enable and Disa...

Page 36: ...tween Enable and Disable 8 Use the navigation buttons to highlight 5 Day Forecast Page 9 Press Mode Select to toggle the 5 Day Forecast Page setting between Enable and Disable Disabling the Screen Sav...

Page 37: ...ut setting between Lock and Unlock Locking the Temperature Settings You can lock the temperature settings on the thermostat so no one can change them When you lock the temperature settings you must se...

Page 38: ...d can be changed again Perform the following steps to lock the fan settings 1 From the Main screen press and hold Mode Select for three seconds to access the Settings screen 2 Use the navigation butto...

Page 39: ...s Mode Select to toggle the mode lockout setting between Yes and No 10 Use the navigation buttons to select Mode Lock Time and press Mode Select activate it 11 Press Mode Select multiple times until y...

Page 40: ...ode Select to access the Security Code screen 4 Enter the security code and select Enter to access the User Preferences screen See the Entering the Security Code section on page 28 for more informatio...

Page 41: ...l sensor You can choose from Indoor or Outdoor Selecting one of these choices activates the external sensor You can select Off if you want to deactivate the sensor Activating the Internal On board Sen...

Page 42: ...navigation buttons to highlight Advanced Setup and press Mode Select to access the Advanced Setup screen see FIG 32 8 Use the navigation buttons to select Humidity Sensor and press Mode Select to acti...

Page 43: ...cate The AxLink address distinguishes a device on the AxLink bus from all other devices Valid AxLink addresses are 1 255 Address 0 belongs to the Master The default setting for the ViewStat Color Comm...

Page 44: ...econd stage differentials 1 From the Main screen press and hold Mode Select for three seconds to access the Settings screen 2 Use the navigation buttons to select Advanced Setup 3 Press Mode Select to...

Page 45: ...seconds to access the Settings screen 2 Use the navigation buttons to select Advanced Setup 3 Press Mode Select to access the Security Code screen 4 Enter the security code and select Enter to access...

Page 46: ...screen see FIG 35 10 Use the navigation buttons to highlight Temperature Offset and press Mode Select 11 Press Mode Select to indicate the temperature offset Setting the Balance Point Balance Point co...

Page 47: ...reen see FIG 36 11 With Balance Point highlighted press Mode Select to activate it 12 Press Mode Select to indicate the balance point 13 Use the navigation buttons to highlight Exit and press Mode Sel...

Page 48: ...Operating the Thermostat 44 ViewStat Color Communicating Thermostat User Guide...

Page 49: ...Operating the Thermostat 45 ViewStat Color Communicating Thermostat User Guide...

Page 50: ...egistered trademarks of AMX AMX reserves the right to alter specifications without notice at any time It s Your World Take Control 3000 RESEARCH DRIVE RICHARDSON TX 75082 USA 800 222 0193 469 624 8000...

Reviews: