

AMX Corporation reserves the right to alter specifications without notice at any time.
For full warranty information, refer to the AMX Instruction Manual(s) associated with your Product(s).
043-004-2874 03/05 ©2005
AMX Corporation. All rights reserved. The AMX logo is a trademark of AMX Corporation.
3000 RESEARCH DRIVE, RICHARDSON, TX 75082 • 800.222.0193 • fax 469.624.7153 • technical support 800.932.6993 • www.amx.com
93-2605
REV: A
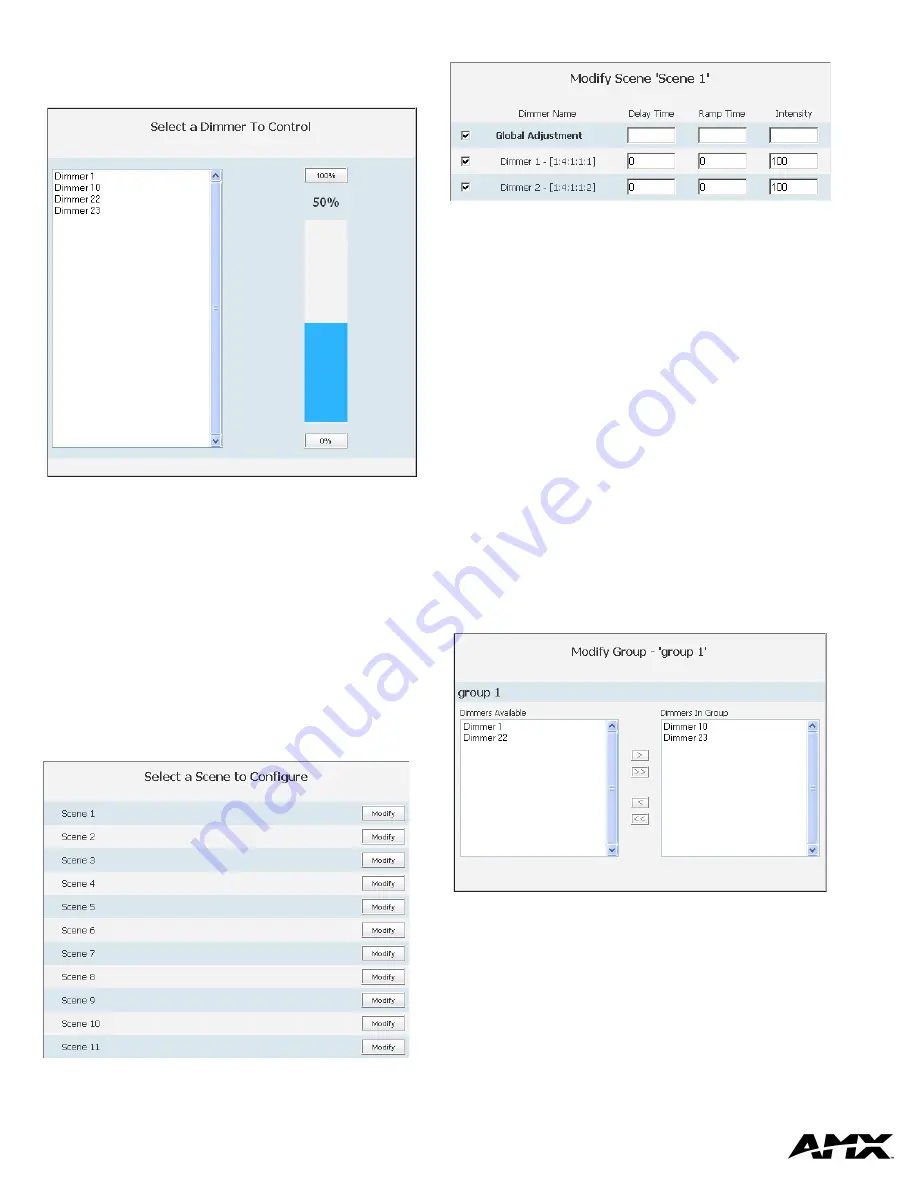
Controlling Dimmers via The Web Page
Once a dimmer has been addressed, you have access to a few basic level controls
from the master’s web page.
1.
Click the button
Dimmer Control
to open the Dimmer Control page.(FIG. 4)
Listed in the column on the left are all dimmer addresses available for control. On the
right is a percentage bargraph representation of the current state of the selected
dimmer.
2.
To change the state of a dimmer, select a dimmer address in the column on the
left.
•
Click on 100% to ramp the dimmer completely on and 0% to ramp the dimmer
off.
•
Click within the bargraph area on the right to shift the dimmer state up and
down to a desired percentage.
Establishing And Modifying Scenes
Once your dimmers have been addressed and states set, you can create a scene. A
scene is a collection of dimmers with specific states for each dimmer, i.e., Scene 1
could be set as a meeting scene where Dimmers 1 and 12 ramp down to 45%,
Dimmers 6 and 14 ramp to 80% and Dimmers 2 through 5 ramp to 0%. A dimmer
can be a part of many different scenes. To create a scene:
1.
Click the
Scenes
button at the top of the page. Shown below is the Scenes
page.
2.
Click the
Modify
button for the Scene you would like to set. This opens the
Modify Scene page.
3.
Moving left to right the first field is a check box. Placing a check in the box
includes the dimmer in the scene.
Once you have all of your desired dimmers selected you can set the Delay time.
•
The delay time is the duration, in 1/10ths of seconds, it takes the dimmers to
respond to the button push.
4.
Type a number value in the field
Delay Time
.
The next field is the ramp time.
•
The ramp time is the duration, in 1/10ths of seconds, it takes the dimmers to go
from their current intensity state to that set in the scene.
5.
Type a number value in the field
Ramp Time
.
The next field is intensity.
•
Intensity is a percentage value, 0-100%, for the luminosity of the light.
6.
Type a number value in the field
Intensity
.
7.
Click
Save
to set your scene.
Global Adjustment allows you to select and deselect all dimmers at one time, and to
set the
Delay Time, Ramp Time
and
Intensity
values for all dimmers, to the same
value.
When modifying scenes, ignored dimmers will display their current intensity level
while dimmers included in the scene will display their defined intensity level, not
necessarily the current state.
Establishing And Modifying Groups
For the purpose of controlling several dimmers at one time you can place them into
groups. The groups can then be manipulated collectively.
1.
Click the
Groups
button to list all available group numbers.
2.
Click the
Modify
button for the Group you would like to set. This opens the
Modify Group page. Shown below.
In the column on the left is a list of all dimmers available for adding to the group. The
column on the right is a list of all dimmers currently included in the selected group.
3.
Select an available dimmer on the left and click the “
>”
button in the center to
move it to the included list on the right. You can move all dimmers at one time
by clicking on the “
>>”
button, remove a dimmer from the scene list by clicking
the
“<”
button and remove all dimmers by clicking “
<<”
.
4.
Click
Save
to set your group.
Advanced ALD-H48 Configuration
Consult the
ALD-H48
Instruction Manual available at
www.amx.com
.
FIG. 4
Dimmer Control
FIG. 5
Scenes Page
FIG. 6
Modify Scene
FIG. 7
Modify Group


