background image


CURRENCY DISCRIMINATION COUNTER                                                      MiB-9 SERVICE MANUAL 


- 19 -

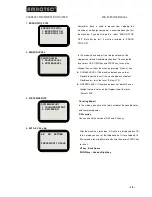
ERROR STOP CTRL.   

1. ERROR STOP ON


2. ERROR STOP OFF 

SENSOR LEVEL 

1. DOUBLE LEVEL 
2. HOPPER LEVEL 

SYSTEM REPORT 

1. COUNTING REPORT 
2. S/W VERSION 


A/S      NO.    SETTIMG 

PRESS START TO SAVE 

Sometimes  there  is  need  to  prevent  from  stopping  the 

machine even though some error is occurred when you test 

the  machine.  If  you  want  to  do  this,  select  “ERROR  STOP 

OFF”.  But  after  the  test,  it  must  be  restored  to  “ERROR 

STOP ON” 

In this mode, you can adjust the reference levels of the 

Hopper sensor and Double detection level. To change the 

level, press UP/DOWN key and START key to save the 

change then exit from the menu by pressing ‘9(menu)’ key.   

  DOUBLE LEVEL: If the machine detects one note as 

Double, lower the level. If the machine does not detect 

Double notes, raise the level. (Default- 10)   

  HOPPER LEVEL: If the machine does not detect it, even 

though there are notes on the Hopper, lower the level. 

(Default- 200) 

Counting Report 

In this mode, you can see the total number of the counted notes 

and the rejected notes.   

S/W version 

You can check the version of S/W and Currency.   


After the machine is turned on, A/S call no. is displayed on LCD. 

In this mode, you can set the telephone no. It is available up to 

20 characters by using Numeric Key and then press START key 

to save it.   

UP key - Back Space   

DOWN key – Used as Right key 

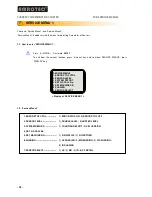
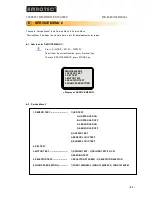
1. ERROR STOP CTRL.


2. SENSOR LEVEL


3. SYSTEM REPORT


4. SET A/S CALL No.


Summary of Contents for MiB-9

Page 1: ...Ver 1 00 Service Manual MiB 9 Currency Discriminator Leading Image Processing Technology We ve been there when you needed...

Page 2: ...s with a soft cloth slightly dampened with water Do not use aerosol cleaners Gas Leaks Never use any machine close to a gas leak If you think gas is leaking shut off the machine and unplug immediately...

Page 3: ...AMROTEC team Safety Notes Your machine and the supplies are designed and tested to meet strict safety requirements Included are safety agency examination and approval and compliance to established en...

Page 4: ...SERVICE MANUAL 4 Recommended Tools Picture Description and Size Picture Description and Size L Wrench 1 5 Hexagonal Screwdriver 5mm L Wrench 2 Screwdriver 6mm Spanner 7mm Screwdriver 1 5mm Nipper Scre...

Page 5: ...fine 13 Chapter 4 Reject Reason and Error Message 14 Reject Reason 14 LCD Error Messages 15 Chapter 5 Connection Diagram 16 Chapter 6 S W Version Check 17 Chapter 7 SERVICE MENU1 18 Chapter 8 SERVICE...

Page 6: ...ver Door Top Upper 52 Housing Pocket 53 Ass y Ope 54 Plate Side R 55 Plate Side L 56 Base Exp View 57 Bkt Stacker Sensor 58 Cover Top 59 Shaft Case Detector 60 Case Detector With MR 61 Double Sensor 6...

Page 7: ...ation To facilitate trouble free operation of your machine place it on a flat stable surface near your workstation Do not place your machine In direct sunlight Near heat sources or air conditioners In...

Page 8: ...a service provider the Call number will be displayed 1 4 2 Printer Your MIB 9 has a serial interface port which allows you to connect to an external printer as recommended by AMROTEC to print out cou...

Page 9: ...of the Parts 2 1 Out Side 2 2 Interface Port RJ 11 LAN RS232C USB A 9P D SUB SD card Slot PORT INTERFACE RS232C RJ 11 Customer Display LAN RJ 45 Network 100M BPS RS232C 9P D SUB Printer or PC USB Typ...

Page 10: ...es various sensors to detect the malfunction of the machine and the status of the notes in the machine and to recognize the denominations of the notes The sensors are very sensitive and if they are no...

Page 11: ...day after operating The power must be turned off before cleaning and please do not use a dangerous solvent for cleaning Note In case of feed roller clean with slightly dampened cloth with alcohol Whil...

Page 12: ...CURRENCY DISCRIMINATION COUNTER MiB 9 SERVICE MANUAL 12 2 4 Rollers...

Page 13: ...nual mode Stop key Transmit data or Print PRINT Print GT Grand Total Display Menu Change settings or parameters Escape from Menu Up Also used for switching USER 1 to USER 2 and vice Versa Down Also us...

Page 14: ...reject reasons user can change settings under Service Menu1 password 57557 CAUTION If the reject reason is Chain or Half the number of the reject note displayed on LCD can be different with the actual...

Page 15: ...M3 Jam Error near SP sensor JAM4 Jam Error near Selector Caution In occurrence of JAM3 if the note is tightly jammed and it is not easy to remove it then please open the rear cover and turn a roller t...

Page 16: ...CURRENCY DISCRIMINATION COUNTER MiB 9 SERVICE MANUAL 16 5 Connection Diagram...

Page 17: ...TOP CTRL 2 SENSOR LEVEL 3 SYSTEM REPORT________ 4 SET A S CALL No 5 SET MACHINE S N 6 SHADING 7 SENSOR SELECT The left image shows Version and Checksum of the software installed in the machine FA SPEC...

Page 18: ...7 1 How to enter SERVICE MENU 1 7 2 Service Menu1 Display of SERVICE MENU 1 Press 9 MODE Password 55757 To exit from the current function press 9 menu key and to move SERVICE MENU2 press DISPLAY key...

Page 19: ...key to save the change then exit from the menu by pressing 9 menu key DOUBLE LEVEL If the machine detects one note as Double lower the level If the machine does not detect Double notes raise the level...

Page 20: ...orm of a signal SENSOR SELECT 1 UV ON 2 MR ON 3 IR ON 4 CF DETAIL OFF UV MR IR If you want to turn on or off some kind of sensor you can do that in this mode CF Detail In case that the machine would r...

Page 21: ...SERVICE MENU 2 8 2 Service Menu2 Press 9 MODE 55757 DISPLAY To exit from the current function press 9 menu key To move SERVICE MENU1 press MODE key Display of SERVICE MENU2 1 SENSOR TEST 1 LED TEST A...

Page 22: ...is defective or not by checking detected logic status of each sensor The below pictures shows logic status when the sensor is covered or open by note CASE LCD DISPLAY PICTURE All doors are closed Fron...

Page 23: ...select this mode you need to check bellows Clean the all notes in the path and close all doors Please run the motor more than 5 sec Both of double level Channel left and right needs to adjusted 550 5...

Page 24: ...ut notes More than 5 notes and test the speed of each level Speed LOW 1000 1200 1500 NPM The speed of Wing Stacker can change fast or slow 10 by pressing UP DOWN key and press START key to save it To...

Page 25: ...rejects too many notes in Mixed Mode or in CF Detection Mode the system might not analyze the input of waveform It is possible to make a standard waveform for the system 9 Shading There are 4 kind of...

Page 26: ...SHADING V1 0 Shading sheet provided from AMROTEC should be used Shading sheet provided from AMROTEC should be used Before UV shading put UV shading sheet inside Front cover as the below image Open Fro...

Page 27: ...ess 9 Shading sheet is pushed out If shading of each currency is done normally OK is displayed Wait SERVICE MENU1 1 ERROR STOP CTRL 2 SENSOR LEVEL 3 SYSTEM REPORT 4 SET A S CALL No 5 SET MACHINE S N 6...

Page 28: ...DOLLAR Real Banknote Needed Quantity of MR SHADING SHEET 1 5 pcs MODE CODE 6 2 9 MENU SERVICE MENU1 1 ERROR STOP CTRL 2 SENSOR LEVEL 3 SYSTEM REPORT 4 SET A S CALL No 5 SET MACHINE S N 6 SHADING______...

Page 29: ...is sent to Stacker Reference on MR SHADING NG 1 Noise If average value is more than 10 it is NG 2 Level If average value is less than 10 it is NG MR Single Sensor MRA Sensor MR SHADING NG Norm 1 56 N...

Page 30: ...ADING and MDD Module Double Detector SHADING are performed simultaneously As a figure below MR SENSOR is O K in NOISE and LEVEL But in case NG REASON displays NG 0 MDD is not good Module Double Detect...

Page 31: ...one or there are lots of rejected notes from failure of recognition NO I D it is recommended to make a new CIS Shading 1 Open upper cover then clean the sensors 2 Place the shading sheet on the surfa...

Page 32: ...eck if OK is displayed MODE CODE 6 3 9 MENU SERVICE MENU1 1 ERROR STOP CTRL 2 SENSOR LEVEL 3 SYSTEM REPORT 4 SET A S CALL No 5 SET MACHINE S N 6 SHADING_______________ 7 SENSOR SELECT SHADING 1 UV SHA...

Page 33: ...re to have IR SHADING WHITE After prepare IR SHADING refer to the below and have IR shading Open Front Cover and brush the dust Place IR SHADING SHEET in the middle of Hopper like the picture Close Fr...

Page 34: ...revious MENU press 9 IR SHADING WAIT ABOUT 5 SEC IR SHADING MIN MAX AVG UNI IB 0 00 0 74 0 00 IW 0 87 1 28 1 00 82 WB 0 00 0 74 0 00 WW 0 88 1 14 0 99 90 OnTime1 IR_T 57 OnTime2 WHT T 63 OK 9 MENU or...

Page 35: ...ROR 1 UV SHADING NG Check if shading sheet is clean and there is no problem with the sheet Then have shading according the order 2 NO UV SHADING SHEET If a shading sheet is not inserted this message m...

Page 36: ...f ADF by using one note Check both sides and Gap of both sides should be equal Check Gap of ADF by using 2 pcs of notes If 2 pcs of notes are fed adjust Gap so only one note can be fed 10 Adjustment 1...

Page 37: ...he timing Step 1 Loosen SCREW slightly 4 Tooth 1 0 Tooth ADF_ROLLER P PICK_UP_ROLLER P If the timing is not adjusted properly the problem such as NO ID OVER RUN and so on could happen CAUTION Turn off...

Page 38: ...uide SELECTOR as the below image In this case notes are sent to Stacker Step 3 Be careful with the tip of Selector Guide so that notes are not jammed in the Selector while the notes are transferred Th...

Page 39: ...ck Light Step 1 Remove Side Cover Step 2 Pull OPE cover slightly to remove OPE cover as the below image Step 3 Maintain the space as the below image so that you can adjust it comfortably Step 4 Turn o...

Page 40: ...ightness referring to the below image Adjust R16 Variable Resistor with Driver checking LCD Back Light Step 3 Place the Sheet on the Hopper sensor Check if the black tape cover Hopper sensor The sheet...

Page 41: ...able Resistor so that DIFFERENCE can be from 190 to 210 HOPPER ON 213 HOPPER OFF 13 DIFFERENCE 200 R9 High Low If LED lights even though there are no notes on the REJECT POCKET or if LED does not ligh...

Page 42: ...High Low High Step 1 How to make sheet for adjusting Reject F Make a test sheet for adjustment with IR SHADING DARK Sheet Provided by AMROTEC Cut dotted part as the image on the left side Step 2 Plac...

Page 43: ...lean the all notes in the path and close all doors Please run the motor more than 5 sec You need to set the double level to 550 50 using variable resister R123 and R128 located in PBA Main Please refe...

Page 44: ...DISCRIMINATION COUNTER MiB 9 SERVICE MANUAL 44 Press Menu Mode 55757 1 Sensor Test 4 Double logic test Please adjust Channel Left using R123 and adjust Channel Right using R128 Both of target levels a...

Page 45: ...5_RUR_USD_EUR V1 0 2 03_KRW_USD_EUR_JPY 11 Program Upgrade 11 1 Program Upgrade Save Upgrade File MiB 9 provided by AMROTEC in USB flash drive Insert USB into USB port Select the software by pressing...

Page 46: ...20 MiB 9 Check version and checksum of the software and press START Key START ENTER STOP Check version and checksum after the machine reboots and take out USB Upgrading The machine automatically reboo...

Page 47: ...rame Exp View Roller Exp View Cover Door Top Cover Door Top Upper Housing Pocket Ass y Ope Plate Side R Plate Side L Base Exp View Bkt Stacker Sensor Cover Top Shaft Case Detector Case Detector with M...

Page 48: ...RIGHT 2 SCREW_M C_PWH_M3X6_Fe_Ni 3 COVER_SMPS 4 SCREW_M C_FH_M3X8_Fe_Ni 5 ASS Y_COVER_DOOR_TOP 6 COVER_SPECIAL_SCREW 7 SCREW_T P_FH_M3X10_Fe_Zy 8 COVER_LEFT 9 ASS Y_OPE 10 ASS Y_HOUSING_POCKET 11 SCRE...

Page 49: ...5 COVER_REAR 6 E_RING_ 4 4x11x0 6 _Fe_ZB 7 LINK_COVER_REAR_R 8 SHAFT_COVER_REAR 9 E_RING_ 6 6x12x0 8 _Fe_ZB 10 SHAFT_COVER_TOP 11 BUSH_HINGE 12 ASSY _PLATE_GUIDE_UPPER_P 13 SCREW_M C_PH SWW_M3X6_Fe_Zy...

Page 50: ...13 3 Frame Exp View 1 ASS Y_BKT_SMPS_BOTTOM 2 SCREW_M C_FH_M3X8_Fe_Ni 3 ASS Y_BKT_SMPS_TOP 4 ASS Y_PLATE_SIDE_L 5 SUPPORT_PCB 6 SCREW_M C_PH SWW_M4X8_Fe_Ni 7 ASS Y_WING_STACKER_SENSOR 8 ASS Y_PLATE_BA...

Page 51: ...R_PICK_UP_P 14 PBA_ENCODER_2 W SHP 01 Harness 2 PBA 15 PBA_ENCODER_1 W SHP 27 Harness 16 LINK_SELECTOR 17 E_RING_ 6 6x12x0 8 _Fe_ZB 18 BUSH_SELECTOR 19 ASS Y_SWING_SELECTOR 20 SCREW_M C_PH_M3X8_Fe_Zy...

Page 52: ...Top 1 COVER_DOOR_TOP_UPPER 2 COVER_DOOR_TOP_LOWER 3 SCREW_T P_PH_T2_ 3X8_Fe_Zy 13 6 Cover Door Top Upper 1 COVER_DOOR_TOP_UPPER 2 HOPPER_GUIDE_L 3 SCREW_T P_PH_T2_ 3X6_Fe_Zy 4 RACK_L 5 GEAR_BILL_GUID...

Page 53: ...NTER MiB 9 SERVICE MANUAL 53 13 7 Housing Pocket 1 HOUSING_POCKET 2 PIN_REJECT_BAR 3 SPRING_LIMIT_REJECT 4 LIMIT_REJECT 5 SCREW_T P_FH_M3X8_Fe_Ni 6 PORON_LIMIT_REJECT 7 REJECT_PLATE 8 ELECTRO_BRUSH 9...

Page 54: ...NG_BADGE 4 LCD ODT_TECH 128X80 W 2P Harness 5 BUTTON_NUMERIC_P 6 LENS_LED 7 DOME_SHEET_NUMERIC 8 BUTTON_FUNCTION_P 9 DOME_SHEET_FUNCTION 10 P OPE 11 SCREW_T P_PH_T2_ 3X6_Fe_Zy 12 QUICK_CLAMP_DQC_106 1...

Page 55: ...RRENCY DISCRIMINATION COUNTER MiB 9 SERVICE MANUAL 55 13 9 Plate Side R 1 PLATE_SIDE_R 2 TORSION_SPRING_OPEN_HOOK_R_P 3 OPEN_HOOK_R_P 4 E_RING_ 6 6x12x0 8 _Fe_ZB 5 COVER_SADDLE_DS 2 6 WIRE_SADDLE_SMAL...

Page 56: ...ER MiB 9 SERVICE MANUAL 56 13 10 Plate Side L 1 PLATE_SIDE_L 2 TORSION_SPRING_OPEN_HOOK_L_P 3 OPEN_HOOK_L_P 4 E_RING_ 6 6x12x0 8 _Fe_ZB 5 SUPPORT_PCB 6 SIDE_LOCKING_SADDLE_DS 110 7 SIDE_LOCKING_SADDLE...

Page 57: ...CURRENCY DISCRIMINATION COUNTER MiB 9 SERVICE MANUAL 57 13 11 Base Exp View 1 PLATE_BASE_P 2 FOOT_MOLD 3 SCREW_M C_PH SWW_M3X6_Fe_Zy 4 RUBBER_FOOT_P 5 WIRE_SADDLE_SMALL...

Page 58: ...CKER W SHP 18 Harness 2 SCREW_M C_PH SWW_M3X6_Fe_Zy 3 BUSH_STACKER_MOTOR_P 4 WING_STACKER_P 5 SHAFT_STACKER_P 6 BUSH_STACKER_WING 7 BKT_STACKER_SENSOR_P 8 WIRE_SADDLE_SMALL 9 P STACKER_TRN_V1 2 W 2P H...

Page 59: ...3 Cover Top 1 ASS Y_CASE_DETECTOR 2 SCREW_T P_PH_T2_ 3X8_Fe_Zy 3 E_RING_ 5 5x11x0 6 _Fe_ZB 4 BUSH _HINGE 5 BKT_COVER_TOP 6 ARM_ADJUST_UPPER 7 COIL_SPRING_ADJUST 8 SPECIAL_SCREW_ADUSJT 9 SCREW_M C_PH S...

Page 60: ...BEARING_P 4 E_RING_ 7 7x14x0 8 _Fe_ZB 5 BKT_SEPARATOR_P 6 SHAFT_CASE_DETECTOR 7 SCREW_M C_PH SWW_M4X10_Fe_Ni 8 HEX_NUT_M4X0 7_Fe_Zy 9 SCREW_SET_SIH_FP_M4x6_Fe_ZB 10 SCREW_M C_PH SWW_M4X20_Fe_Ni 11 ARM...

Page 61: ...tor With MR 1 UV_FILTER N 420nm D7 2 5T 9 MRA 2 SUV_FILTER 375nm D7 2 5T 10 MRS_R 3 GLASS_UV_REFLECT 11 MRS_L 4 CASE_DETECTOR_P2 12 RP_RCV 5 CAP_RP 13 SCREW_T P_PH_T2_ 3X8_Fe_Zy 6 PBA_IR_TRN_MODULE 14...

Page 62: ...ENCY DISCRIMINATION COUNTER MiB 9 SERVICE MANUAL 62 13 16 Double Sensor 1 DOUBLE_BRACKET_BASE 2 DOUBLE_BRACKET_ROLLER 3 BEARING L_1560ZZ 4 SHAFT_DOUBLE 5 DOUBLE_PLATE_DUST 6 SPRING_DOUBLE 7 DOUBLE_SEN...

Page 63: ...COUNTER MiB 9 SERVICE MANUAL 63 13 17 Plate Reinforce 1 REJECT_BAR 2 PLATE_REINFORCE 3 GUIDE_RPS 4 PBA_REJECT_T 5 WINDOW_HOPPER 6 PBA_REJECT_R 7 SCREW_M C_PH SWW_M3X8_Fe_Zy 8 SCREW_M C_PH SW_M3X6_Fe_Z...

Page 64: ...UAL 64 13 18 Plate Guide Upper 1 PLATE_GUIDE_UPPER_P2 2 COVER_SENSOR_P2 3 JP_TRN 4 GUIDE_RPS 5 PBA_JP SP_T 6 CIS MIB 9 7 BKT_CIS_P2 8 SCREW_T P_PH_T2_ 3X6_Fe_Zy 9 SCREW_M C_PH_M3X8_Fe_Zy 10 SCREW_M C_...

Page 65: ...CURRENCY DISCRIMINATION COUNTER MiB 9 SERVICE MANUAL 65 13 19 Plate Guide Lower 1 PLATE_GUIDE_LOWER_P 2 COVER_SENSOR 3 P JPSP_RCV 4 SCREW_M C_PH_M3X8_Fe_Zy 5 SCREW_T P_PH_T2_ 3X6_Fe_Zy...

Page 66: ...iB 9 SERVICE MANUAL 66 13 20 Exp Guide Lower P 1 SCREW_T P_PH_T2_ 3X8_Fe_Zy 2 GUIDE_PINCH_ROLLER 3 TORSION_SPRING_PINCH 4 ASS Y_SHAFT_PINCH 5 GUIDE_LOWER 6 P SP_TRN 7 COVER_SENSOR 8 ASS Y_SHAFT_PINCH_...

Page 67: ...HP 23 3P AC INLET 4 SCREW_T P_FH_M4x10_Fe_Ni 5 COOLING_PAN_40X40 t 10mm SHP 24 2P IF FAN 6 MIB 9 IF V1 5 7 NHP 02 12P MAIN IF 8 NHP 03 06P MAIN IF 9 SHP 25 IF GROUND 10 SCREW_M C_PWH_M3X6_Fe_Ni 11 SHP...

Page 68: ...CURRENCY DISCRIMINATION COUNTER MiB 9 SERVICE MANUAL 68 13 22 Bkt SMPS Top 1 BKT_SMPS_TOP 2 CUSHION_SUPPRESS_NOISE 3 COVER_SADDLE_DS 2...

Page 69: ...es Banknote size range mm W 100 185 H 60 90 Banknote thickness mm 0 08 0 12 Counting Speed Notes min 1000 1200 1500 Operating Mode MIXED SINGL SORT FACE ORIENT COUNT Other optional features may be ava...

Reviews: