Amrobt SI-350 Manual Download Page 12

3.2 Quick Start

1

 Plug in the Charging Dock and place the remaining wire into 

the trunking at the bottom of the Charging Dock


Note: 

Failure to place the remaining wire into the 

trunking, may cause Robot to become stuck while 

charging or cleaning.

2

 Place the Charging Dock on a hard level surface and 

against a wall.


3

 Charging Dock Position

• Place the Charging Dock against the wall and make sure it is in an 

open and uncluttered area leaving at least:

• 2 meters (6 feet) in the front of the Charging Dock.
• 1 meter (3 feet) on both sides of the Charging Dock.
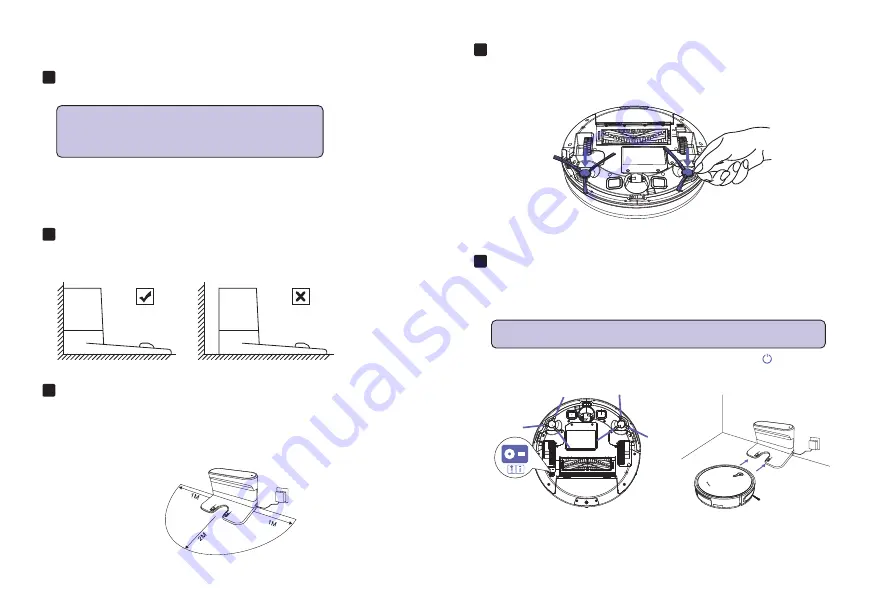
4

 Install Side Brushes

• Attach Side Brushes to the bottom of Amrobt by pressing a brush into 

each slot until it clicks.

5

 Activate the Robot

• Place Amrobt onto the Charging Dock, making sure the metal charging 

contacts on the Charging Dock match up with those underneath the 
robot.


Note: 

Initial Use, Switch on the Power Button on the Bottom.

If successful, you will hear a series of tones. Once the   Power button 

illuminates, Amrobt is ready for use.

09

Summary of Contents for SI-350

Page 1: ...Amrobt Sweeping Robot Product Manual...

Page 2: ......

Page 3: ...uick Start 09 3 3 How Amrobt Clean Your Home 11 3 4 Cleaning Schedule 13 3 5 APP Connecting 15 4 Regular Robot Care 4 1 Emptying Robot s Bin 19 4 2 Cleaning Robot s Filter 19 4 3 Cleaning Robot s Side...

Page 4: ...your local authority for information regarding the collection systems available If electrical appliances are disposed of in landfills or dumps hazardous sub stances can leak into the groundwater and...

Page 5: ...long term storage or transportation Charge indoors only Your robot s Charging Dock may be protected with a surge protector in the event of severe electrical storms Never handle the Charging Dock with...

Page 6: ...2 Product Diagram 2 1 Robot Power On Cleaning Press to Power on or Power Off Hold on Enter into network connecting Press to Start Cleaning 03...

Page 7: ...Release Button Bumper Charing Entrance Infrared Sensor Dust Collector Anti Drop Sensors Side Brushes Driving Wheels Power Switch Dust Bin Universal Wheel Charing Contacts Battery Pack Main Brush 04...

Page 8: ...2 2 Accessories 1 x Charging Dock 1 x Adapter 1 x Remote Control 1 x Dust Bin 4 x Side Brushes 1 x High Efficiency Filter 1 x Brush 1 x Main Brush Water Tankand Cleaning Cloth 05...

Page 9: ...2 3 Charging Dock Charging Indicator Signal Transmission Area Power Interface Butting Charging Pole Piece 06...

Page 10: ...e and Time Display Screen Start Pause Button Automatic Cleaning Automatic Re charging Button Edge Cleaning Button Zigzag Cleaning Button Time Setting Direction Buttons Schedule Setting Spot Cleaning B...

Page 11: ...g Before using Robot pick up objects like clothing loose papers pull cords for blinds or curtains power cords and any fragile objects If the Robot passes over a power cord and drags it there is a chan...

Page 12: ...is in an open and uncluttered area leaving at least 2 meters 6 feet in the front of the Charging Dock 1 meter 3 feet on both sides of the Charging Dock 4 Install Side Brushes Attach Side Brushes to t...

Page 13: ...robot manually on Charging Dock for charging Refer Activate the Robot Note Please refer to section 3 3 for more Cleaning Mode 7 Pause To pause the robot during a cleaning cycle press the button on ro...

Page 14: ...es of the room as well as chair legs and other furni ture Amrobt continues this process until it has cleaned an entire level of your home If its battery gets low before finishing a cleaning cycle Am r...

Page 15: ...best cleaning possible where you need it To use Spot Cleaning place robot on top of the localized debris and press Spot on the Remote Control 4 Zigzag Cleaning Press button on remote control or zigzag...

Page 16: ...the Remote Control near by the Robot while setting the Clock or Schedule 1 Set the Remote Control s Time 08 25 Long press button on Remote Control and then the hour section begins to flash in the time...

Page 17: ...8 30 And then press the button the robot will Ding Dong when the schedule setting successfully Note If you don t hear ding dong it means shcedule setting fails If fails please repeat the above procedu...

Page 18: ...me WiFi Click to add your Amrobt cleaner On the left side Click small home appliance And then click Robot Vacuum 4 Click confirm blink rapidly and enter wifi password Do not confirm after entering the...

Page 19: ...onnect NOTE Please ignore the tips on the phone Follow our trouble shooting instruction Tips If you retry at least 3 times connecting still fails or any other problems about your robot you can contact...

Page 20: ...Monday or etc and make note for it Clean ON 10 If Amrobt doesn t work for a long time it will turn to standby mode and interface will become dark If you want it to clean click and dingdong rings Note...

Page 21: ...s with pets Every 2 months Cleaning Cloth Sold Separately After each use Every 2 4 months Rolling Brush Once every 4 months once every 3 months in homes with pets Every 6 12 months Dust Bin After each...

Page 22: ...in 1 Press dust bin release button to remove it Open dust bin door to empty it 4 2 Cleaning Robot s Filter 1 Remove filter by grasping the white tab 2 Shake off debris by tapping the filter against yo...

Page 23: ...lean the brush and the brush stand and reinstall the brush 4 4 Cleaning Robot s Cliff Sensors and Charging Contacts 1 Wipe Robot s Cliff Sensors with a clean dry cloth 2 Wipe the charging contacts on...

Page 24: ...eaning solution directly into the sensor entrance 4 6 Cleaning Robot s Rolling Brush 1 Pull on the release tabs to unlock the brush guard as shown 2 Lift the rolling brush to remove 3 Clean the rollin...

Page 25: ...l charging contacts Reinstall the battery with the tape on it in the product and secure the battery door Package the product in its original packaging or in your own packaging that prevents any moveme...

Page 26: ...ery 1 Unscrew the door and the two screws on the battery door then remove 2 Reinstall the battery with the battery label and tabs facing up 3 Reinstall the battery door and the two screws Take care no...

Page 27: ...arge the robot Check again after full charging 3 The robot do not recharge automatically Make sure the indication light on charging station is on Check if there are obstacles between robot and chargin...

Page 28: ...or 2 seconds and then turn it back on You cannot schedule cleanings Make sure the main power switch on the bottom of Amrobt is turned on Make sure the time time of day AM PM and the scheduled time hav...

Page 29: ...ase be patient as it walks back Clean the charging contact pins The rolling brush does not rotate Clean the rolling brush Check if the rolling brush and brush guard have been installed properly Amrobt...

Page 30: ...Dear customer thank you for purchasing our products If the appliance should become defective within the warranty period please contact the customer service at customerservice Amrobt outlook com to re...

Page 31: ......

Page 32: ...Model SI 350 E mail customerservice Amrobt outlook com...

Reviews: