background image

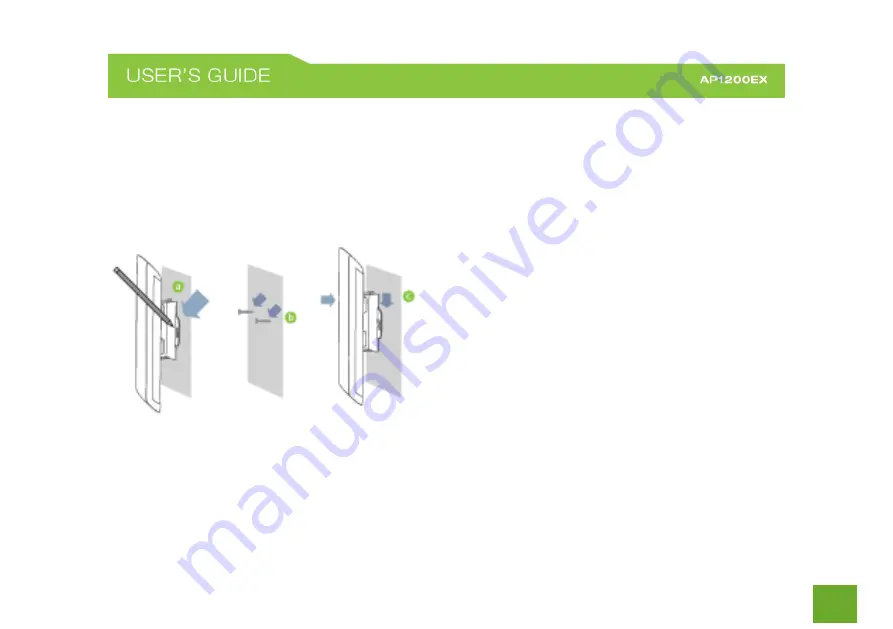
Wall Mounting 

a)

Place the AP1200EX against the wall, use a


pencil and mark two locations through the


mounting hole

s

 on the wall.

b)

Remove the AP1200EX and securely drill two


screws where you’ve marked on the wall.


Leave some space between the screw head


and the wall so the AP1200EX can 

be 

slide


mounted onto the screws.

c)

Mount the AP1200EX onto the secured screws


and adjust the screws if needed to secure the


Access Point to the wall. 

Summary of Contents for AP1200EX

Page 1: ...User s Guide User s Guide AP1200EX HIGH POWER TM AC1200 PRO WI FI ACCESS POINT...

Page 2: ...Hz 28 Guest Networks 2 4GHz 30 Advanced Settings 2 4GHz 31 Airtime Allocation 2 4GHz 32 Wireless Coverage Controls 2 4GHz 33 Access Schedule 2 4GHz 34 Wi Fi Protected Setup WPS 2 4GHz 35 WDS SETTINGS...

Page 3: ...ty products through innovation and advanced technology We pride ourselves on delivering products that outperform the competition and go beyond your expectations If you have any questions please feel f...

Page 4: ...ve all the contents within your package High Power AC1200 Pro Wi Fi Access Point 30 ft Power over Ethernet Cable Power over Ethernet Adapter Standard Ethernet Cable Power Cable Metal Desktop Stand Met...

Page 5: ...network network devices connected to the Pro Access Point f 2 4GHz Wireless Activity Blinks rapidly when 2 4GHz wireless data traffic is passing through the Pro Access Point g h 5 0GHz Wireless Activ...

Page 6: ...nna configuration section for setup procedures b PoE Port Power over Ethernet capable RJ 45 port used to connect the Pro Access Point to the included PoE Adapter for power and data connectivity c LAN...

Page 7: ...the Pro Access Point b AP Port Connect a PoE cable between the PoE Adapter s AP port and the PoE port on the Pro Access Point to provide power and data to the Pro Access Point c Network Port Connects...

Page 8: ...unting Indoor a Place the stand in an optimum location b Secure the AP1200EX onto the desktop mount by sliding it down onto the L shaped desktop mount c Position the cables so that they are neatly tuc...

Page 9: ...on the wall b Remove the AP1200EX and securely drill two screws where you ve marked on the wall Leave some space between the screw head and the wall so the AP1200EX can be slide mounted onto the screw...

Page 10: ...against the pole b Use the included hose clamp or plastic tie and secure it through the smaller hole located on the bottom of the mounting bracket Use a screw driver to tighten the clamp until the ada...

Page 11: ...c Locate the power adapter and connect one end to a power outlet and the other end to the PWR port on the back of the PoE adapter d Locate the shorter network cable and connect one end to the NETWORK...

Page 12: ...work for the Pro Access Point By default the Pro Access Point will have a SSID with the name Amped_AP1200EX_2 4 or 5 0 The default WPA security key is wireless Wired Connections Attach any wired devic...

Page 13: ...will allow you to change all features and settings for the Pro Access Point To access the settings menu follow the instructions below a Scan for available wireless networks on your PC and connect to t...

Page 14: ...eb Browser a Open your web browser b Type in http setup ampedwireless com into the web address bar c If the web menu fails to open then type in the following IP address into your web address bar http...

Page 15: ...to Access the Setup Wizard d Open your web browser e Type in http setup ampedwireless com into the web address bar f If the web menu fails to open type in the following IP address into your web addres...

Page 16: ...h to manually configure your Access Point you can also choose to skip the Setup Wizard Double check that the Access Point is connected to your network router or switch port Click Next to continue If t...

Page 17: ...e be patient If there is a problem with the Automatic Configuration the wizard will notify you of the issue If you continue to have problems contact our Elite Support department at 888 573 8820 If the...

Page 18: ...y to the Access Point will use this ID to identify your wireless network Depending on the capabilities of your wireless adapter you may connect to either the 2 4 or 5GHz wireless networks The default...

Page 19: ...oint to configure additional settings Leave this blank if you do not wish to have a password Click Apply to save your settings The Access Point will reboot This process may take up to 1 minute The pag...

Page 20: ...etup Summary page and provide you with the details of your setup Print the Setup Summary details and save it for future reference If you have any wired devices that you would like to attach to the Acc...

Page 21: ...u to the Access Point s Dashboard The Dashboard provides you with information regarding your network connection and basic Access Point settings From here you can enable or disable guest networks have...

Page 22: ...d speed for your wireless network Broadcast SSID Selecting Disable Broadcast SSID will hide the visibility of the Access Point s 5GHz network SSID Users must manually enter the SSID to connect Wi Fi N...

Page 23: ...eamforming capabilities with Beamforming capable devices to increase Wi Fi connection reliability and range Security Settings Change the type of wireless security settings for your 5GHz Wi Fi Network...

Page 24: ...y enter the SSID into their wireless software interface to connect Active Client List View all computers and network devices that are connected to your Guest Network wirelessly Security Settings Chang...

Page 25: ...the Access Point will never fragment any frames that it sends to wireless users RTS Threshold Adjusts the size of RTS data packets Lower values reduce throughput but allow the system to recover quick...

Page 26: ...ntrols 5 0GHz Adjust the output power of the Access Point to control the coverage distance of your 5GHz wireless network For a smaller coverage area you can select a lower output power For the maximum...

Page 27: ...of the day for parental control or security reasons a Enable Access Schedule b Select which days you wish for your Wi Fi to be available c Select the time frame during that day that you wish for Wi Fi...

Page 28: ...supports all types of WPS setup Option A Push button You may push the WPS button on the web menu or use the physical button on the back of the Access Point Option B PIN Some wireless devices use PIN...

Page 29: ...turn off all 2 4GHz Wi Fi activity Users will no longer be able to connect wirelessly to your 2 4GHz network Band Select the compatible Wi Fi standard and speed for your wireless network Broadcast SSI...

Page 30: ...set a static channel instead of using Auto WMM Prioritizes multimedia data over the wireless network Associated Clients Shows the active users connected wirelessly to your 2 4GHz network Security Set...

Page 31: ...manually enter the SSID into their wireless software interface to connect Active Client List View all computers and network devices that are connected to your Guest Network wirelessly Security Setting...

Page 32: ...g the Access point will never fragment any frames that it sends to wireless users RTS Threshold Adjusts the size of RTS data packets Lower values reduce throughput but allow the system to recover quic...

Page 33: ...connected devices Wi Fi Airtime can be allocated by the entire Wi Fi network or SSID or individually by each connected device Airtime Allocation is often used for creating low priority Guest Networks...

Page 34: ...ntrols 2 4GHz Adjust the output power of the Access point to control the coverage distance of your 2 4GHz wireless network For a smaller coverage area you can select a lower output power For the maxim...

Page 35: ...of the day for parental control or security reasons a Enable Access Schedule b Select which days you wish for your Wi Fi to be available c Select the time frame during that day that you wish for Wi F...

Page 36: ...WPS setup you wish to use The Access point supports all types of WPS setup Option A Push button You may push the WPS button on the web menu or use the physical button on the back of the Access Point O...

Page 37: ...Main Access Point To configure WDS mode you will need to adjust the settings for the following fields a Enable WDS First you must enable the WDS function to use it b MAC Address Enter the MAC address...

Page 38: ...ess SSID of your Pro Access Point Ensure that all WDS Access Points have unique SSID s Do not use the same SSID for two separate Pro Access Points f Channel Ensure that all Pro Access Points Main or R...

Page 39: ...nd accepts RP SMA antenna connections It is compatible with most high gain antennas It is important that you attach the external antenna to the External Antenna Port BEFORE activating the External Ant...

Page 40: ...obtain an IP address from your router and act as a DHCP Client However when there is no connection available the Access Point will act as a DHCP Server You may also manually control the IP settings of...

Page 41: ...the system wireless network and configurations as well as the current IP settings of the Access Point This page is often used to check the health of your wireless network and the link to your home Ac...

Page 42: ...m Clock Maintain the internal clock for the Access Point by syncing with your computer s time or over the Internet Your system clock settings need to be accurate for logs and wireless access schedules...

Page 43: ...Access Point The System Logs are also used by Amped Wireless Elite Support Concierges to help troubleshoot your Access Point when needed It is recommended that you enable all logs if troubleshooting...

Page 44: ...save your current settings first by going to the Save Reload Settings page The firmware upgrade process will reset the settings of the Range Extender to default settings Manual Firmware Upgrade In the...

Page 45: ...ireless com support and remember the location where you saved it Firmware files may also be provided by Amped Wireless Elite Support Concierges b Click Choose File and locate the file c Click Upload t...

Page 46: ...orry about returning to a stable platform To save current settings a Click Save b Select a file name and location To load previously saved settings a Click Browse b Locate the previously saved setting...

Page 47: ...ement Password Settings By default the Access Point does not require a password to log on to the web menu If you wish to enable a password to protect unauthorized access to the web menu you may enter...

Page 48: ...GHz Amplifiers 2 x 5 0GHz Amplifiers 4 x Low Noise Amplifiers Antennas 1 x Detachable High Gain Directional Dual Band Antenna 1 x Reverse SMA Connector for optional external antennas Ports Ports Pro A...

Page 49: ...the Reset button on the back panel for 10 seconds The Access Point will reset back to factory settings as listed below IP Address 192 168 80 1 Web Menu Access http setup ampedwireless com 2 4GHz Wire...

Page 50: ...are here to help If you have any issues with your Access Point please contact us To contact Amped Wireless Technical Support use one of the following methods Phone 888 573 8820 Email techsupport dpii...

Page 51: ...your web browser instead of setup ampedwireless com http 192 168 80 240 c Power off unplug the power adapter the Access Point and power it back on Try again d Try to open your web browser to the defau...

Page 52: ...e Access Point using an Ethernet cable Disconnect your PC from any wireless networks that it may be connected to Access the web menu at setup ampedwireless com using a web browser Access the IP settin...

Page 53: ...rk Check to see if your connection has been reestablished by viewing a website I can no longer access the web menu or the Access Point no longer responds a Double check that you are connected to the A...

Page 54: ...a long time to transfer a You may be too far away from the wireless network Wireless data transfer speeds degrade as distances increase between your computer and the Access Point b You may be downloa...

Page 55: ...antennas are connected to their corresponding antenna connectors The number designated on the antenna 1 3 should match the number on the antenna connector 1 3 c The wireless channel that your network...

Page 56: ...s network adapter may be outdated and have older wireless technology not capable of achieving the wireless network speeds of the Access Point To achieve maximum wireless speeds it is required that you...

Page 57: ...Management web menu page Wi Fi Protected Setup WPS is not working Push button configuration does not detect the connection a The Access Point supports WPS connections however some companies may use p...

Page 58: ...that Amped Wireless is unable to repair or replace a product i e discontinued product Amped Wireless will offer a credit toward the purchase of a similar product of equal or lesser value direct from...

Page 59: ...limited to weather and electrical disturbances The Amped Wireless Limited Warranty is the sole warranty for this product There are no other warranties expressed or except required by law implied incl...

Page 60: ...ca are responsible for all shipping and handling costs including custom duties taxes and all other related charges Technical Support The Amped Wireless Limited Warranty is not related to the terms con...

Page 61: ...s are designed to provide reasonable protection against harmful interference in a residential installation This equipment generates uses and can radiate radio frequency energy and if not installed and...

Page 62: ...roduct near water or during an electrical storm as there may be a remote risk of electrical shock from lighting This product may contain lead known to the State of California to cause cancer and birth...

Page 63: ...nment This equipment should be installed and operated with minimum distance 20 cm between the radiator your body The antennas used for this transmitter must be installed to provide a separation distan...

Page 64: ...unction with any other antenna or transmitter This radio transmitter RTA2600 has been approved by Industry Canada to operate with the antenna types listed below with the maximum permissible gain indic...

Page 65: ...sfonctionnement D claration d exposition la radiation Cet quipement respecte les limites d exposition aux rayonnements IC d finies pour un environnement non contr l Cet quipement doit tre install et m...

Page 66: ...5825 MHz doit se conformer la limite de p i r e sp cifi e pour l exploitation point point et non point point selon le cas De plus les utilisateurs devraient aussi tre avis s que les utilisateurs de r...

Page 67: ...eless authorizes you to copy materials published by Amped Wireless solely for non commercial use within your organization in support of Amped Wireless products No other use of this information is auth...

Page 68: ...n on all media However Amped Wireless makes no warranty as to the accuracy of the information including representations and warranties about the accuracy of product specifications marketing material p...

Page 69: ...st results Actual performance may vary due to differences in operating environments building materials and wireless obstructions Performance may increase or decrease over the stated specification Wire...

Page 70: ...ing Amped Wireless will not support or warrant any product in which you have or have attempted to modify the Software provided by Amped Wireless You may not lease sublicense resell redistribute or oth...

Page 71: ...IRELESS IS NOT RESPONSIBLE FOR ANY DAMAGE TO THE PURCHASER S COMPUTER SYSTEM OR DATA All title and copyrights in and to the Software and any copies thereof are owned by Amped Wireless or its partners...

Page 72: ...clusive authority to the extent permitted by law to resolve all disputes arising out of or relating to the interpretation applicability enforceability or formation of our agreement including but not l...

Page 73: ...rings will take place in the county where you reside If your claim is for 10 000 or less you may choose whether the arbitration will be conducted solely based on documents submitted to the arbitrator...

Page 74: ...your full name and contact information your concern and your proposed solution by mail to us at 900 N 23rd Street St Louis MO 63106 Attn Legal Department This Agreement and the rights of the parties h...

Page 75: ...pyright 2018 Amped Wireless Digital Products International Inc All rights reserved Amped Wireless DPI Inc and the Amped Wireless Logo are registered trademarks or trademarks of DPI Inc 888 573 8820 te...

Reviews: