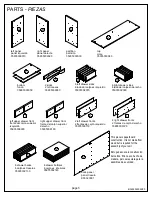
Ameriwood Essential Home Grayson 6 Drawer Dresser Owner'S Manual Download Page 3

PARTS - 

PIEZAS

B345935309K00

page 3 

left panel
panel izquierdo 
35935309010

right panel
panel derecho 
35935309020

top
cime
35935309040

bottom
fondo
35935000050

back panel
panel trasero
K55320001

6 drawer bottoms
6 cajónes  inferiores 
35935302140

6 drawer backs
6 cajónes traseros
35935302130

partition
partición
35935309030

2 kicks
2 retrocesos
35935309060

6 left drawer sides
6 lado del cajónes izquierdo
35935302070

6 right drawer sides
6 lado del cajóesn derecho
35935302080

This piece is paperboard 
construction. It is not made from 
wood but is required for the 
assembly of your unit. 
 
Esto pedazo son la construcción 
del cartón. Ello no son hecho de 
madera, pero se requlere para la 
asamblea de su unidad. 


left upper drawer front
frente del cajón superior 
izquierdo
35935309090

right upper drawer front
frente del cajón superior 
derecho
35935309100

2 left drawer fronts
2 frentes de cajón izquierdo
35935309110

A

B

C

D

E

F

G

H

I

J

K

L

M

N

O

2 right drawer fronts
2 frentes de cajón derecho
35935309120

Summary of Contents for Essential Home Grayson 6 Drawer Dresser

Page 1: ......

Page 2: ......

Page 3: ...rdo 35935302070 6 right drawer sides 6 lado del caj esn derecho 35935302080 This piece is paperboard construction It is not made from wood but is required for the assembly of your unit Esto pedazo son...

Page 4: ...A53600 angle bracket anaquel del ngulo x 13 24 A11600 1 1 4 flat head cabeza plano 1 1 4 x 14 12 A17400 7 8 machine screw 7 8 tornillo x 15 12 A80250 shelf support soporte de estante 4b 4a 4d 4c x 5...

Page 5: ...B345935309K00 page 5 1 x 9 9 x 7 2 1 a x 3 Finished Edge Borde Acabado 7 1a 9 A x 6 2 6 proper orientation of cam lock posicion correcta de la cerradura de leva marked with an L marcado con un L...

Page 6: ...B345935309K00 page 6 2 b 3 x 1 x 7 2 x 9 9 7 Finished Edge Borde Acabado 9 1b B x 6 2 6 proper orientation of cam lock posicion correcta de la cerradura de leva marked with an R marcado con un R...

Page 7: ...o 7 7 1a 1a 1a 9 9 9 9 9 9 1b 1b 1b C C right surface superficie derecha left surface superficie izquierda 9 9 9 9 9 9 9 9 9 9 9 x 6 2 6 proper orientation of cam lock posicion correcta de la cerradur...

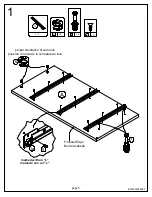
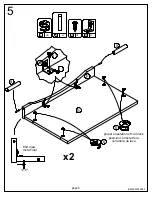
Page 8: ...B345935309K00 page 8 4 x 7 6 x 4 1 4b 4a 4a 4b D Finished Edge Borde Acabado 7...

Page 9: ...B345935309K00 page 9 5 x 11 8 12 4 x 1 16 End View Vista Final 6 11 11 12 E F x2 6 x 6 8 x 8 4 8 8 proper orientation of cam lock posicion correcta de la cerradura de leva...

Page 10: ...B345935309K00 page 10 6 C E E F F Finished Edge Borde Acabado UNLOCK LOCK APRETAR DESAPRETAR x4...

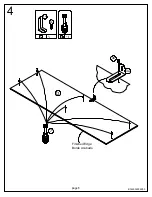
Page 11: ...B345935309K00 page 11 7 A B E E F F UNLOCK LOCK APRETAR DESAPRETAR x4...

Page 12: ...B345935309K00 page 12 8 A B C D UNLOCK LOCK APRETAR DESAPRETAR x6...

Page 13: ...B345935309K00 page 13 9 Carefully turn the unit over on its face as shown Cuidadosamente voltee la unidad en su cara como se muestra...

Page 14: ...l borde inferior del estante inferior Allinee en ngulo recto y clave derecho dentro o en los bordes traseros Notch location Ubicaci n de la muesca and or serious injury Por favor aseg rese que el Pane...

Page 15: ...the wall as shown Opci n 1 Firmemente el tornillo 4c en el rea s lida de la pared como mostrado Option 2 Drill a 3 16 diameter hole 5mm in the wallboard Tap the wall anchor 4d into the hole until it...

Page 16: ...que los lados del caj n sobre una superficie plana y dura Alinee cuidadosamente el soporte del caj n con los agujeros en el lado del caj n como se muestra Con un martillo golpee cada v stago del sopor...

Page 17: ...B345935309K00 page 17 13 1 c x 6 1 d x 6 x 9 24 9 9 1c 1d Finished Edge Borde Acabado G H x6 x6 marked with an L marcado con un L marked with an R marcado con un R...

Page 18: ...B345935309K00 page 18 14 x 11 24 11 11 11 11 G G G G H H H H I J K L x2 x2 x1 x1...

Page 19: ...age 19 15 15 12 x H G N Finished Surface Superficie Acabado 15 x6 Insert a drawer bottom N into all six drawer components as shown Inserte todos los componentes de seis cajones como se muestra a un fo...

Page 20: ...B345935309K00 page 20 16 x 13 24 13 13 M H x6 Attach a drawer back M to all six drawer components as shown Conecte un caj n detr s M a todos los componentes de seis cajones como mostrado...

Page 21: ...B345935309K00 page 21 17 x 3 4 x 14 12 x 2 4 2 3 3 14 14 14 14 I J K L x2 x2 x 16 8 16...

Page 22: ...B345935309K00 page 22 18 corredera de mueble cabinet member rodillo roller drawer runner deslizador de cajon roller rodillo I J K K L L...

Page 23: ...75 lbs 34 0 kg 25 lbs 11 3 kg 25 lbs 11 3 kg When inserting the Left and Right drawers into your cabinet note that the outer edges of the drawer fronts need to be flush with the outer surface of the...

Page 24: ......

Reviews: